How to Analyse a Building Site Before Choosing a House Plan in Nigeria
Introduction
Before you choose a house plan for your Nigerian property, stop and analyse the land first. The best house plan is not the one with the most beautiful façade, largest rooms, or most bedrooms. It is the plan that actually fits your plot, responds to its physical conditions, works with planning requirements, and makes living safe and comfortable.
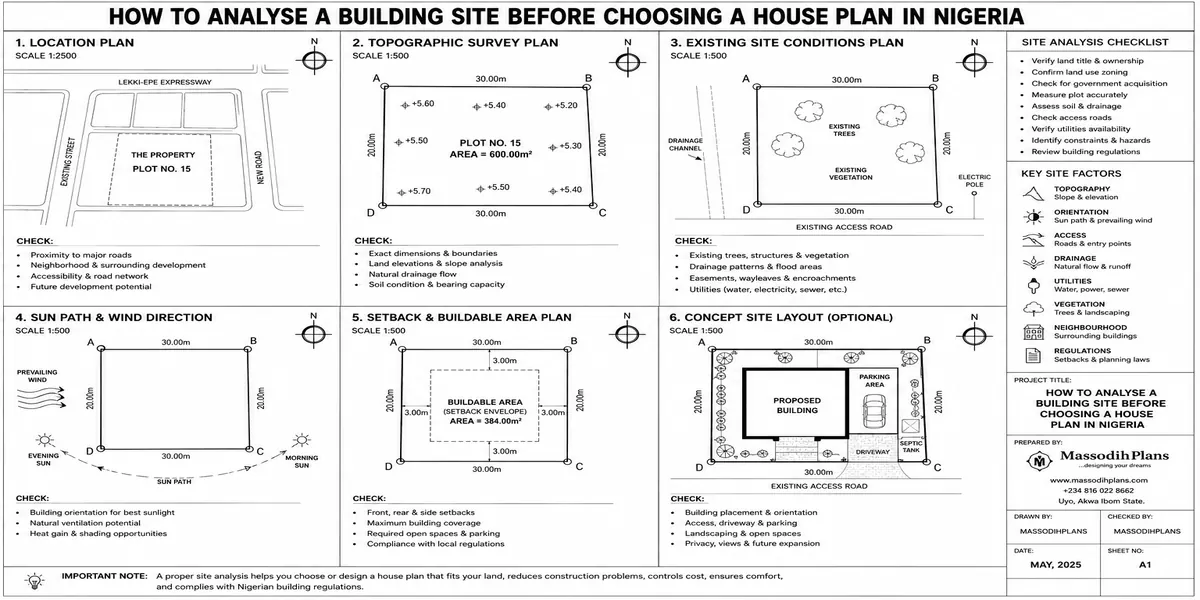
So, how do you analyse a building site before choosing a house plan in Nigeria? Start with the land, not the drawing. Confirm the plot dimensions, shape, boundaries, road access and orientation. Then study the site’s slope, existing ground levels, drainage pattern, soil condition, vegetation and surrounding buildings. Check where the morning and afternoon sun fall, where prevailing winds come from, and whether neighbouring buildings create privacy, ventilation or security concerns. These factors can change where your living room, bedrooms, kitchen, parking area and service spaces should be positioned.
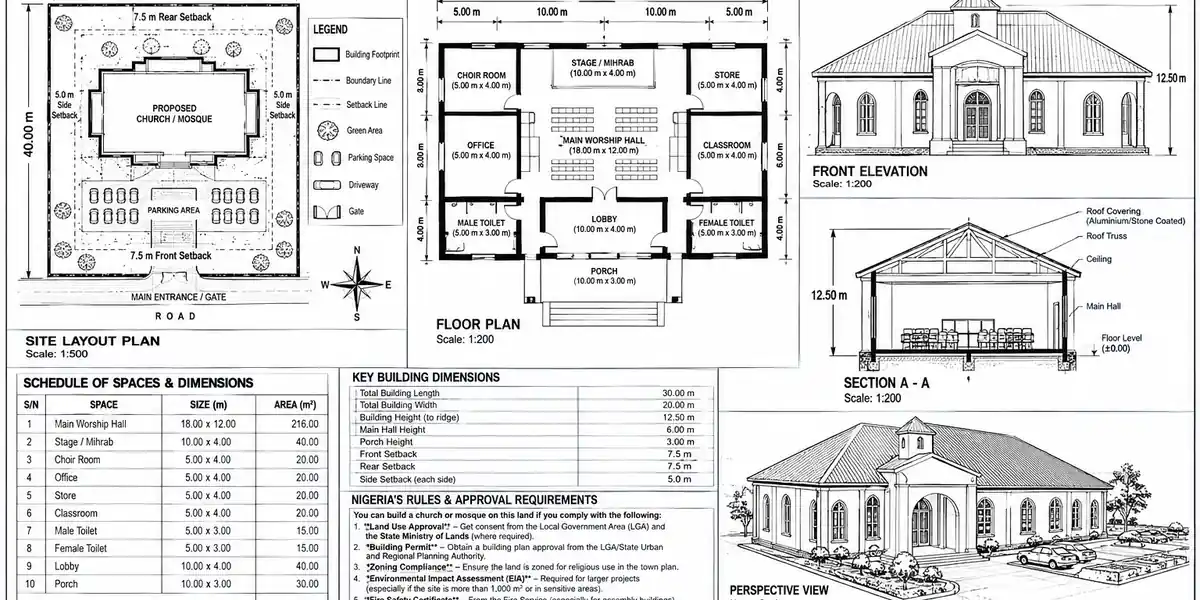
You also need to establish the buildable portion of the property. Setbacks, airspaces, site coverage, access requirements, easements, rights of way and planning controls can reduce the area available for your house. Nigerian authorities expect site planning to consider orientation, open spaces, circulation, parking, ventilation and drainage, while exact requirements can vary by location.
In this guide, I will show you how I would read a Nigerian building site before selecting or designing a house plan, including the measurements to take, site-analysis drawings to prepare, warning signs to look for, and the “fit test” that can tell you whether a plan belongs on your land or should be rejected before you spend money on construction.
By the end, you will understand why two plots with the same dimensions can require different house plans.
Why Site Analysis Has To Come Before Plan Selection
A house plan is a set of assumptions. It assumes a certain soil-bearing capacity, a certain sun path, a certain drainage pattern, a certain relationship to the street. When those assumptions match your actual site, the plan works as designed. When they don’t, every one of those mismatches becomes a change order, a cost overrun, or a comfort problem you’ll live with for years.
Buying a plan or worse, a full architectural design before analysing the site is like buying shoes before measuring your feet. It might work by coincidence. More often, you’re paying twice: once for the plan, and again to modify it into something that actually fits.
If you already have a house plan you love before you’ve bought land, treat it as a reference, not a fixed commitment. Confirm with your architect that it can be adapted to your specific site before you finalize a land purchase around it.
Step 1: Map the Plot’s Physical Dimensions and Shape
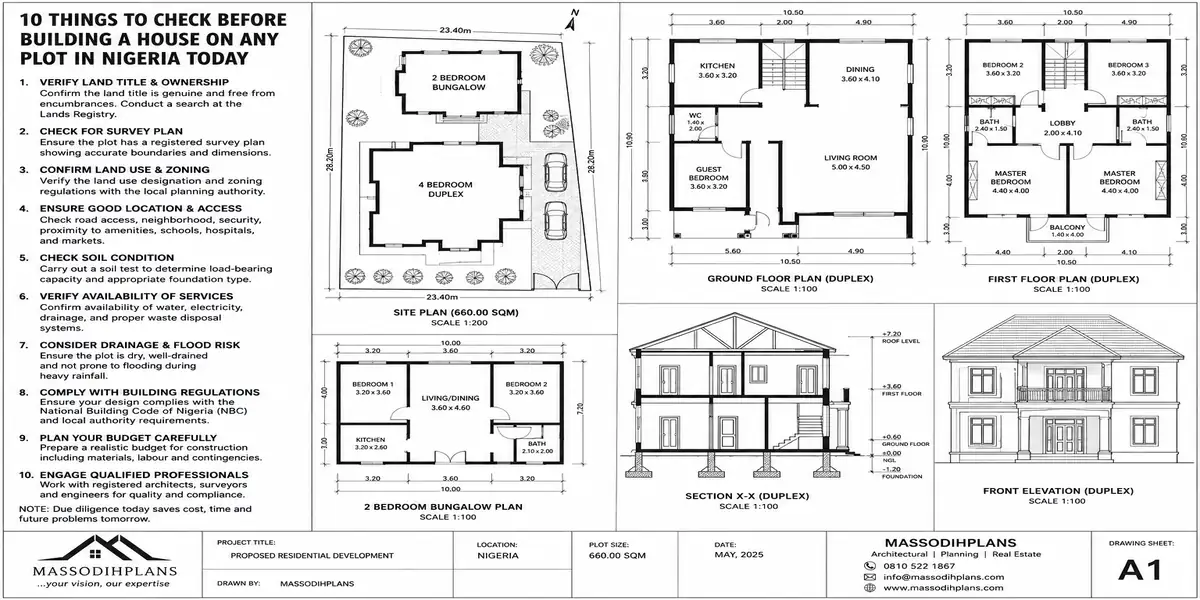
Start with the basics most people rush through: the plot’s actual survey dimensions, not the size quoted verbally by the seller. Get the survey plan and confirm:
- Exact frontage, depth, and total area
- Whether the plot is a regular rectangle or an irregular shape (many urban Nigerian plots, especially subdivided older layouts, are trapezoidal or have an angled boundary)
- Corner plot versus mid-row plot, which affects how many sides face a street versus a neighbour
An irregular or narrow plot immediately rules out certain plan types. A wide, shallow plot suits a spread-out bungalow layout; a narrow, deep plot often forces a storey building or a design with rooms stacked front-to-back rather than side-to-side. This is the first filter, before you even think about style.
Step 2: Read the Topography Don’t Assume Flat Means Simple
Walk the plot and note where it’s higher, lower, or sloped. Even a modest slope changes foundation design, and a plot that looks flat to the eye often has a subtle fall you’ll only notice with a proper level survey.
Sloped plots may need a stepped foundation, retaining walls, or a split-level design that works with the slope instead of cutting and filling it flat cutting and filling is expensive and, done badly, creates long-term drainage and stability problems.
Low-lying plots relative to the street or neighbours are flood risks by default, regardless of how the rest of the neighbourhood looks in dry season. This changes your foundation type and often requires raising the building’s finished floor level above the surrounding grade.
Plots noticeably higher than the street drain well but may need extra consideration for safe, gently graded vehicle access from the road.
Visit the plot during or right after heavy rain if you possibly can, not only on a dry, sunny day. Water behaviour on a site tells you things a dry-season visit never will where it pools, where it flows, and whether your “flat, dry” plot is actually low-lying relative to its surroundings.
Step 3: Investigate the Soil Before You Fall in Love With Any Design
Soil condition is the site factor with the single biggest cost impact, and it’s the one most people skip entirely until the contractor discovers a problem mid-excavation.
Commission a proper soil test, not a guess based on how the ground looks or feels. This tells you the soil’s bearing capacity and water table depth, which together determine whether a standard strip foundation is sufficient or whether you need a raft or pile foundation.
Sandy, loose, or reclaimed soil common in coastal and wetland-adjacent areas across Nigeria often needs a raft or pile foundation, which can add several million naira to a project versus a standard strip foundation on firm ground.
A high water table affects not just foundation type but also septic system design and whether a basement or sunken living area (a feature some modern plans include) is even feasible on your site.
This step alone can eliminate certain plan types outright. A design with a partial basement or sunken lounge, beautiful on paper, is simply not viable on a plot with a shallow water table no amount of architectural adjustment fixes that; the plan has to change.
Step 4: Trace the Sun Path and Orientation
Stand on the plot with a compass (or a phone compass app) and identify true north. Then map which sides of the plot face which direction. This single step determines more about long-term comfort than almost any material or finishing choice you’ll make later.
The east and west faces of your plot catch the harshest, most direct morning and afternoon sun. Rooms and large windows on these faces will run hot unless specifically shaded.
The north and south faces receive gentler, more consistent light through the day these are generally the better faces for larger windows and outdoor living spaces.
A plan designed for a site with a different orientation, used unmodified on your plot, can put your kitchen or main bedroom on the hottest wall of the house purely by accident.
This is where a downloaded plan most commonly goes wrong. Plans are drawn assuming a specific orientation relative to the entry road, and if your plot’s actual compass orientation differs from what the plan assumed, the whole design needs to be mirrored or rotated which is a straightforward fix if caught early, and a lived-with discomfort if caught after construction.
Take photos of your plot at roughly 9am, midday, and 4pm on a clear day, noting where shadows fall and which areas get direct sun. Hand these to your architect along with the compass orientation it gives them real data instead of a guess.
Step 5: Study Drainage and Water Flow Across the Plot and Its Surroundings
This goes beyond the topography check in Step 2. You’re now looking specifically at where water enters, crosses, and leaves your plot, and how that connects to the plots and street around it.
Identify the natural low point of your plot and trace where water would flow if it rained heavily right now.
Check whether your plot receives runoff from a neighbouring plot that sits higher, and whether your plot, in turn, drains onto a neighbour who sits lower.
Confirm the location and condition of the nearest drainage channel or gutter, and whether it has capacity for your plot’s runoff or is already struggling in the surrounding area.
A plot that’s a net receiver of upstream runoff needs different site works a perimeter drain, a raised building pad, careful gate and driveway grading than a plot that’s a net contributor. Skipping this step is one of the most common causes of the flooding disputes that later erupt between Nigerian neighbours, because nobody analysed the shared water flow before building.
Step 6: Assess Access, Frontage, and Street Relationship
How your plot meets the road affects both your house plan’s entry design and, practically, how construction materials get onto the site in the first place.
Frontage width determines gate placement and whether you have room for a driveway alongside the house or need the plan to route parking differently.
Road width and condition determine whether large delivery trucks (block, sand, cement) can actually reach your site a plot on a narrow, poorly maintained access road may need a plan and construction approach that accounts for material being offloaded further away and moved manually.
Note the street’s traffic character a busy road affects noise, privacy, and where you’d want to place bedrooms versus service areas within the plan.
Step 7: Read the Surrounding Context Neighbours, Views, and Privacy
A site analysis that stops at your own boundary is incomplete. What’s already built around you shapes what will actually work on your plot.
Note the height and window positions of neighbouring buildings, particularly anything directly overlooking your plot this affects where you place bedrooms, bathrooms, and outdoor living spaces in your chosen plan.
Identify any genuinely good views (open space, greenery, water) worth designing toward, and any views worth designing away from (a neighbour’s blank wall, a busy road, an unsightly structure).
Check the general height and density pattern of the street a two-storey design among predominantly single-storey neighbours will have different privacy and overshadowing implications than one that matches the surrounding scale.
Step 8: Confirm Zoning, Setbacks, and Legal Building Envelope
Before any plan is finalized, you need to know the legal box you’re actually allowed to build within this isn’t optional due diligence, it’s a hard design constraint.
Confirm your plot’s zoning classification and permitted density from your local planning authority.
Get the mandatory setback distances on all four sides and the maximum permitted plot coverage these determine your actual buildable footprint, which is almost always smaller than the full plot size.
If the plot sits within a private estate, check the estate’s own design covenants in addition to state requirements these can be stricter and are a common source of post-approval conflict when ignored.
Working drawings prepared for approval are expected to show land-use analysis, orientation relative to true north, and dimensioned floor, elevation, and foundation drawings drawn to a proper scale. That requirement exists precisely because approval authorities expect your design to respond to a properly analysed site not an assumed, generic one.
Step 9: Check Utilities and Services Infrastructure
Site analysis should also cover what’s available to connect to, because this affects both your plan’s service layout and your budget.
Confirm the nearest public water supply point, or whether you’ll need a borehole and if a borehole, whether the soil and water table findings from Step 3 suggest good groundwater availability.
Check power infrastructure proximity to a transformer, typical supply reliability in the area which affects how seriously your plan should provision for solar or generator backup.
Identify where sewage/septic infrastructure will sit relative to the water table depth found in your soil test, since a high water table constrains septic system placement and design.
Step 10: Note Microclimate Wind, Noise, and Surrounding Vegetation
The smallest-scale factors, and the ones most consistently skipped, but they materially affect comfort.
Note prevailing wind direction, which combined with your sun path findings tells you where cross-ventilation openings will actually catch a breeze rather than face a wall.
Identify persistent noise sources (a busy road, a market, a generator-heavy neighbour) and use that to guide which rooms in your plan face which direction.
Note existing mature trees worth preserving for shade a plan that works around a good existing tree rather than clearing it can meaningfully improve a home’s passive cooling from day one.
Turning Your Site Analysis Into Plan Decisions
This is the part most “factors to consider” articles never actually do connecting each finding to a specific plan decision. Here’s how the analysis above should shape your plan choice:
| What you found | What it should change in your plan |
|---|---|
| Narrow, deep plot | Favour a storey building or front-to-back room stacking over a wide spread-out bungalow layout |
| Sloped site | Consider a split-level design or budget for a stepped/retaining foundation rather than forcing a flat-footprint plan |
| Soft or waterlogged soil | Rule out designs with basements or sunken living areas; budget for raft/pile foundation regardless of which plan you choose |
| Plot’s longer face is east-west | Rotate or mirror the plan so major glazing and living spaces face north-south instead |
| Plot receives upstream runoff | Add a raised floor level and perimeter drainage to the plan; avoid designs with ground-level rooms on the low side |
| Narrow access road | Confirm your chosen plan’s structural system is buildable with the equipment and material delivery access actually available |
| Overlooked by neighbouring windows | Reposition bedrooms/bathrooms away from the overlooked face, or specify obscured glazing in the plan for that elevation |
| Strict setback and low plot coverage limit | Choose or adapt a plan that fits the actual buildable footprint, not the full plot size |
| Unreliable power supply in the area | Ensure the plan includes proper roof space and conduiting provision for solar, not just a generator shed |
| Prevailing wind from a specific direction | Confirm window placement in the plan actually aligns with that wind direction for effective cross-ventilation |
If your chosen plan requires more than minor adjustment against three or more rows in this table, it’s worth asking whether a different plan or a custom design would actually cost less overall than heavily modifying one that was never suited to your site.
Common Site Analysis Mistakes
Visiting the plot only once, and only in good weather a single dry-season visit misses drainage behaviour, wind patterns, and how the site changes with rainfall
Skipping the soil test to save money early this is consistently the most expensive shortcut in Nigerian residential construction, because foundation problems discovered mid-build cost far more than a test would have
Choosing a plan before confirming the buildable footprint falling in love with a design that simply cannot fit within your actual setback-constrained area
Ignoring neighbouring buildings and infrastructure analysing the plot as if it exists in isolation, when drainage, privacy, and access all depend on what’s already around it
Treating orientation as a minor detail of everything on this list, sun path and orientation have the largest ongoing impact on comfort and cooling cost, yet they’re the most commonly skipped in a casual site visit
Frequently Asked Questions
What is the first thing to check when analysing a building site in Nigeria?
Start with the survey-confirmed plot dimensions and shape, since this immediately narrows which plan types are even physically possible before moving on to soil, drainage, and orientation.
Do I need a soil test if the ground looks firm?
Yes. Visual appearance is not a reliable indicator of bearing capacity or water table depth, and a soil test is far cheaper than discovering a foundation problem after excavation has begun.
How does orientation actually affect a house plan?
It determines which faces of the building receive harsh direct sun versus gentler light, which should guide where windows, living spaces, and bedrooms are placed within the plan for comfort and lower cooling cost.
Can I still use a house plan I found online if it doesn’t match my site’s orientation?
Often yes, by mirroring or rotating the design but this needs to be done deliberately by an architect reviewing your actual site data, not assumed to be a minor detail.
What site condition most commonly forces a completely different foundation type?
Soft, sandy, reclaimed, or waterlogged soil with a high water table confirmed only through a proper soil test is the most common reason a standard strip foundation has to be upgraded to a raft or pile foundation.
Conclusion
A house plan is only as good as its fit with the land it’s built on. Every one of the ten checks above exists to catch the mismatches that turn a beautiful design into an expensive one or worse, an uncomfortable one you’re stuck living with. Do this analysis before you fall in love with a plan, not after, and the plan you eventually choose will genuinely fit the site instead of fighting it for the next several decades.
If you already have land and want a design analysed and matched against your specific site conditions, our Services page outlines how we approach that process from site visit to final drawings. Browse our Plans Library for designs that can be adapted to your plot’s orientation and soil findings, or visit Plan School to understand the approval documentation your site analysis will feed into. You can also explore more site and planning guides on our Homepage.
Related Guides
- Semi-Detached House Plans: Modern Duplex and Bungalow Designs With Shared Walls, Dimensions, Costs and Layout Ideas
- Courtyard House Plans: Beautiful 2–6 Bedroom Designs With Private Outdoor Spaces, Floor Plans and Dimensions
- Contemporary House Plans: Modern 2–6 Bedroom Designs With Open Layouts, Large Windows, Dimensions and Costs
- House Finishing Cost in Nigeria: Complete Breakdown of Tiles, Painting, Ceiling, Doors, Plumbing and Electrical Work
- Foundation Cost Calculator: Estimate House Foundation Cost From Soil Type, Dimensions, Materials and Labour
- Block Quantity Calculator: How to Calculate the Number of Blocks Needed for Any House From Your Floor Plan
- Cement Quantity Calculator for Building: Calculate Bags Needed for Foundation, Blockwork, Slab, Plastering and Screeding
- Self-Contained House Plans: 15 Efficient Designs With Room Dimensions, Floor Plans, Building Costs and Ideas
- 1 Bedroom House Plan: Affordable Self-Contained Floor Plans With Dimensions, Materials, Cost and Space-Saving Ideas
- 6 Bedroom House Plans: Modern Nigerian Floor Plans With Dimensions, Ensuite Rooms, Parking and Cost Estimates
- How to Check a Plot of Land Before Buying It in Nigeria: Complete Guide
- How to Choose the Right Land for Building a House in Nigeria Safely Today
- How Much Does It Cost to Build a House in Nigeria? Full Guide to Materials, Labour, Foundation, Roofing and Finishing
- Roofing Quantity Calculator: Calculate Roofing Sheets, Timber, Nails, Ridge Caps and Accessories From Your House Plan
- Labour Cost to Build a House in Nigeria: Complete Mason, Carpenter, Plumber, Electrician and Finishing Cost Guide
- How to Draw a Neighbourhood Plan (SPAR): Step-by-Step Guide to Roads, Plots, Land Use, Setbacks and Layout Design
- How to Draw a House Layout Plan: 10 Step-by-Step Guide From Plot Dimensions to Rooms, Doors, Windows and Setback
Author
Massodih Okon is a Nigerian built-environment professional with academic and professional experience in urban and regional planning, geography, architectural design, Landscape Design, GIS and land development.
He holds a Master’s degree in Urban and Regional Planning from the University of Uyo and a first degree in Geography and Regional Planning.
Through MassodihPlans, he publishes practical guides on Nigerian house plans, building design, physical planning, site planning, development approval and residential construction. Read the full author profile →