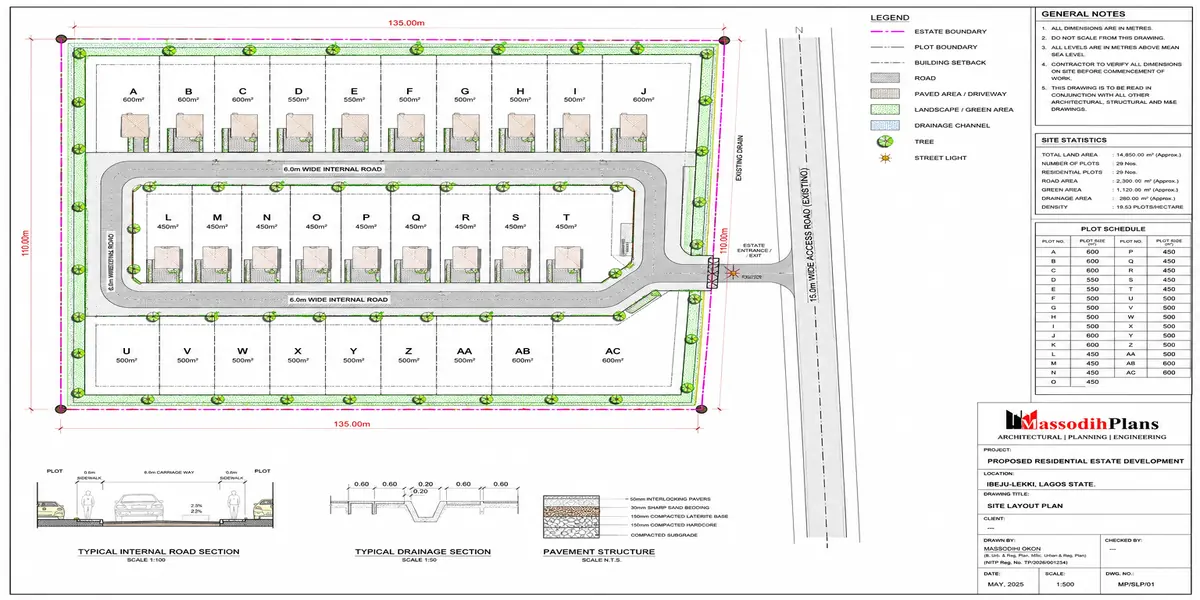
Estate Master Plans for Real Estate
Introduction
Real estate development and site planning is the process of turning land into a safe, functional, legally compliant and financially viable development by coordinating land use, site layout, access, buildings, infrastructure, utilities, drainage, stormwater management and construction. It connects what can be built on a property with how people, vehicles, water, services and buildings will work together after development. A strong site plan therefore does far more than arrange buildings on a plot it anticipates approvals, construction costs, environmental risks, traffic movement, infrastructure capacity and long-term usability.
Whether you are developing a residential estate, commercial property, mixed-use project, institutional facility or a small individual site, poor planning can create expensive problems before construction even begins. Inadequate setbacks, inefficient circulation, undersized drainage, uncontrolled stormwater, unsuitable grading, utility conflicts or overlooked planning regulations can lead to redesigns, delays, flooding, approval difficulties and unnecessary construction costs.
This guide goes beyond the typical overview of real estate development. You will learn how professionals assess a site, interpret planning requirements, prepare development concepts, organize plots and buildings, design access and circulation, coordinate infrastructure, plan grading and drainage, manage stormwater, and move from a preliminary concept toward construction-ready documentation. You will also see practical planning principles, technical considerations, common mistakes, decision-making checkpoints and real-world site-planning logic that can help you evaluate a development before committing money to it.
Most importantly, this guide connects the entire development chain from land acquisition and site analysis to planning, infrastructure, stormwater control and construction. By the end, you should understand not only what a good site plan contains, but why every road, setback, building position, drainage route and open space belongs where it does and how choices affect cost, safety, approvals and value.
What Is Real Estate/Land Development?
Real estate development, often called land development, is the process of transforming raw or underused land into a functional, value-adding property whether that’s a residential estate, a commercial plaza, an industrial layout, or mixed-use community. It sits at the intersection of planning, engineering, finance, and construction, and it is the foundation on which every other stage of a building project rests. Before a single block is laid or a road is graded, land development determines whether a site can legally, physically, and economically support the vision a landowner or investor has in mind.
At its core, land development is about converting potential into performance. A vacant plot on the outskirts of Uyo or a swampy parcel along a Port Harcourt access road has latent value, but that value only becomes real when the land is properly assessed, planned, serviced, and approved for use. This is why land development is best understood not as a single event but as a structured sequence of decisions decisions about land use, access, drainage, utilities, and compliance each one building on the last.
Land Development vs. Real Estate Development: Is There a Difference?
The terms are often used interchangeably, but there is a subtle distinction worth understanding. Land development typically refers to the physical and regulatory work of preparing raw land for construction surveying, zoning compliance, subdivision, grading, and installing infrastructure like roads, drainage, and utility lines. Real estate development is the broader umbrella, encompassing land development plus the construction, financing, marketing, and eventual sale or lease of the finished property.
In practice, especially in the Nigerian context, most people use “real estate development” to describe the entire journey from acquiring a plot to handing over a completed estate while “land development” or “site planning” refers more specifically to the preparatory groundwork. Understanding this distinction matters because it shapes how you budget, sequence approvals, and engage professionals. A developer who treats land development as a mere formality often ends up with costly surprises: flooded plots, blocked access roads, or buildings erected outside approved setbacks.
Why Land Development Matters Before You Build
Every parcel of land carries hidden constraints soil conditions, flood risk, existing easements, zoning restrictions, and topography that are invisible until someone deliberately investigates them. Skipping this investigation is one of the most common and expensive mistakes landowners make. A plot that looks buildable on the surface may sit on a natural drainage channel, fall within a setback reserved for a proposed road expansion, or lack the elevation needed for gravity-fed drainage.
This is why land development begins long before construction with due diligence on land title, topographic and soil analysis, and an honest assessment of how the site relates to its surroundings. These early steps directly inform later decisions: how many units a site can accommodate, where access roads should enter, how stormwater will be channeled away from buildings, and what utility connections are realistically available. Skipping or rushing this phase doesn’t save time; it simply relocates the cost and delay to a later, more expensive stage of the project.
Who Is Involved in Land Development?
Land development is rarely a one-person effort. It typically draws on a team of professionals, each addressing a different dimension of the site:
Town planners and urban planners assess land-use suitability and align the project with local master plans.
Registered surveyors establish accurate boundaries and topography.
Architects and architectural designers translate land-use potential into buildable layouts.
Civil and drainage engineers design roads, stormwater systems, and utility networks.
Environmental consultants evaluate ecological impact where required.
Government planning authorities review and approve the proposed development against zoning and building codes.
For a landowner or investor, understanding this team structure early helps set realistic expectations for both timeline and cost two things that catch many first-time developers off guard.
The Scale of Land Development
Land development is not exclusive to large estates or commercial megaprojects. It applies equally to a single family building a home on a half-plot and to a developer laying out a 50-hectare residential scheme. What changes with scale is the complexity of subdivision, the depth of infrastructure required, and the number of regulatory approvals involved not the underlying logic. Even a single-plot build benefits from the same disciplined approach: know the land, plan the access, manage the drainage, and secure the right permissions before construction begins.
With that foundation in place, the next question naturally follows: what does the land development process actually look like from start to finish? That’s where a clear, sequential understanding of the stages from initial site acquisition through to final handover becomes essential, and it’s exactly what we’ll walk through next.
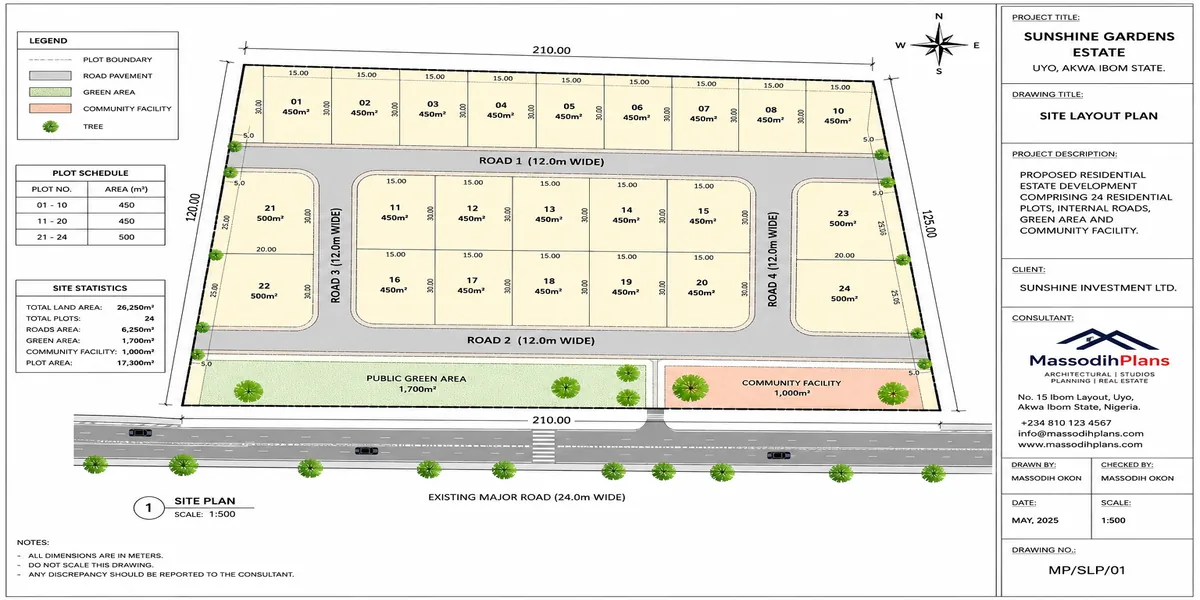
Real Estate and Land Development
Land Development Process
Every successful development whether it’s a single residential plot or a multi-hectare estate follows a logical sequence of stages. Skipping or reordering these steps is where most land projects run into trouble, from stalled approvals to drainage disasters discovered only after the rains come. Understanding the process from start to finish gives you, as a landowner or investor, the ability to plan realistically and avoid the costly rework that comes from building before the groundwork is settled.
1. Land Acquisition and Title Verification
The process begins before you even think about drainage or setbacks it starts with confirming that the land is legitimately yours to develop. This means verifying title documents (Certificate of Occupancy, Deed of Assignment, or Excision, depending on the state), checking the land registry, and confirming there are no competing claims, government acquisitions, or right-of-way reservations affecting the parcel. In many parts of South-South Nigeria, this step alone can determine whether a project is viable, given the prevalence of overlapping customary and statutory claims.
2. Site Investigation and Feasibility
Once title is secure, attention shifts to the physical realities of the land. This stage involves topographic surveys, soil testing, flood history checks, and an assessment of surrounding infrastructure access roads, drainage channels, and utility lines nearby. A feasibility study at this point answers the practical question every developer should ask first: can this land actually support what I intend to build, and at what cost?
3. Concept and Site Planning
With a clear picture of the land’s constraints and opportunities, the next step is translating that information into a workable layout. Site planning determines how the parcel will be organized where buildings sit, how roads and access points are arranged, where green spaces or setbacks fall, and how the site drains. This stage bridges raw data and buildable design, and it’s where architects, planners, and engineers typically begin working together.
4. Zoning and Land-Use Compliance
Before any design becomes final, it must be checked against the applicable zoning classification and local master plan. This determines what the land is legally permitted to be used for residential, commercial, mixed-use, or industrial and what density, height, or use restrictions apply. Ignoring zoning at this stage is a common and expensive misstep; plans drawn without zoning input often require costly redesign later.
5. Subdivision (Where Applicable)
For larger parcels intended for multiple plots or units, subdivision follows. This involves dividing the land into individually titled plots, each with defined boundaries, access, and often shared infrastructure like internal roads and drainage. Subdivision must be approved by the relevant planning authority and typically requires an approved layout plan before individual plot sales or allocations can proceed.
6. Permits and Approvals
With a compliant site plan in hand, the developer applies for the necessary development permits building approval, planning permission, environmental clearance where applicable, and any state-specific authorizations. This stage is often the slowest part of the process, and it’s where having professionally prepared documentation (survey plans, architectural drawings, drainage designs) speeds things up considerably.
7. Infrastructure and Site Preparation
Once approvals are secured, physical groundwork begins clearing, grading, road construction, and installation of drainage and utility lines (water, electricity, and where available, sewer connections). This infrastructure stage lays the physical backbone that every subsequent building will depend on, which is why cutting corners here tends to surface as problems years later.
8. Construction
With infrastructure in place, vertical construction can proceed whether that’s a single home, a row of duplexes, or a full estate. Construction planning at this stage focuses on sequencing, materials, and coordination with the already-installed infrastructure, ensuring buildings align with approved setbacks and drainage flows.
9. Handover and Post-Development Management
The final stage involves final inspections, compliance sign-off, and handover either to homeowners, tenants, or an estate management structure responsible for maintaining shared infrastructure like roads and drainage going forward.
Each of these stages depends on decisions made earlier in the sequence, which is why site planning the stage where raw land data becomes a workable layout deserves closer attention. It’s the hinge point where feasibility turns into design, and it’s the subject we turn to next.
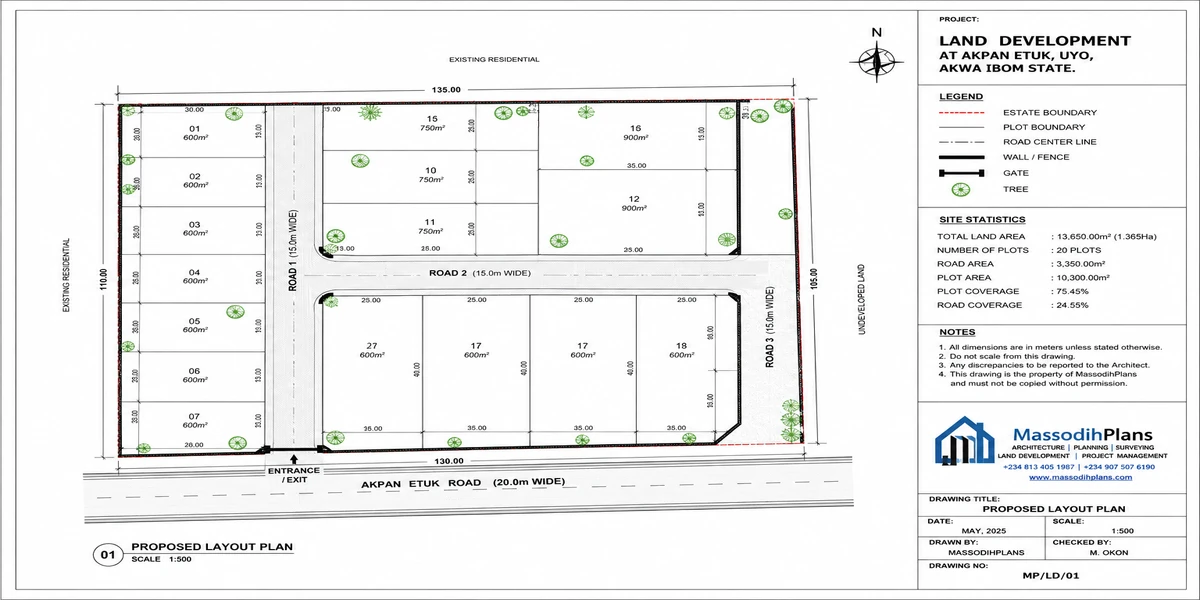
Land Development Process
Site Planning
If land acquisition and feasibility answer the question “can this land be developed?”, site planning answers the more practical question that follows: “how should this land be organized?” It is the stage where survey data, soil conditions, and zoning restrictions stop being abstract findings and start becoming an actual arrangement of roads, buildings, drainage, and open spaces on the ground. Get site planning right, and everything downstream construction, utility connections, stormwater management falls into place with far fewer surprises.
What Site Planning Involves
Site planning is the deliberate arrangement of a parcel’s physical elements to make the most efficient, compliant, and livable use of the land available. It considers how buildings will be positioned relative to the site’s boundaries and to each other, where vehicular and pedestrian access will enter and move through the property, how the land naturally drains and how that drainage will be managed, and where utilities will run. Unlike architectural design, which focuses on individual structures, site planning looks at the whole parcel as a system one where every element affects the others.
A well-prepared site plan typically shows plot boundaries and dimensions, building footprints and setbacks, road and access layouts, drainage paths and stormwater infrastructure, utility routing, and designated green or open spaces. This document becomes the reference point for architects, engineers, and approving authorities throughout the rest of the project.
Site Analysis: The Starting Point
Site planning cannot begin meaningfully without a thorough site analysis an evaluation of the land’s physical, environmental, and contextual characteristics. This includes topography and slope direction, soil bearing capacity, existing vegetation, flood history, prevailing drainage patterns, and the location of neighboring roads and infrastructure. A sloped site, for instance, will drain very differently from a flat one, and that single factor can dictate where roads and buildings are best positioned. Because site analysis feeds directly into every planning decision that follows, it deserves its own dedicated treatment later in this guide but it’s worth noting here that no site plan should be finalized before this groundwork is done.
Balancing Land Use Efficiency With Compliance
One of the central tensions in site planning is maximizing usable land while staying within regulatory limits setbacks, plot coverage ratios, and zoning densities. A common mistake among landowners is designing for maximum building footprint without first checking how much of the plot is actually available for construction once setbacks and access requirements are subtracted. Good site planning works backward from these constraints, establishing the buildable envelope first, then fitting the design within it rather than designing freely and discovering compliance issues at the approval stage.
Access and Circulation Planning
A site plan must account for how people and vehicles will move into, through, and around the property. This includes the primary access road connection, internal circulation for larger developments, parking allocation, and pedestrian pathways. Poor access planning is one of the most visible failures in Nigerian developments estates where a single narrow entrance creates congestion, or plots where access roads were never formally secured and later become disputed. Addressing circulation early, at the site planning stage, prevents these issues from becoming permanent design flaws.
Drainage and Grading Considerations
Because water always follows the path of least resistance, site planning must account for natural drainage patterns before buildings and roads are positioned. This involves grading the land subtly to direct rainwater away from structures and toward designated drainage channels, rather than allowing it to pool or cut its own path across the property. Sites planned without attention to natural grade are the ones most likely to experience erosion, waterlogging, or flooding once construction changes how water moves across the land a topic explored in greater depth in the drainage and stormwater management sections ahead.
Integrating Utilities Into the Layout
Water supply, electricity, and where applicable, sewage or septic systems, all need defined routing within the site plan. Planning utility corridors alongside roads and drainage rather than as an afterthought reduces the cost of installation and avoids future conflicts, such as a borehole positioned too close to a soakaway, or power lines crossing planned building footprints.
Site Planning as a Living Document
It’s worth noting that a site plan is rarely finalized in a single pass. As zoning checks, drainage engineering, and permit reviews progress, the plan is typically revised to reflect new constraints or approval requirements. Treating the site plan as an evolving working document rather than a one-time output leads to smoother approvals and fewer costly redesigns later in the process.
With the physical layout of the land established, the next consideration is how that layout aligns with the broader legal and administrative framework governing what the land can be used for in the first place which brings us to land-use planning.
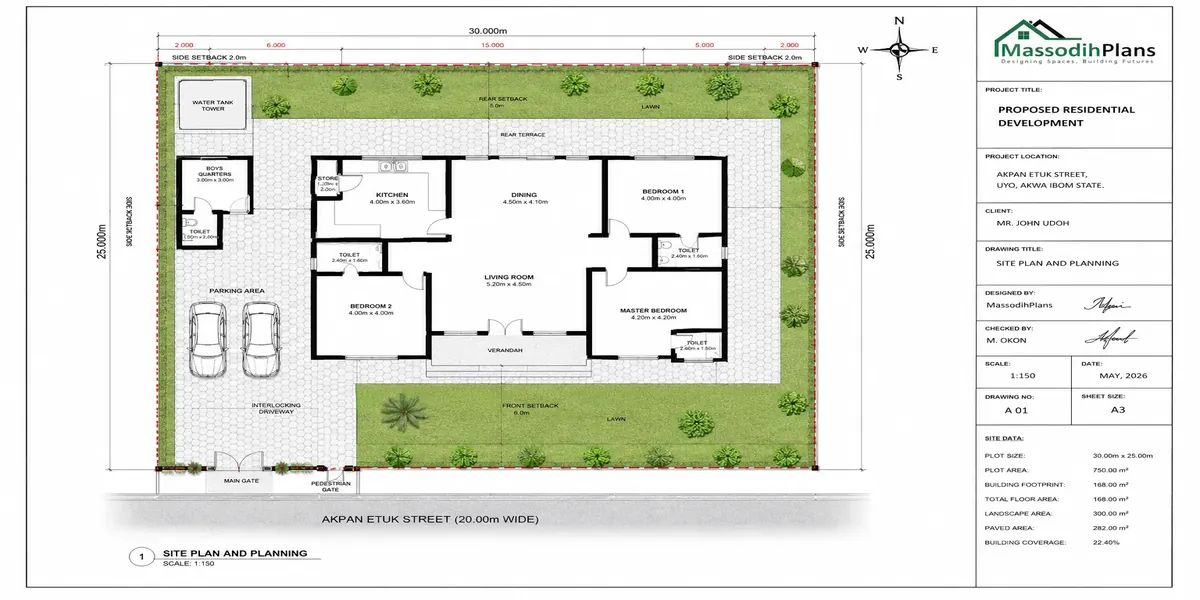
Site Plan and Planning
Land-Use Planning
Once a site plan begins to take shape, it must answer to a bigger question than “how does this specific parcel work?” It must also ask: “what is this land meant to be used for, in the context of the area around it?” That’s the role of land-use planning the broader framework that determines whether a proposed development fits within the intended character, function, and long-term direction of a locality. Where site planning deals with the arrangement of a single parcel, land-use planning deals with the pattern of many parcels working together.
What Land-Use Planning Actually Does
Land-use planning is the process by which government planning authorities designate how land within a given area should be used residential, commercial, industrial, agricultural, institutional, or mixed-use and at what intensity. It’s typically expressed through a master plan or structure plan covering a town, local government area, or designated development zone. For a landowner, this framework is what ultimately decides whether your parcel can legally host the estate, plaza, or warehouse you have in mind, regardless of what the physical site itself can accommodate.
This is a distinction worth sitting with: a piece of land can be perfectly suited by topography and drainage for a housing estate, yet still be designated for agricultural or institutional use under the local master plan. Land-use planning exists precisely to prevent conflicting, uncoordinated development industrial activity next to residential quarters, for instance and to ensure infrastructure like roads and drainage is planned at a scale that serves the whole area, not just one plot.
Categories of Land Use
Most Nigerian planning authorities classify land into broad categories, including:
- Residential low, medium, and high-density housing zones
- Commercial retail, office, and mixed commercial activity
- Industrial light and heavy industrial use, often set apart from residential zones
- Institutional schools, hospitals, government facilities
- Agricultural farmland and undeveloped reserve areas
- Mixed-use combined residential and commercial development, increasingly common in urban infill areas
Each classification carries its own density limits, building restrictions, and infrastructure expectations, which is why confirming a parcel’s designated use early saves significant time and cost later.
Why This Matters Before You Design
A common and costly mistake among landowners is commissioning full architectural drawings before confirming the land-use designation of their site. If the land is zoned for a different use than intended, those drawings and the money spent on them often need to be reworked or discarded entirely once the discrepancy surfaces at the approval stage. Confirming land-use designation with the relevant planning authority, or through a qualified town planner, should happen at the very start of the process, ideally alongside the feasibility and site investigation stage.
Land-Use Planning and Long-Term Value
Beyond compliance, land-use planning also protects the long-term value of a development. A residential estate built in a zone that later attracts planned industrial activity, or a commercial property surrounded by unplanned informal development, can see its value and livability erode over time. Understanding the land-use trajectory of an area not just its current designation, but the direction the master plan is heading helps developers and buyers alike make more informed, durable decisions.
Land-use designation tells you broadly what a parcel can become. But the specific rules governing how that use is implemented permitted density, building heights, plot coverage, and use restrictions fall under a more detailed regulatory layer: zoning. That’s the next piece of the puzzle, and it’s where land-use intentions get translated into enforceable development rules.
Zoning is one of those words that sounds bureaucratic until it directly affects your plot and then it becomes the most important word in your vocabulary. Let me break it down the way I’d explain it to someone sitting across from me with a piece of land and a dream.
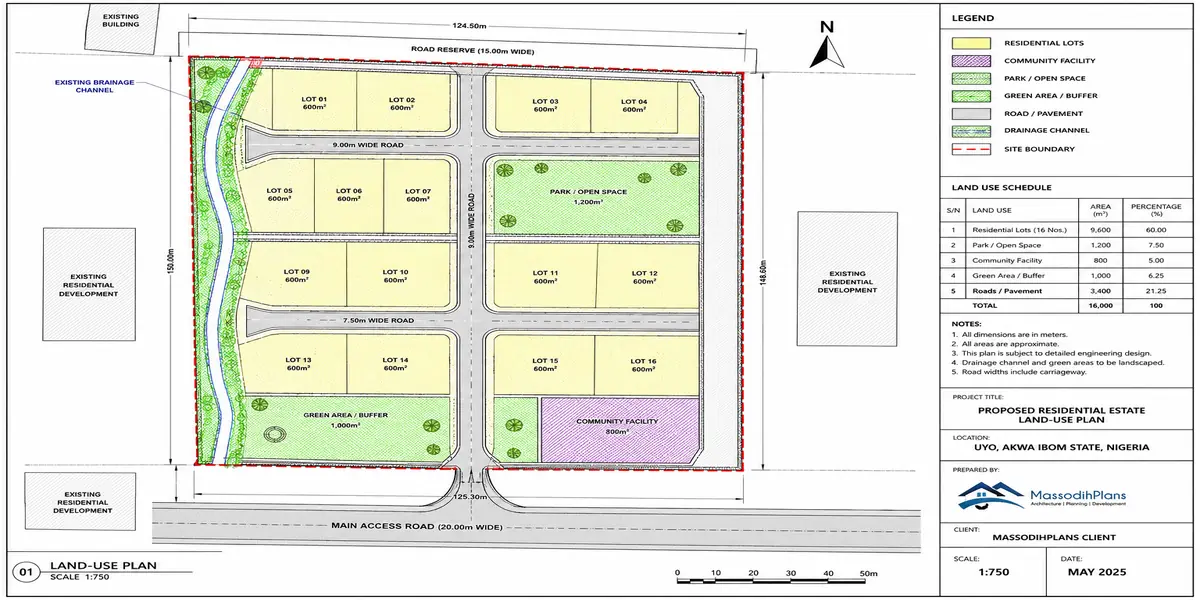
Land-Use Plans and Planning
Zoning
Think of zoning as the rulebook a city or local planning authority uses to decide what can happen where. It’s not about whether you own the land that’s title. Zoning is about what you’re legally allowed to do with it. You can own a plot outright and still be told, “sorry, you can’t put a shopping complex here, this is a residential zone.” That’s the power zoning holds, and it’s why I always tell clients: check the zoning before you fall in love with a design.
Why Zoning Exists in the First Place
Imagine a street with a school, a noisy fabrication workshop, and a poultry farm all sitting side by side. Nobody planned that on purpose that’s what happens without zoning. Planning authorities use zoning to group compatible land uses together, protect residential areas from industrial noise or pollution, control density so infrastructure like roads and drainage isn’t overwhelmed, and generally keep a town from growing in a chaotic, unmanageable way. It’s less about restricting you and more about protecting the value of everyone’s property, including yours.
The Main Zoning Categories You’ll Encounter
Most zoning systems, Nigeria included, are built around a few broad categories:
- Residential zones for homes, from single-family plots to high-density housing.
- Commercial zones shops, offices, plazas, markets.
- Industrial zones factories, workshops, warehousing.
- Mixed-use zones a blend of residential and commercial, common in fast-growing urban corridors.
- Institutional and public-use zones schools, hospitals, government facilities.
- Agricultural or green zones land reserved for farming or conservation, often with strict development limits.
Each category usually comes with its own sub-rules on building height, plot coverage, and density so “residential” in one part of town might allow only single-family bungalows, while another residential zone permits multi-storey apartments.
How Zoning Affects Your Site Plan
Here’s where it gets practical. Zoning doesn’t just tell you what you can build it shapes how you build it. It influences your setbacks, how much of the plot you’re allowed to cover, how tall your structure can go, and even how many units you can fit if you’re developing multiple plots. If you design first and check zoning later, you’re setting yourself up for rejected approvals and expensive redesigns. I’ve seen it happen a beautiful duplex design thrown back by the planning office simply because the zoning only permitted single-family residential.
Checking Zoning Before You Commit
Before you commit money to design or construction, visit the relevant state or local planning authority in Akwa Ibom, that’s typically the Ministry of Lands and Physical Planning and confirm the zoning classification of your specific plot, not just the general area. Zoning can change block by block, especially near major roads where commercial corridors often creep into what used to be purely residential streets.
Once you know what your land is allowed to become, the next question is how that land gets legally divided if you’re working with a larger parcel and that’s exactly what subdivision is all about, which we’ll unpack next.
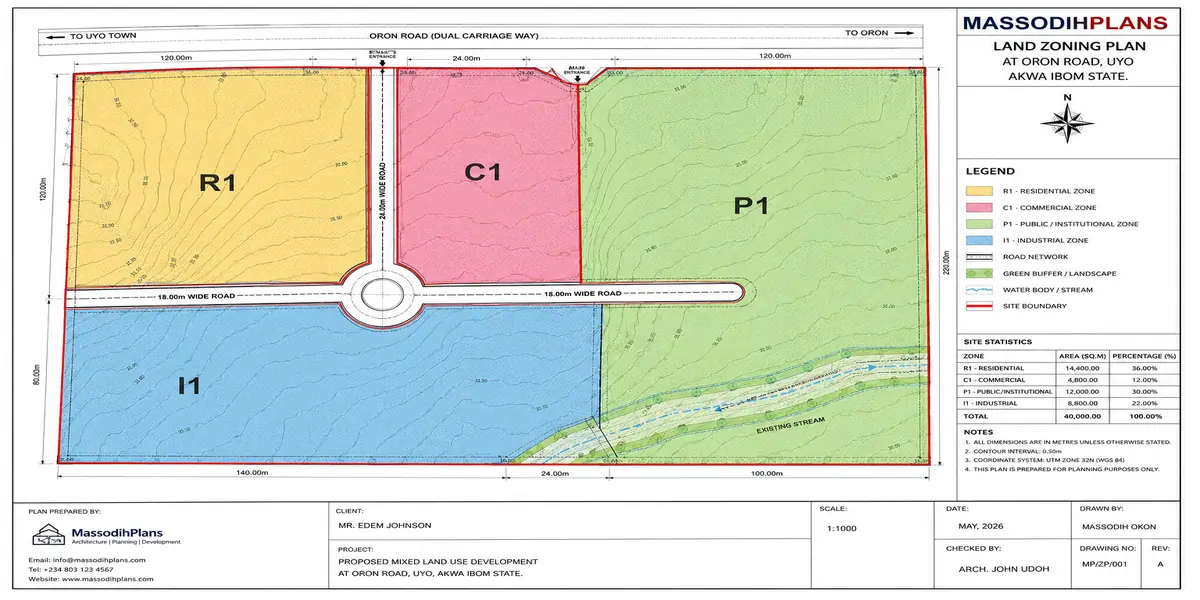
Land Zoning
Subdivision
Alright, let’s talk about subdivision and I want you to picture something concrete first. Imagine you own a two-hectare parcel of land somewhere along the outskirts of Uyo. Right now, it’s one plot, one title, one boundary. But your plan isn’t to build one giant house on it you want to create, say, twenty individual plots you can sell or develop separately. That transformation, from one large parcel into several smaller, individually titled plots, is what we call subdivision.
It sounds simple when I put it that way, but subdivision is actually one of the more technical and closely regulated stages in the entire land development process. And it directly follows zoning, because think about it you can’t subdivide land into twenty residential plots if the zoning classification says the area is industrial. Zoning tells you what’s allowed; subdivision is how you physically carve the land to deliver on that allowance.
What Subdivision Actually Involves
At its simplest, subdivision means dividing a larger parcel into smaller lots, each with its own defined boundaries, its own access, and often its own share of common infrastructure roads, drainage, sometimes utility easements. But here’s the part many landowners miss: subdivision isn’t just about drawing lines on a survey plan. Each new plot has to be genuinely usable on its own. It needs road access. And it needs a way to drain water off it. It needs to meet minimum plot size requirements set by the local planning authority.
So when I’m advising a client who wants to subdivide, the first thing I tell them is: don’t think of it as slicing a cake. Think of it as designing twenty small, independent building sites that all happen to share one big piece of land.
The Layout Plan: Your Subdivision Blueprint
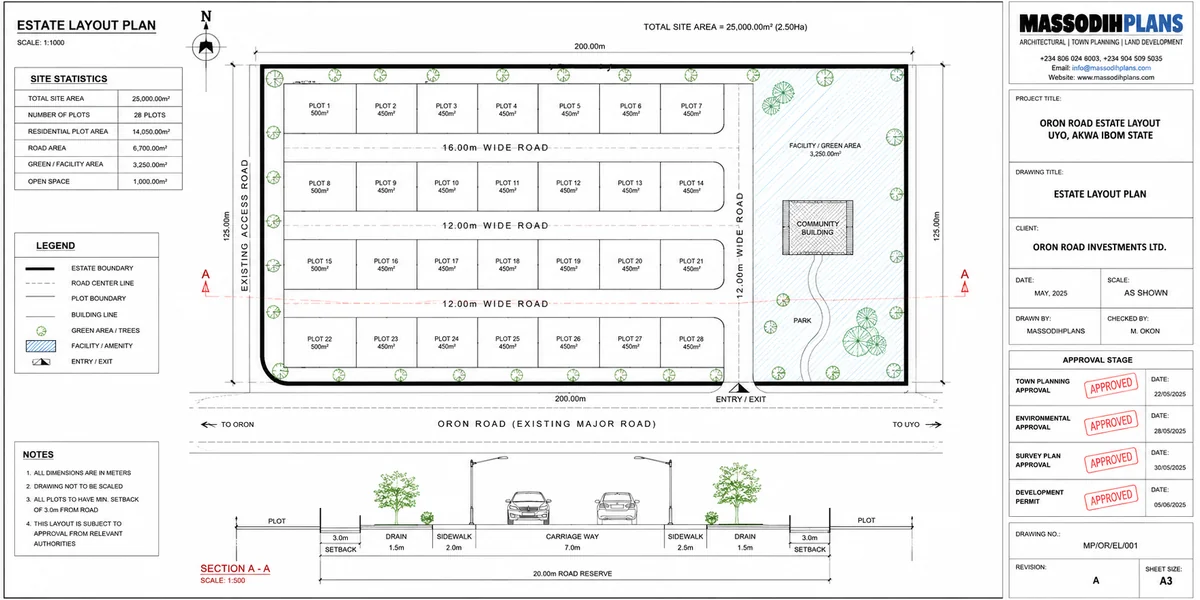
Before any subdivision is legally recognized, you need what’s called a layout plan (sometimes called a subdivision plan). This is a detailed drawing showing exactly how the parcel is divided plot sizes, road networks running through the estate, drainage alignment, and any reserved areas for green space or public use.
This layout plan has to go to your state’s planning authority for approval before you can start selling or allocating individual plots. I always tell my students: the layout plan is where good site planning either pays off or falls apart. If the roads are poorly positioned, or the drainage doesn’t have a natural fall, you’ll be fighting those mistakes for the life of the estate.
Types of Subdivision You’ll Commonly Encounter
Residential subdivision dividing land into standard plot sizes (half-plot, full plot, etc.) for individual homes or estate development. This is the most common type you’ll deal with in Akwa Ibom and Rivers States.
Commercial subdivision creating lots for shops, offices, or mixed commercial use, usually along major roads with different access and setback requirements than residential plots.
Estate subdivision a larger-scale version where an entire gated community is planned, complete with internal roads, drainage networks, and sometimes shared facilities like a clubhouse or recreation area.
Common Mistakes I See Landowners Make
Honestly, the biggest mistake is subdividing land before confirming it can actually support the number of plots planned. Someone will insist on squeezing in extra plots, and the internal roads end up too narrow, or the drainage channel has nowhere to go. Another common one is ignoring minimum plot dimensions set by local regulations — some landowners try to create “extra” plots by shrinking sizes below what’s legally approvable, which only delays approval later.
My advice, always: let your surveyor and town planner determine the maximum number of plots the land can genuinely support based on access, drainage, and zoning rather than working backward from how many plots you’d like to sell.
Why Subdivision Sets the Tone for Everything After
Once your layout plan is approved and plots are created, every other decision downstream building setbacks, road widths, drainage direction, utility routing follows the framework subdivision established. Get it right, and the rest of the development flows naturally. Get it wrong, and you’ll be retrofitting problems for years.
With your land properly subdivided and the layout plan in hand, the next logical step is turning that approval into something official securing the actual development permits that give you legal clearance to build. That’s exactly what we’ll unpack next.
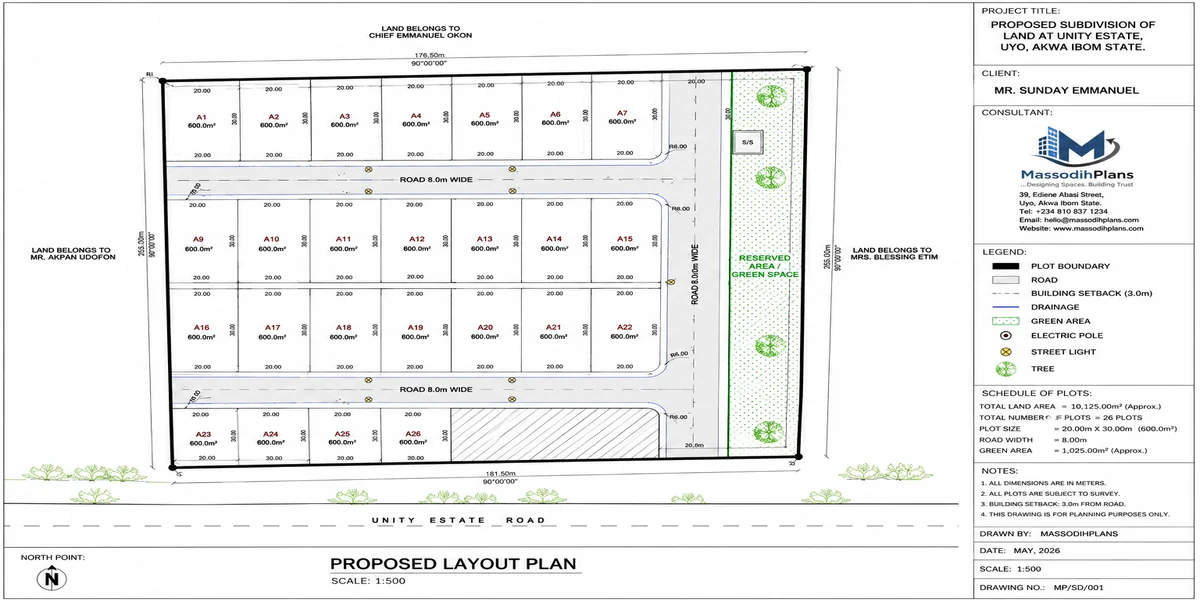
Land subdivision and layout plan
Development Permits
Now, let’s talk about something that trips up a lot of landowners permits. You’ve done your site analysis, sorted out access, thought through setbacks and roads. But none of that matters legally until the right government office says “yes, you can build this.” That’s what a development permit is official permission that your project meets planning, safety, and environmental standards before construction starts.
Think of it like this: your site plan is the plan, but the permit is the license to actually execute it. Skip this step, and you’re building at the mercy of enforcement officers who can (and do) stop work, seal buildings, or demand demolition even if your design is perfect.
What Exactly Is a Development Permit?
A development permit is a formal approval issued by a planning authority usually a state or local Ministry of Lands, Physical Planning, or Urban Development Board confirming that your proposed project complies with zoning, building codes, and site-specific requirements. Depending on your state, you might hear it called a “building permit,” “development approval,” or simply “planning approval.” They all point to the same thing: official sign-off before you break ground.
The Documents You’ll Typically Need
I always tell my students to prepare these ahead of time, because gathering them late is where projects lose months:
- Approved survey plan proof of accurate boundaries
- Architectural drawings your building design, properly drafted
- Structural drawings for anything beyond a simple bungalow
- Site/layout plan showing setbacks, access, and drainage
- Soil test report especially for multi-storey buildings
- Environmental impact assessment required for larger or sensitive sites
- Evidence of title your C of O, Deed of Assignment, or equivalent
Missing even one of these is usually enough to stall an application, so it pays to assemble the full set before submission rather than trickling documents in one at a time.
Types of Permits You Might Encounter
Not every project needs the same permit. Common categories include:
- Building permits for actual construction work
- Change of use permits if you’re converting land from, say, residential to commercial
- Subdivision approval when splitting land into multiple plots
- Demolition permits before tearing down an existing structure
- Environmental permits for projects near water bodies, wetlands, or with significant ecological impact
Why This Step Deserves Patience
Here’s the honest truth permit processing can be slow, sometimes frustratingly so. But rushing or trying to bypass it almost always costs more in the long run: fines, stop-work orders, or worse, demolition of completed work. My advice to anyone I’m mentoring is simple build the permit timeline into your project schedule from day one, not as an afterthought.
Once your permit is in hand, there’s usually one more approval layer many people confuse with the permit itself planning permission. It’s related, but distinct enough that it deserves its own explanation, which is exactly where we’re headed next.
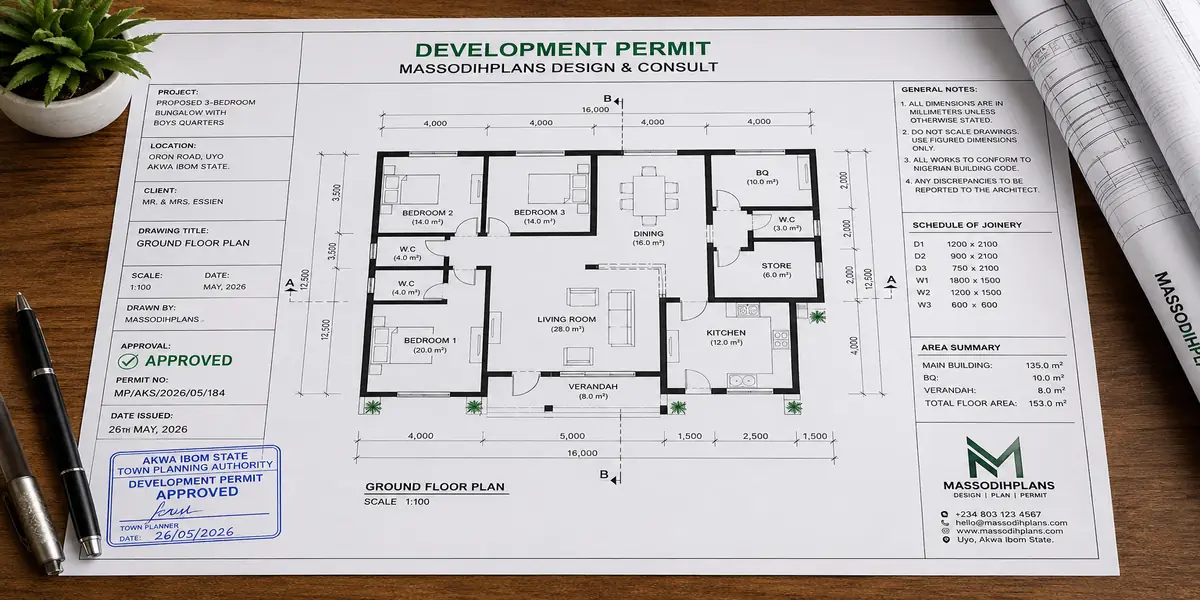
Development Permits
Planning Permission
Let’s talk about planning permission because I’ve seen too many landowners confuse this with a “building permit” and assume they’re the same thing. They’re related, but they’re not identical, and mixing them up is one of those small misunderstandings that can cost you months of delay.
Think of it this way: planning permission is the government’s formal “yes, you may proceed” to your intended use of the land, before you get into the technical details of how the structure itself will be built. It’s the planning authority confirming that what you want to do with the land build a shop, put up a duplex, open a filling station actually fits the approved land use for that area.
What Planning Permission Actually Covers
When you apply for planning permission, the authority isn’t checking your beam sizes or column spacing that’s a building permit conversation. What they’re checking is broader: does your proposed development align with the zoning classification for that plot? Does it respect setbacks, plot coverage limits, and density allowances? Does it fit into the local master plan for that neighborhood? In short, planning permission answers the “is this allowed here” question before anyone gets to “is this built correctly.
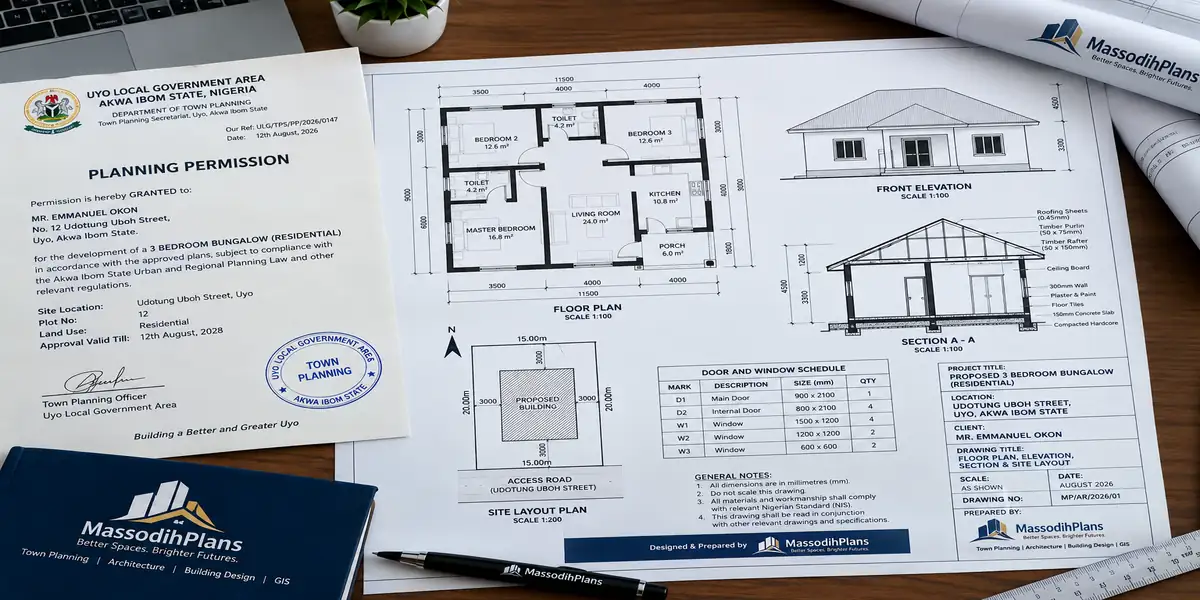
Planning Permission
Why It Comes Before Building Approval
Here’s the logical order I always explain to clients: you secure planning permission first, because it validates the concept, then you move on to detailed architectural and structural drawings for building approval. Trying to reverse that order designing first, then hoping the authority approves the use is how developers end up redesigning entire projects. I’ve watched it happen with a client who built structural drawings for a commercial complex on a plot zoned strictly residential. The redesign cost more than the original planning consultation would have.
What You’ll Typically Need to Apply
Requirements vary by state, but generally you’ll be asked for your survey plan and title documents, a site analysis or layout showing how the development sits on the land, and a written description of the proposed use. Some authorities also want a preliminary drainage or access plan at this stage, especially for larger developments, since those factors influence whether the use is even suitable for that location.
A Word on Timelines
I won’t sugarcoat this one planning permission can take time, and it varies significantly from state to state and even office to office. What speeds it up, consistently, is submitting complete, professionally prepared documentation the first time. Half-finished applications get queried, queried applications get shelved, and shelved applications are how a two-month process becomes a two-year one.
Now, once planning permission confirms that your intended use is allowed, the next natural question is: what does the land itself actually tell you before you design anything? That’s where site analysis comes in the hands-on, on-the-ground process of reading your land’s physical story before you commit a single line to paper. Let’s get into that next.
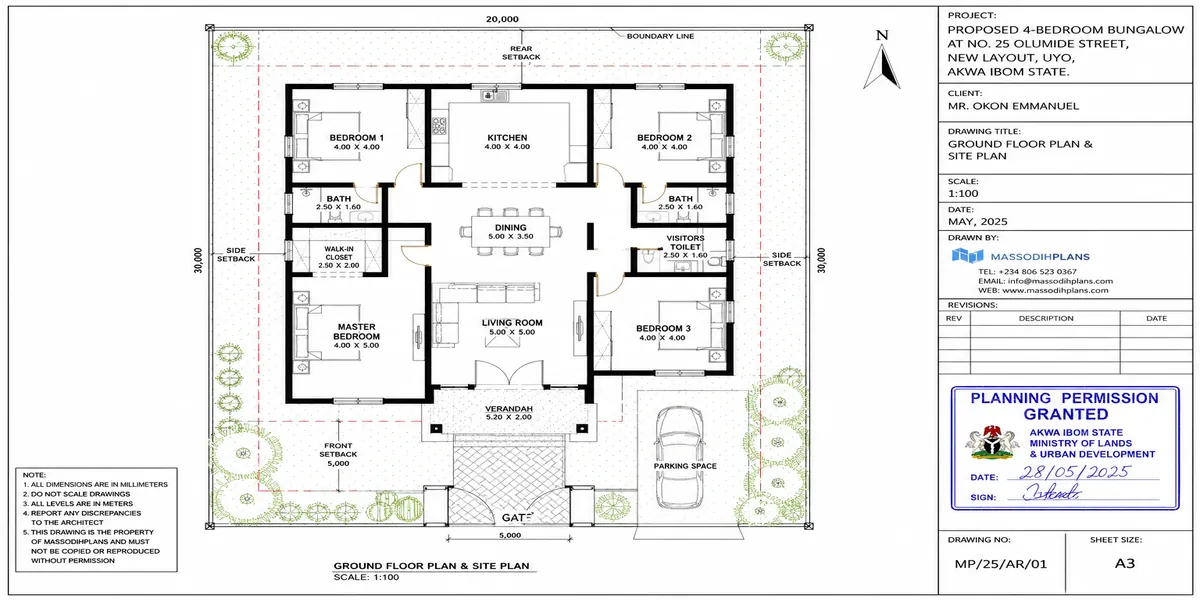
Planning Permit and Permission
Site Analysis
Let me put it this way: before you design anything, you need to sit down with the land and really listen to what it’s telling you. That’s essentially what site analysis is a structured way of studying a parcel before you commit a single line to paper. Skip this step, and you’re designing blind. I’ve seen plots that looked perfectly fine on a site visit turn into nightmares during construction, simply because nobody bothered to check what was actually going on beneath the surface or how water moved across the land.
Topography and Land Contours
The first thing I always tell my students to check is the shape of the land itself is it flat, sloped, or does it have depressions that could collect water? A topographic survey gives you the contour lines, elevation points, and high-to-low gradients across the site. This single document quietly answers dozens of later questions: where drainage will naturally flow, whether you’ll need retaining walls, and how much earthwork (cutting and filling) the site will require before you can build.
Soil Conditions
Next, you want to know what you’re actually building on. Soil testing usually geotechnical investigation tells you the bearing capacity of the ground, water table depth, and whether the soil is expansive, sandy, or prone to erosion. This directly informs foundation design. A site with weak or waterlogged soil, common in parts of the Niger Delta, may need piling or raised foundations rather than a standard strip foundation.
Existing Access and Surrounding Infrastructure
Then there’s the question of how the site connects to the world around it. What roads border the parcel? Are they motorable year-round, or do they wash out in the rains? Is there proximity to utility lines electricity poles, water mains or will the developer need to extend services from a distance? This affects both design and cost projections significantly.
Drainage Patterns and Flood History
This is one I can’t stress enough: study how water behaves on and around the site, not just during your visit, but historically. Talk to neighbors. Look for water marks, silt deposits, or vegetation patterns that hint at seasonal flooding. A site analysis that ignores drainage history is incomplete, and it’s often the single biggest cause of post-construction regret.
Environmental and Vegetation Features
Take note of existing trees, wetlands, or protected vegetation, since these can affect both design decisions and regulatory approval. Some features may need to be preserved or factored into the layout rather than simply cleared.
Neighboring Land Use and Zoning Context
Finally, look at what’s around the site residential neighbors, commercial activity, or industrial use nearby. This context often shapes not just design sensitivity but also zoning compatibility, which we’ll unpack shortly.
Once you’ve gathered all this topography, soil, access, drainage, vegetation, and context you have a genuine picture of the land’s personality. And that picture becomes the foundation for the next step: building setbacks, where all this raw information starts shaping exactly where and how construction can legally and safely happen.
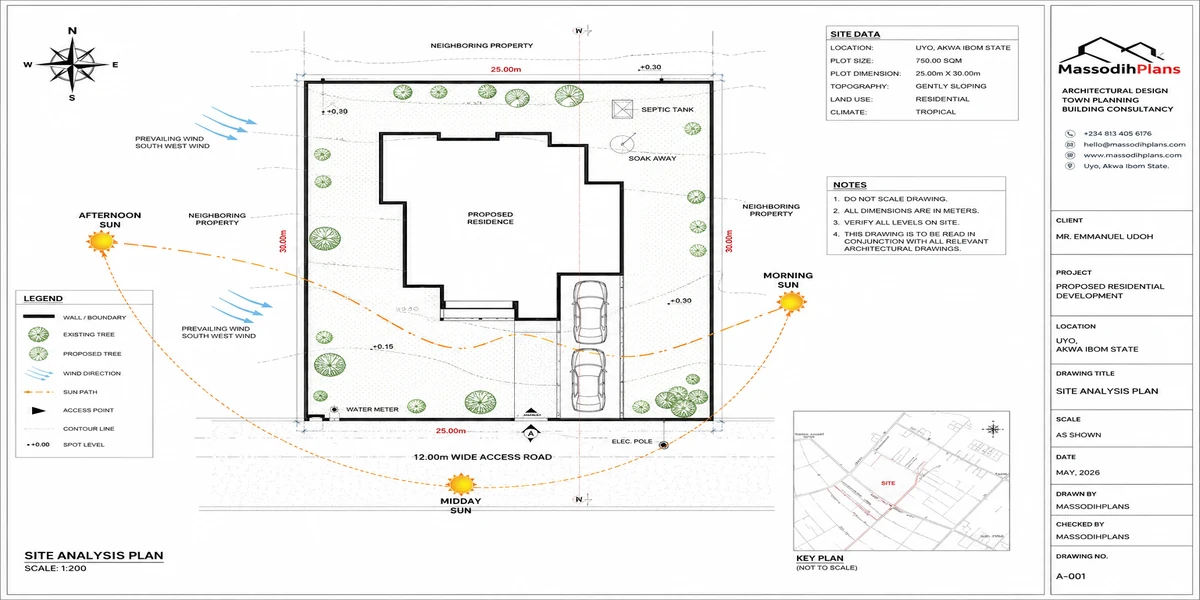
Site Plans Analysis
Building Setbacks
Let me explain setbacks the way I’d explain it to someone standing on their own plot for the first time: a setback is simply the minimum distance your building must keep from the boundaries of your land front, back, and sides. It’s not a suggestion. It’s a legal requirement set by your local planning authority, and it shows up on every approved building plan whether the owner likes it or not.
Why Setbacks Exist
Setbacks aren’t there to waste your land. They exist for practical reasons to allow light and ventilation between buildings, to give room for drainage channels to run along plot boundaries, to leave space for future road expansion, and to give emergency vehicles or maintenance access room to move. When your neighbor’s wall sits too close to yours, you feel the effect immediately: poor airflow, blocked drainage, disputes over boundary walls. Setbacks prevent that from happening at scale, across an entire neighborhood.
Typical Setback Requirements
Requirements vary by state and by the classification of the road your plot fronts, but as a general pattern in most Nigerian development control guidelines, you’re looking at something like:
- Front setback: Often 3–6 metres from the road boundary, more on major or arterial roads
- Side setbacks: Typically 1.5–3 metres on each side, depending on plot width
- Rear setback: Usually similar to side setbacks, sometimes slightly more
I always tell clients: don’t assume confirm the exact figures with the local planning office for your specific site, because these numbers shift depending on whether you’re on a major road, a cul-de-sac, or an estate with its own internal layout rules.
What Happens When You Ignore Setbacks
This is the part that costs people money. A building erected without respecting setbacks can be marked for demolition, refused a Certificate of Occupancy, or flagged during resale when a buyer’s surveyor checks compliance. I’ve seen cases where a beautifully finished building had to have a wall shaved back because it encroached on the required setback an expense nobody budgets for.
A Quick Rule of Thumb
Before your architect finalizes any drawing, confirm setback figures with the planning authority first, then design around them not the other way around. It’s far cheaper to plan correctly on paper than to correct concrete after the fact.
With setbacks defining how far back your building sits, the next question becomes just as important: how does anyone actually reach that building? That brings us to roads and access.
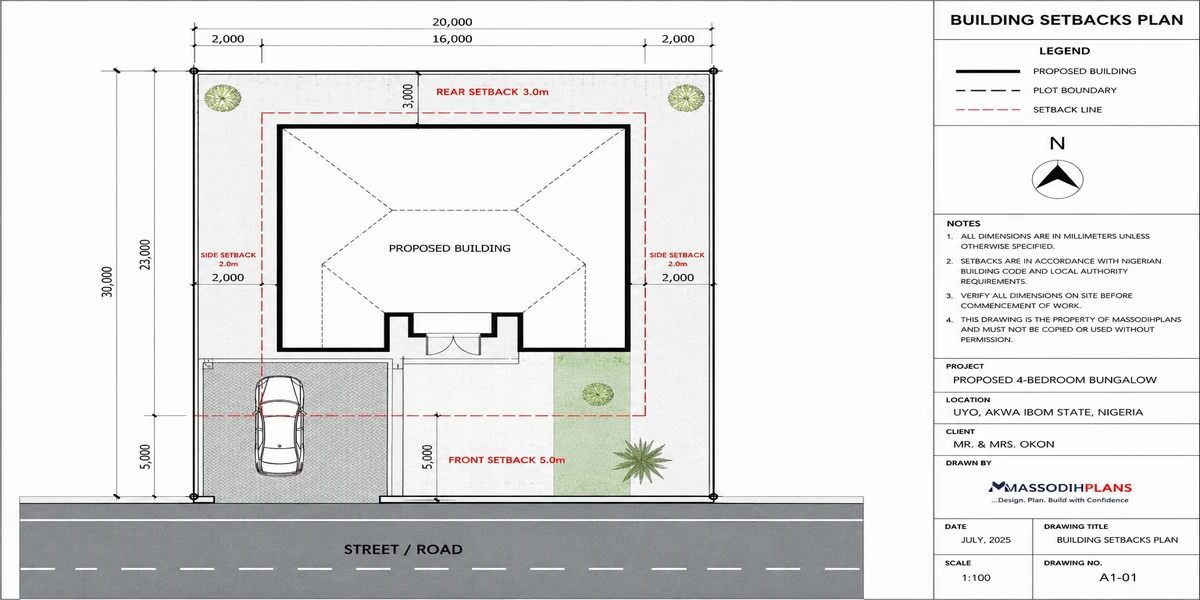
Building Setbacks
Roads and Access
Let’s talk about something that sounds simple but trips up more developers than almost anything else on this list roads and access. I always tell my students: you can have the most beautiful site plan in the world, but if people can’t get in and out of it easily, safely, and legally, the whole project is compromised. Access isn’t a detail you figure out later. It’s one of the first things that should shape your site plan.
Why Access Comes Before Almost Everything Else
Here’s the thing before you even decide where a building sits on a plot, you need to know how vehicles and people will reach it. I’ve seen landowners design a beautiful layout, only to realize afterward that the only practical entry point cuts straight through what should have been the drainage path, or that the road frontage they assumed they had doesn’t actually exist on the survey. So the rule of thumb is simple: map your access points before you finalize your layout, not after.
Types of Roads You’ll Deal With
When we talk about roads and access, we’re really talking about a hierarchy, and it helps to think of it like a tree with branches.
Arterial or trunk roads these are the major roads that connect your site to the wider city or region. Think of the main highway or federal road your land sits near.
Collector roads these link your site (or estate) to the arterial roads. If you’re developing a subdivision, this is often the main internal road that feeds all the smaller streets.
Local access roads these are the smaller roads within the site itself, the ones that actually run past individual plots or buildings.
Understanding this hierarchy matters because each level has different design requirements width, pavement type, drainage allowance and getting the classification wrong can mean rework or rejected approvals later.
Right-of-Way: The Space You Don’t Get to Build On
Now here’s a concept that confuses a lot of first-time developers right-of-way, or ROW. This is the strip of land reserved for a road and its associated infrastructure (drainage, utility lines, sometimes walkways), and it’s wider than just the paved surface itself. Local planning authorities specify minimum ROW widths depending on the road classification an arterial road might require a much wider ROW than a small internal access road.
The mistake to avoid: building right up to the edge of the road pavement. That space is often not yours to build on, even if it looks empty. Always confirm the approved ROW before finalizing setbacks along any road frontage.
Access Points: Where and How Many
Once you know your road hierarchy and ROW, the next question is: where exactly does your site connect to the road network? A few practical guidelines I share with students:
Sight distance matters. An access point on a curve or near a junction can be dangerous and may simply be rejected by planning authorities.
Fewer, well-placed access points beat many scattered ones. Multiple uncontrolled entries create traffic conflict and drainage complications.
Emergency access is non-negotiable. Fire trucks and ambulances need to reach every part of a development, especially larger estates this often dictates minimum road widths and turning radii internally.
Internal Road Design for Subdivisions and Estates
If you’re laying out a subdivision, internal roads deserve just as much thought as the main entrance. Think about road width (enough for two-way traffic plus parking, where needed), turning circles at dead ends, and how the road network interacts with drainage because roads and stormwater management are more connected than most people realize; a poorly graded road becomes a flood channel the first heavy rain that comes.
A Quick Reality Check
Before you finalize any road and access plan, ask yourself: Does this connect properly to an existing public road? Is the right-of-way respected? Can emergency vehicles reach every building? Will the road drain properly, or will it pool water at the lowest point?
Get these answers right, and you’ve solved one of the biggest structural problems in land development. Get them wrong, and no amount of good architecture will fix it later.
Now, once people and vehicles can actually get onto your site, the next question becomes just as important how does the site get power, water, and other essential services? That’s where utilities come in, and it’s exactly what we’ll unpack next.
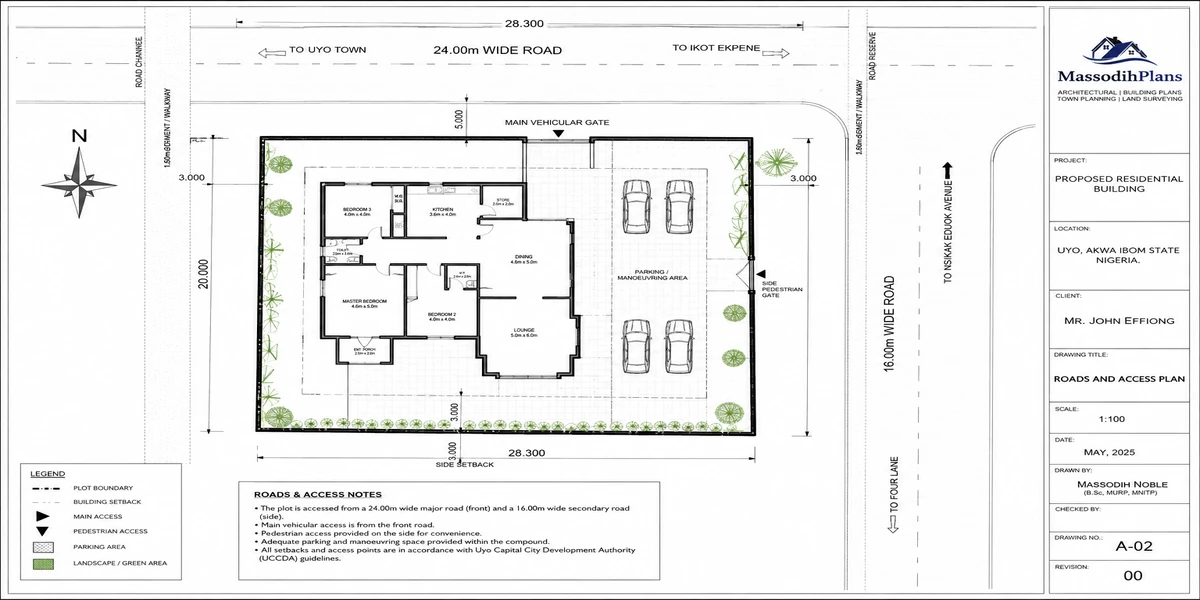
Roads Access
Utilities
Let’s talk about something that doesn’t get nearly enough attention when people are excited about buying land utilities. You can have the most beautifully designed layout, perfect setbacks, and a gorgeous access road, but if there’s no reliable way to get water, power, and other essential services onto that site, none of it matters much in practice. Think of utilities as the lifelines of any development the invisible network that makes a plot of land actually livable or usable.
I always tell people: don’t wait until construction is halfway done to start thinking about utilities. This should be part of your site analysis from day one, because the availability or absence of utilities can quietly determine your entire budget and timeline.
Water Supply
Water is usually the first utility question on everyone’s mind, and rightly so. Depending on where your site sits, you might be connecting to a public water scheme, or as is common across much of Akwa Ibom and Rivers States you might be relying entirely on a borehole. If it’s the latter, you’ll want a hydrogeological assessment early on to understand water table depth and quality before you commit to a location for your borehole. Nothing is more frustrating than drilling and getting poor yield or contaminated water because nobody checked the ground conditions first.
For larger estates, this also means planning a distribution network pipes, storage tanks, and pumping systems that can serve every plot efficiently, not just the ones closest to the source.
Electricity
Next up is power, and here you’ve usually got two paths: connecting to the national grid through the local distribution company, or planning for alternative sources like solar or generators, especially in areas where grid access is unreliable or simply unavailable. For any layout beyond a single building, you’ll need to plan for transformer placement, cable routing, and load capacity and this really should be coordinated with your site plan, not bolted on afterward. I’ve seen developments where poles and cables end up cutting awkwardly across access roads simply because power planning came too late in the process.
Sewage and Waste Management
This one’s often overlooked until it becomes a problem. If your site isn’t connected to a public sewer system which is the reality for most developments outside major city centers you’ll need to plan for septic tanks or soakaway systems. And here’s the thing: this choice directly depends on your soil’s percolation rate, which ties right back to the soil testing we talked about in site analysis. Get this wrong, and you’re looking at sewage systems that fail or contaminate nearby water sources, which is both a health hazard and a compliance nightmare.
Telecommunications
Don’t forget connectivity. Whether it’s fiber optic cabling for internet or standard telecom infrastructure, modern buyers and tenants expect reliable connectivity almost as much as they expect water and power. Planning conduit routes for cables alongside your other utility trenches during site preparation saves you from digging up finished roads later.
Gas Supply (Where Applicable)
In some commercial or industrial developments, and increasingly in residential estates, piped gas supply is part of the utility package. If this applies to your project, it needs its own dedicated planning safety setbacks, pipeline routing, and coordination with relevant regulatory bodies, since gas infrastructure carries stricter safety requirements than water or electrical lines.
Coordinating Utilities With Your Site Plan
Here’s the lesson I really want to drive home: utilities work best when they’re planned together, not one at a time in isolation. Water lines, power cables, sewage systems, and telecom conduits often need to share the same corridors usually running alongside roads so coordinating their routing early avoids conflicts, reduces trenching costs, and keeps your site looking clean rather than patched together.
Now, once utilities are mapped out, there’s another critical layer that determines whether your site stays dry and functional through the rainy season and that’s drainage. Getting utilities right means nothing if water has nowhere sensible to go, which is exactly why drainage is the natural next stop on this journey.
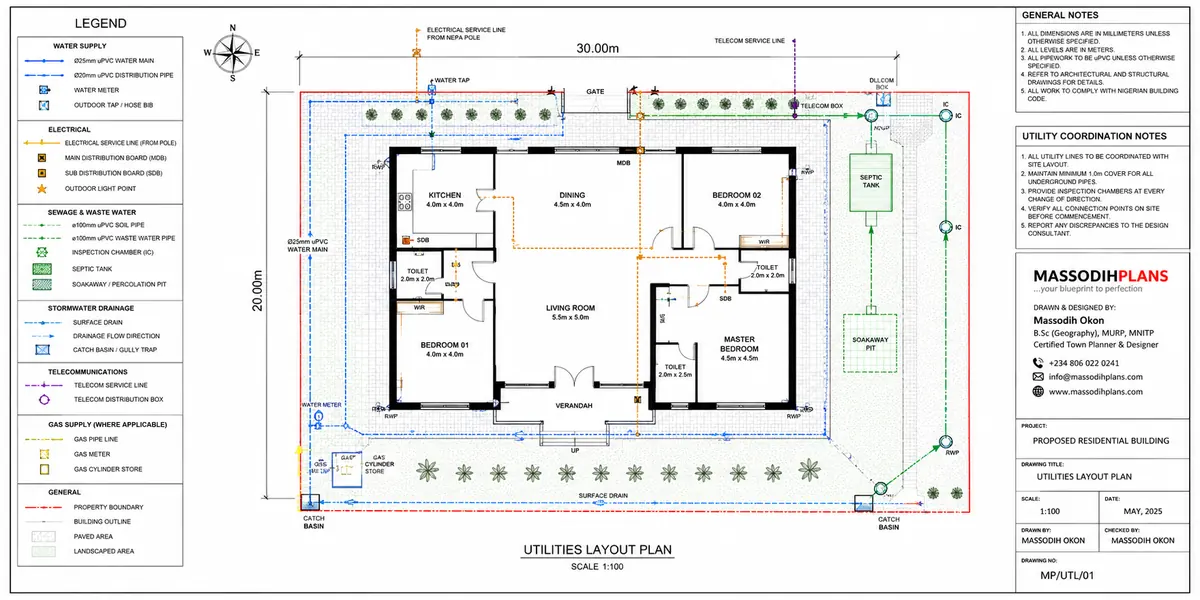
Utilities Plans
Drainage
Let’s talk about drainage because honestly, this is one of those things people don’t think about until it’s too late. You’ve probably driven past a beautiful building somewhere with water pooling right at its entrance every time it rains, or seen a road that turns into a small river after just twenty minutes of downpour. Nine times out of ten, that’s not bad luck. That’s a drainage problem someone should have solved at the planning stage.
So let’s break it down simply: drainage is how water rainwater, wastewater from your kitchen and bathroom, and sometimes groundwater moves away from your site instead of sitting on it or inside it. If you get this right from the start, you save yourself years of headaches. If you get it wrong, you’ll be fighting water for as long as the building stands.
Why Drainage Deserves Attention Early, Not Later
Here’s a mistake I see often: someone buys a plot, builds their dream house, and only then starts wondering why water keeps gathering by the fence during the rainy season. The truth is, drainage isn’t something you fix after construction it’s something you plan for before you even finalize your building layout. The natural slope of your land, the direction water already flows across it, and how your neighbors’ plots drain all affect how your own site should be designed. Ignore this at the start, and you’re basically building on borrowed time.
Types of Drainage You Need to Understand
Surface drainage deals with rainwater how it moves across your compound, off your roof, and eventually off your property. This usually involves graded land (a gentle slope, not flat, because flat land holds water), channels, and gutters that direct rain away from your foundation.
Subsurface drainage handles water that seeps into the ground, especially important if your soil holds moisture or if you’re building close to a water table. This often involves perforated pipes laid beneath the ground to carry excess water away before it weakens your foundation.
Wastewater drainage is separate from rainwater this is your sewage and greywater system, which should never mix with your stormwater channels. Mixing the two is not just messy; in many jurisdictions, it’s actually against building regulations.
Reading Your Land Before You Build
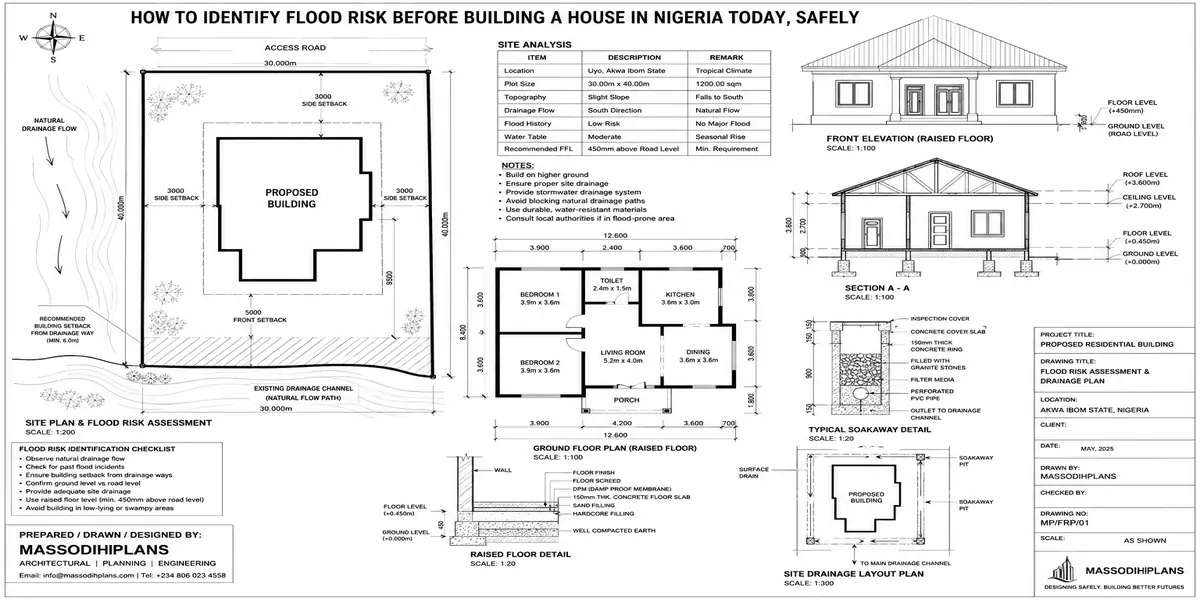
Every plot has a natural drainage pattern, whether anyone designed it or not. Before you plan anything, walk your land after a heavy rain if you can, or ask long-term neighbors where water tends to collect. Combine that with a proper topographic survey, which shows you the exact slope and elevation changes across your site. This tells you where water naturally wants to go and your job as a developer is to work with that flow, not against it.
Designing Your Drainage System
Once you understand how water moves across your land, the actual design comes down to a few practical decisions: where to position drainage channels, what gradient they need to keep water flowing (too flat, and water stagnates; too steep, and you get erosion), and where that water ultimately discharges ideally into a public drain, a natural watercourse, or an approved soakaway, never onto a neighbor’s property.
For sites in low-lying or flood-prone areas which describes a good number of plots across South-south Nigerian States this stage matters even more. You might need to elevate your building pad, install a French drain around the foundation, or design a slightly raised access road so flooding doesn’t cut off your compound during the rains.
Common Drainage Mistakes to Avoid
A few things trip people up repeatedly: building on the lowest point of a plot without correcting the grade, directing roof water straight onto bare soil next to the foundation instead of channeling it away, blocking a natural water path with a perimeter fence, and skipping a proper drainage design altogether because “the land looks fine.” Land can look fine in the dry season and betray you completely in July.
Getting drainage right on your own site is only half the picture, though. The moment your development starts producing large volumes of runoff from roofs, paved compounds, and roads you’re no longer just managing water on your plot; you’re managing how that water behaves at scale. That’s where stormwater management comes in, and it’s a big enough topic that it deserves its own proper conversation next.
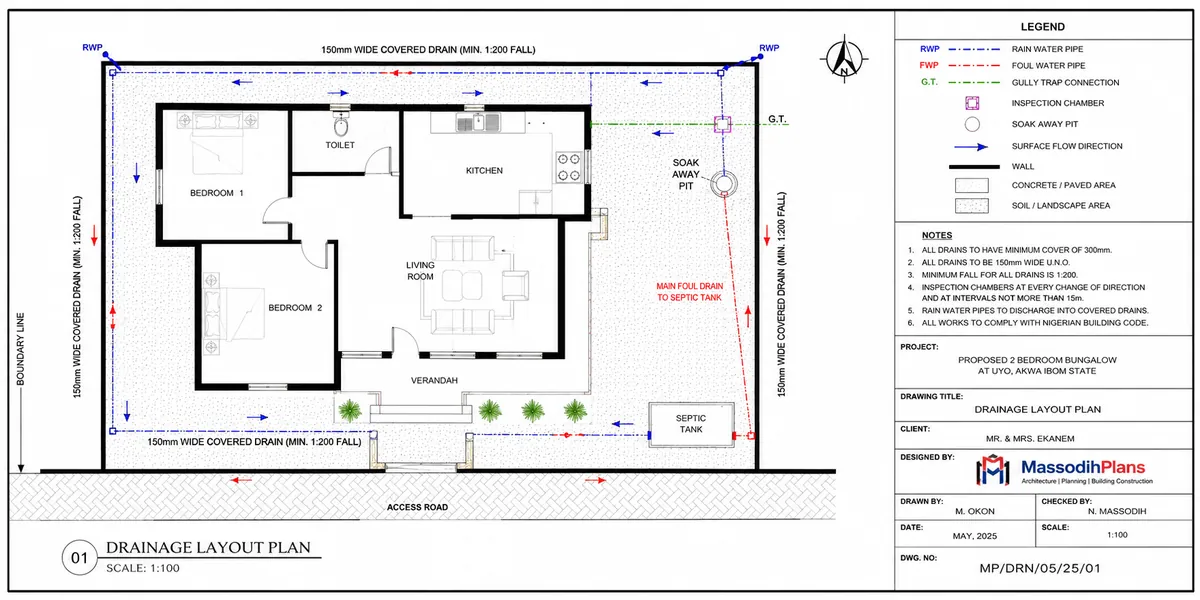
Drainage Plans and Drawings
Stormwater Management
Here’s something I tell every client who comes to me with a plot of land: the rain doesn’t care about your building plans. Whether your site sits in Uyo, Eket, or Port Harcourt, water is going to fall on that land, and it’s going to go somewhere. Your only real choice is whether you decide where it goes, or whether it decides for you usually by pooling in your compound, eroding your access road, or seeping into your foundation.
That’s really what stormwater management is about. It’s the deliberate control of rainwater runoff so it moves off your site (or gets absorbed into it) without causing damage to buildings, roads, or neighboring plots. In the Niger Delta region especially, where rainfall is heavy and prolonged for months at a stretch, this isn’t an optional add-on to your building plan it’s one of the most important things your site design needs to get right.
Why Stormwater Becomes a Problem in the First Place
When land is undeveloped, rain soaks into the soil, gets absorbed by vegetation, or flows gently across natural contours. Once you clear the land, add rooftops, pave driveways, and compact the soil, all of that changes. Water that used to soak in now runs off fast, and in larger volumes than the natural land ever had to deal with. Multiply that across a full estate of paved roads and roofed buildings, and you can see why poorly planned developments turn into flood zones the moment the rains start.
Reading the Site Before You Design Anything
Good stormwater management starts long before you draw a drainage channel it starts with understanding how your site naturally handles water. This means studying the site’s topography (which direction does it slope?), its soil type (does it drain fast or hold water?), and its relationship to nearby waterbodies or existing drainage channels. I always tell students: you cannot design where water should go until you know where it currently wants to go. Fighting the natural flow of a site is expensive and rarely works long-term; working with it is almost always cheaper and more effective.
The Basic Toolkit: How Stormwater Is Actually Managed
There isn’t one single solution a well-planned site usually combines several of these:
Grading and slope design. This is the simplest and often most important tool. Land is shaped so that water flows away from buildings and toward designated drainage points, rather than pooling around foundations.
Surface drains and channels. These are the open or covered channels you see running alongside roads and compounds, directing collected runoff toward a discharge point a stream, a public drain, or a retention area.
Retention and detention ponds. On larger developments, these are built to temporarily hold large volumes of stormwater during heavy rain, releasing it gradually so downstream drains aren’t overwhelmed all at once.
Permeable surfaces. Instead of paving every inch of a compound, using permeable pavers, gravel, or grassed areas allows some water to soak back into the ground naturally, reducing the total runoff volume.
Soakaways and infiltration pits. These are dug pits filled with stone or gravel that allow collected water to slowly percolate into the soil rather than being discharged elsewhere useful on plots where soil conditions allow good absorption.
Designing for Your Specific Site
There’s no one-size-fits-all drainage plan, and this is something I emphasize with every student and client. A site with sandy, fast-draining soil will lean more heavily on soakaways and permeable surfacing. A site with clay soil, which drains poorly, will need more surface drainage capacity and careful grading, since the ground simply won’t absorb water fast enough on its own. Sites near natural waterways need buffer considerations to avoid overwhelming or polluting those channels. This is why stormwater design has to follow proper site analysis it cannot be a generic template copied from one project to another.
What Happens When Stormwater Is Ignored
I’ve seen it too many times: a beautiful building erected on a site with no real drainage plan, and within one or two rainy seasons, the compound is waterlogged, the access road has eroded into gullies, and water is creeping toward the foundation. Fixing this after the fact costs far more than designing it correctly from the start and sometimes the damage to the structure is already done.
Once stormwater is under control, the next piece of the puzzle is making sure it doesn’t work alone drainage as a whole, including how water moves through pipes, culverts, and connections beyond just rainfall, needs its own dedicated look. That’s exactly where we’re headed next.
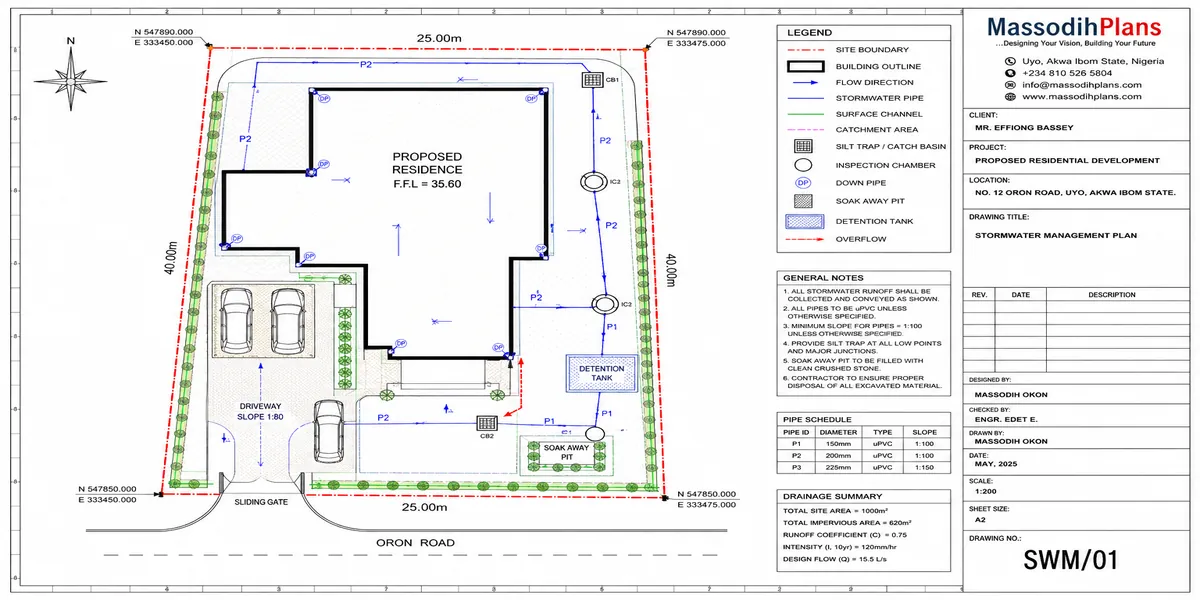
Stormwater Management Plans and Drawings
Infrastructure
By now you’ve got your approvals sorted, your site plan is compliant, and the land has been cleared and graded. But here’s the thing none of that matters much if the infrastructure underneath it all isn’t solid. Infrastructure is the physical skeleton of any development: the roads, pipes, cables, and drainage systems that make a piece of land actually livable and functional. Get this stage right, and everything built on top of it works smoothly for decades. Get it wrong, and you’ll be digging up finished roads to fix a burst pipe five years down the line.
Think of infrastructure as the part of development nobody notices when it’s working and everybody complains about when it isn’t.
Roads and Internal Access Networks
This is usually the first thing that goes in, and for good reason: without proper access, nothing else can happen. Construction vehicles need a way in, materials need to be delivered, and eventually residents or tenants need to move in and out without their cars getting stuck in mud every rainy season. Internal road networks should be planned with proper width, gradient, and drainage channels built in from the start not added as an afterthought once potholes start forming.
Water Supply Systems
A site without reliable water isn’t really ready for occupation, no matter how nice the buildings look. This means laying out the pipe network, connecting to a public water main where one exists, or planning boreholes and overhead tanks where it doesn’t which, honestly, is the more common reality across much of Nigerian States. The key is sizing the system for the number of units the land will eventually hold, not just what’s there today.
Electricity and Power Distribution
Power infrastructure covers the transformer capacity, cabling, and distribution network needed to serve every plot or unit. In areas where grid supply is unreliable which, let’s be honest, is most of Nigeria this stage often includes planning for alternative or backup power, whether that’s space reserved for a central generator house or solar-ready wiring for individual units.
Drainage and Stormwater Infrastructure
This one deserves its own spotlight later in this guide, but it belongs here too because it’s physically part of the same infrastructure layer as roads and water lines. Drains need to be built alongside roads, not squeezed in afterward, and they need to follow the natural fall of the land so water actually moves away instead of pooling at someone’s gate.
Sewage and Waste Management
Depending on the scale of the development, this could mean a centralized sewage treatment system, individual septic arrangements, or connection to a public sewer line where available. Waste management planning including solid waste collection points also falls under this umbrella, and it’s easy to overlook until residents move in and start asking where the refuse goes.
Telecommunications
Increasingly non-negotiable, this covers cabling or ducting for internet and phone connectivity, planned in from the start so contractors aren’t tearing up finished roads later to lay fiber.
Here’s the honest truth: infrastructure is expensive, and it’s tempting to cut corners here to save money upfront. But this is exactly the wrong place to economize, because infrastructure problems don’t stay small they compound. A drainage line sized too small today becomes a flooded estate tomorrow.
Speaking of which, since drainage touches almost every other infrastructure decision, it’s worth slowing down and looking at construction planning next the stage where all this infrastructure actually gets built, sequenced, and coordinated on the ground.
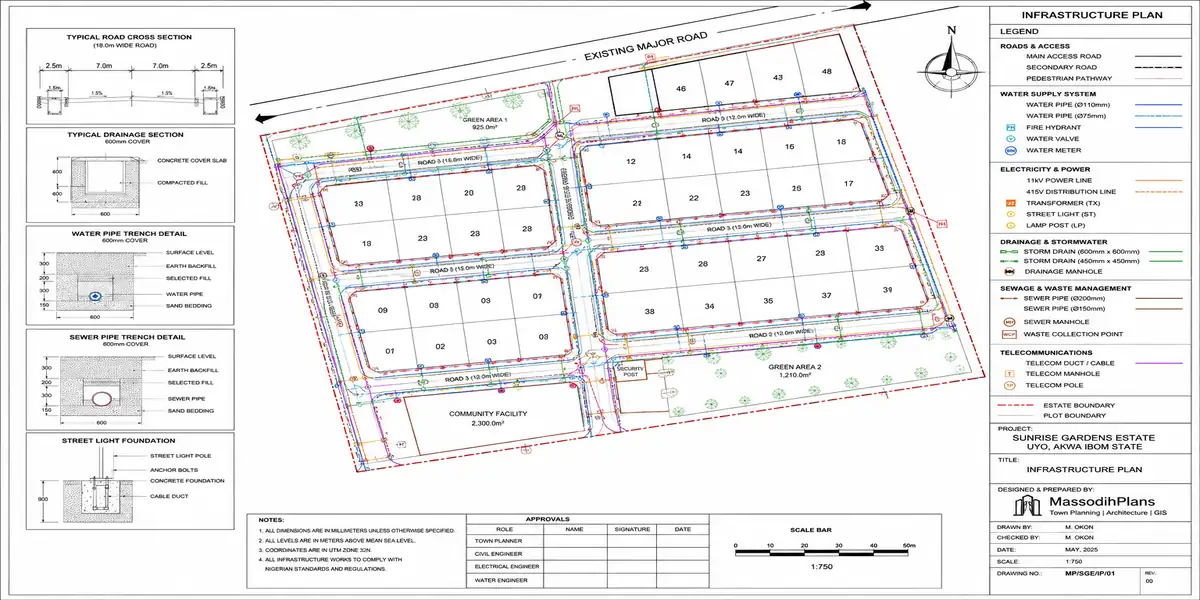
Estate Infrastructure Plans and Drawings
Construction Planning
So you’ve got your permits, your infrastructure is in, and the site is graded and ready. Now comes the part everyone gets excited about actually putting up the building. But here’s what I always tell people I’m mentoring: construction planning is where good site work either pays off or gets undone by rushed decisions. This stage isn’t just “start building.” It’s about sequencing everything so that money, materials, and time aren’t wasted.
Sequencing the Work
Think of construction like cooking a big pot of soup you can’t add the crayfish before the water is boiling. On site, that means foundation work comes before walls, walls before roofing, and rough plumbing and electrical conduit go in before you plaster. Sounds obvious, but you’d be surprised how many small projects lose weeks because someone plastered a wall before running the electrical sleeves through it, then had to break it open again. A proper construction sequence, drawn up before the first block is laid, saves you from this kind of backtrack.
Setting a Realistic Timeline
Every construction plan needs a timeline, but the mistake many first-time developers make is copying a “standard” duration without accounting for their own site’s realities. Rainy season in Akwa Ibom, for instance, will slow foundation and earthworks in a way a dry-season build in the north wouldn’t experience. A good timeline builds in buffer for weather, material delivery delays, and labor availability not just the ideal-case scenario.
Budgeting and Cost Control
This is the part nobody enjoys but everybody needs. Construction planning means breaking the project into cost stages substructure, superstructure, roofing, finishing, fittings and tracking spend against each one as you go. The reason this matters so much is that construction costs rarely stay flat; cement prices shift, steel prices shift, and if you don’t track spend stage by stage, you won’t notice you’re over budget until you’re halfway through finishing with no money left for tiling.
Materials and Procurement
Once your sequence and budget are set, the next question is sourcing what materials, from where, and when do they need to arrive on site? Poor procurement planning is one of the quiet killers of construction timelines. Ordering roofing sheets the week you need them, instead of weeks in advance, can stall a project for a month if there’s a supply delay. Smart construction planning maps out lead times for every major material category upfront.
Labor and Site Supervision
You also need to think about who’s doing the work and who’s watching them do it. A construction plan should specify the skilled trades needed at each stage bricklayers, electricians, plumbers, roofers and when they’re expected on site. Just as important is supervision: someone needs to be checking that work matches the approved drawings, that setbacks are respected, and that drainage falls are being built correctly, not just guessed by the mason on site.
Coordinating With Infrastructure Already in Place
Remember all that road, drainage, and utility work from the infrastructure stage? Construction has to work with it, not against it. Your building’s finished floor level, for example, needs to respect the drainage falls already established on site build it too low, and you’ve just created a flood pocket for yourself.
Safety and Quality Checks
Finally, no construction plan is complete without built-in checkpoints inspections at foundation level, at damp-proof course, before roofing, and before finishing. These checks catch problems while they’re still cheap to fix, rather than after the building is standing.
Get construction planning right, and everything else drainage, utilities, even final approvals falls into place far more smoothly. Speaking of drainage, that’s actually where a lot of construction problems trace back to, which brings us to one of the most overlooked parts of site development: managing water before it becomes a headache.
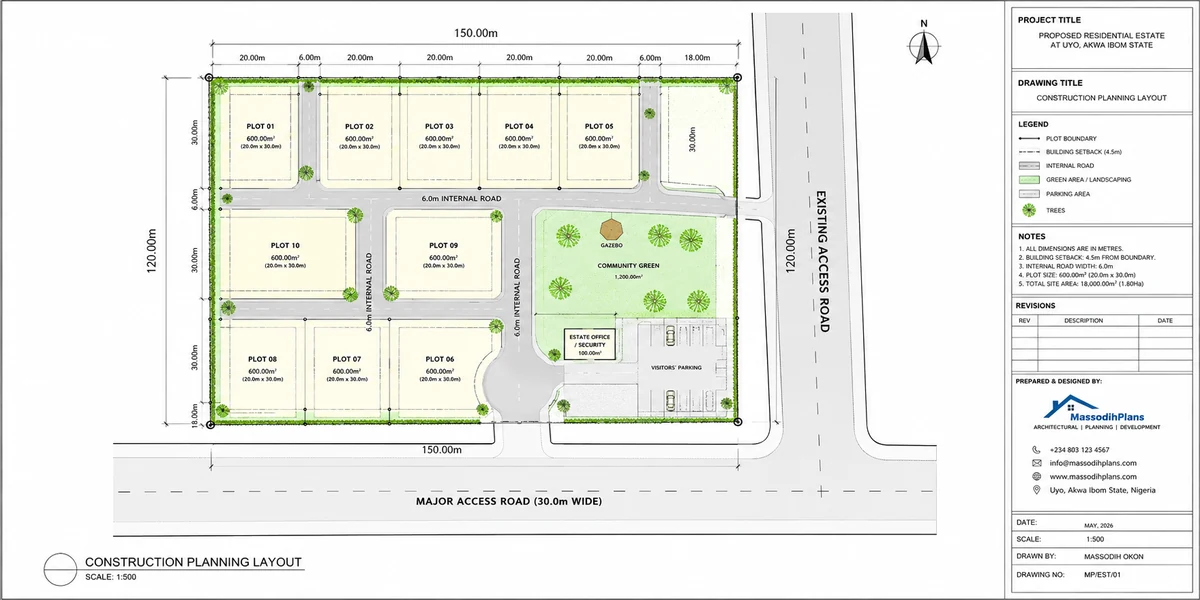
Construction Planning Plans of an estate
Environmental Requirements
Here’s something a lot of landowners don’t think about until it’s too late: your development doesn’t just need planning approval it needs environmental clearance too, especially once the project crosses a certain size or sits near a sensitive area. Ignore this, and you could have a fully approved building plan that still gets stopped on-site because nobody checked what the project does to the land around it.
Think of environmental requirements as the set of checks that ask one simple question: what happens to the surrounding ecosystem, water sources, and community once this development goes up? Let’s walk through what that actually involves.
Environmental Impact Assessment (EIA)
For larger developments estates, industrial sites, or anything near wetlands, rivers, or protected areas an Environmental Impact Assessment is usually required before approval is granted. This is a formal study that looks at how construction and the finished development will affect soil stability, water bodies, air quality, and local vegetation. In Nigeria, this typically falls under the Federal Ministry of Environment or state environmental protection agencies, depending on project scale. Smaller residential builds rarely need a full EIA, but it’s worth confirming early rather than assuming you’re exempt.
Flood-Prone and Wetland Areas
A lot of the South-South, Akwa Ibom and Rivers States included, sits on low-lying terrain with a real flood history. If your site touches a wetland, floodplain, or natural drainage channel, expect extra scrutiny. Authorities may require you to preserve a buffer zone, elevate the building level, or redesign your drainage to avoid disrupting natural water flow. This isn’t bureaucratic box-ticking building on a blocked floodplain doesn’t just hurt you, it pushes flooding onto neighboring plots too.
Erosion and Soil Conservation
Given how erosion-prone parts of this region are, especially sloped or sandy sites, environmental requirements often include erosion control measures. This could mean retaining walls, vegetative cover, or engineered drainage that slows water runoff instead of letting it cut through exposed soil. Skipping this is how a beautiful site plan turns into a gully three rainy seasons later.
Waste and Sanitation Provisions
Every development, residential or commercial, needs a credible plan for solid waste disposal and sewage management. For estates without access to a public sewer line, this usually means septic systems or treatment plants designed to prevent contamination of nearby wells or water bodies. Planning authorities increasingly ask for this upfront rather than leaving it to chance after people move in.
Protection of Natural Features
Where a site includes mature trees, natural water bodies, or ecologically sensitive land, some jurisdictions require these features to be preserved or only partially disturbed. This can actually work in your favor design-wise, a retained tree line or natural pond can become a landscaping asset rather than an obstacle, if you plan around it instead of against it.
Community and Public Health Considerations
Larger developments sometimes require a check on how the project affects nearby communities, noise during construction, dust, traffic, and access to clean water. This is less about paperwork and more about goodwill; a development that creates friction with its neighbors before it’s even finished rarely has a smooth road ahead.
Get environmental requirements right early, and they quietly protect your investment long after approval is granted. Get them wrong, and they resurface as costs, delays, or disputes down the line. With that groundwork covered, the next practical question becomes: what does all of this actually cost, and where does that money go? That’s what we’ll unpack next.
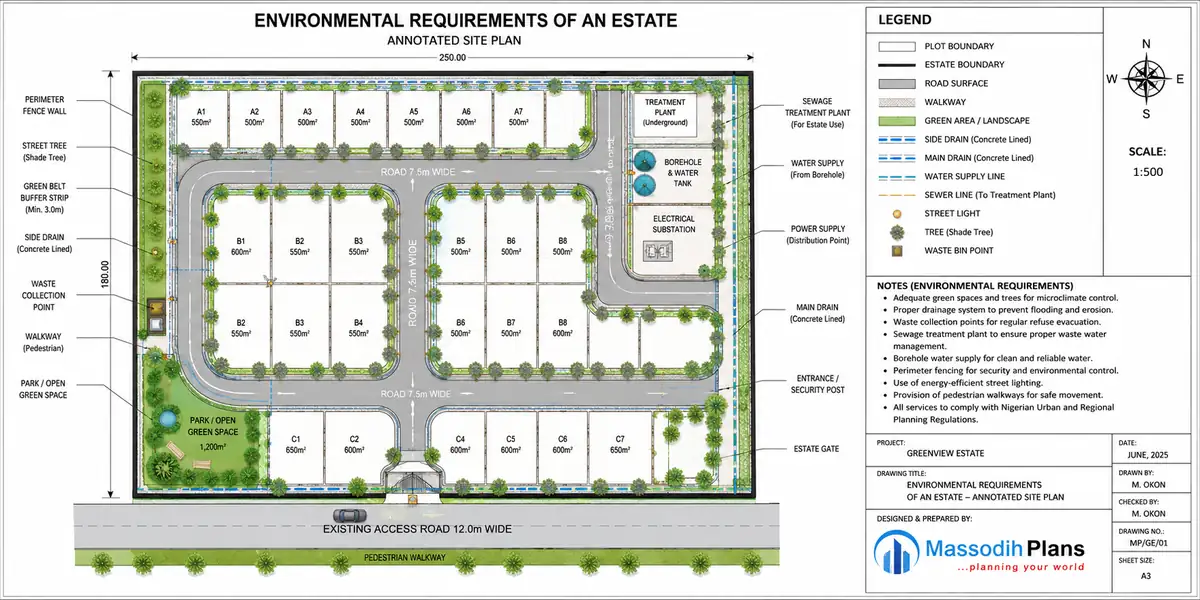
Environmental Requirements Estate
Development Costs
Here’s something I tell every landowner who comes to me excited about a plot they just bought: the price of the land is often the smallest number in the whole project. It’s the cost that comes after clearing, surveying, drainage, roads, utilities, permits that catches most people off guard. If you’re planning a development, you need to see the full cost picture before you commit, not halfway through when the money’s already tight.
Let’s break down where the money actually goes.
Land Acquisition Costs
This is the obvious one the purchase price, plus the paperwork that makes it legally yours. Don’t forget to budget for title verification, survey fees, and Governor’s Consent or the equivalent in your state. A lot of people budget for the land and forget these attachments, then get stuck when the C of O process alone costs more than expected.
Site Investigation and Design Costs
Before anything gets built, someone has to study the land topographic survey, soil test, feasibility assessment and then translate that into drawings. This covers your surveyor, town planner, architect, and civil engineer. It’s tempting to skip a proper soil test to save money here, but I’ve seen that “saving” turn into a much bigger drainage repair bill two years later.
Permit and Approval Fees
Every state charges for building approval, planning permission, and sometimes environmental clearance. These fees vary widely depending on plot size, land use, and location, and they’re rarely a one-time payment expect processing fees, inspection fees, and sometimes “expediting” costs if you want your file moved faster. Budget for this as its own line item, not an afterthought.
Infrastructure Costs
This is usually where budgets get blown. Roads, drainage channels, culverts, water supply lines, electrical connections none of this is cheap, and none of it is optional if you want a functional site. If your land is raw and undeveloped, you’re essentially building a small utility network before you build a single house. The further your site is from existing infrastructure, the more this number grows.
Construction Costs
Once the land is ready, you’re paying for materials, labor, equipment, and site supervision. This is the cost most people already expect, but it still deserves a careful, itemized estimate rather than a rough guess material prices move often, and a stale estimate can throw off your entire budget partway through the build.
Contingency and Soft Costs
Every experienced developer builds in a buffer typically 10 to 15 percent of total project cost for the things you can’t fully predict: price increases, weather delays, unexpected soil conditions, or additional regulatory requirements. Alongside this sit your “soft costs” legal fees, project management, insurance, marketing if you’re selling units. These don’t show up in a construction quote, but they’re very real.
Why Sequencing Affects Cost
Here’s the part students often miss: cost isn’t just about how much it’s about when. Money spent early on proper site investigation and drainage design almost always saves multiples of that amount later. Money saved by skipping those steps tends to resurface as repair costs, redesign fees, or regulatory penalties once the project is already underway.
So when you’re budgeting, don’t just ask “what will this cost me to build.” Ask “what will this cost me if I get the order wrong.” That question alone will shape a smarter, more realistic development budget and it sets up the next thing worth understanding clearly: how the approval process itself unfolds, step by step.
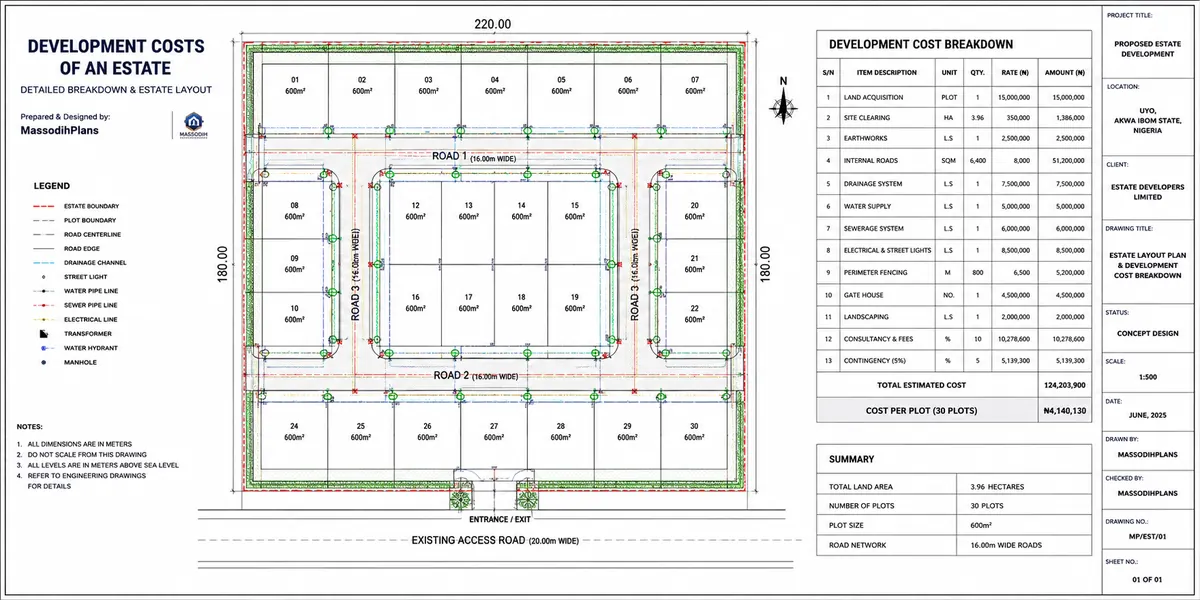
Development Costs Estate
Approval Process
Here’s something I tell every client who comes to me with a plot and a dream: the approval process is where most projects either move smoothly or get stuck for months. It’s not the most exciting part of development, but honestly, it’s the part that protects you legally and saves you from demolition notices down the line.
Where It Starts: Documentation
Before you even submit anything, you need your papers in order survey plan, site plan, architectural drawings, and proof of title. Planning authorities won’t look twice at an application that’s missing any of these. I always advise clients to get their drawings professionally prepared first, because half-baked submissions are the number one reason approvals drag on for months instead of weeks.
Submission to the Planning Authority
Once your documents are ready, they go to the relevant physical planning agency this could be a state Ministry of Lands and Physical Planning, a local development authority, or a town planning board, depending on your state. They’ll review your application against the local zoning classification and master plan for that area. This is essentially them asking: does what you want to build actually belong here?
Technical Review and Site Inspection
Don’t be surprised if an inspector visits your site before approval is granted. They’re checking that what’s on paper matches what’s on ground access roads, neighboring structures, drainage patterns, sometimes even soil conditions. If your site plan says there’s a setback from the road but your survey shows otherwise, this is where that mismatch gets caught.
Fees and Levies
Every approval comes with a cost processing fees, development levies, sometimes an environmental impact fee depending on the scale of your project. These vary widely by state, so it’s worth budgeting for this early rather than treating it as an afterthought.
Approval, Conditions, or Rejection
At the end of review, you’ll typically get one of three outcomes: outright approval, conditional approval (meaning you fix specific issues and resubmit), or rejection. Conditional approvals are actually quite common maybe your drainage plan needs revision, or your setback needs adjusting. It’s rarely the end of the road; it’s usually just a checklist.
Once approval is in hand, you’re legally cleared to build but that clearance only means as much as the site design behind it. And that’s really the heart of everything: how well the site itself was planned before approval was even sought.
Estate Approval Process
Country-Specific Requirements
Everything we’ve covered so far site analysis, setbacks, drainage, permits plays out differently depending on where in the world you’re developing. The principles stay the same everywhere: know your land, plan your access, manage your water, get your approvals. But the how changes from country to country, sometimes drastically. If you’re developing locally or advising diaspora clients on a build back home, here’s a quick tour of what to expect in twenty different jurisdictions.
Nigeria
Now let’s talk home ground because Nigeria’s development landscape has its own personality, and it’s one every landowner here needs to understand before breaking ground.
Land development in Nigeria is largely state-driven, not federal. Each state runs its own planning authority Lagos has LASPPPA and LASBCA, Rivers State has RIVSPPA, and here in Akwa Ibom, the Ministry of Lands and Physical Planning handles approvals alongside the Urban and Regional Planning Board. This means requirements, fees, and turnaround times can vary noticeably depending on where your land sits, even within the same geopolitical zone.
Title verification is the first hurdle most people underestimate. A Certificate of Occupancy (C of O), Deed of Assignment, or Excision must be confirmed at the state land registry before any serious planning begins, given how common overlapping or disputed claims still are across the country.
Building plan approval follows a fairly consistent structure nationwide: submission of architectural, structural, and services drawings, along with a site or layout plan, to the relevant Ministry or Development Control Authority. Environmental Impact Assessments are typically required for larger developments, especially anything near wetlands or waterways a real concern across much of the South-South, where seasonal flooding and poor natural drainage already put pressure on poorly planned sites.
Stormwater management, unfortunately, is where many Nigerian developments fall short. Drainage channels are often treated as an afterthought rather than a design requirement, which is exactly why so many estates flood during the rainy season. States are gradually tightening enforcement, but the responsibility still falls heavily on the developer to plan drainage properly from the start not wait for the authorities to demand it.
United States
Land development in the US runs through local zoning boards, and rules shift dramatically from one county to the next. Stormwater management is taken seriously most municipalities require a detention or retention plan before a permit is issued, and floodplain maps (via FEMA) often dictate what you can build and where.
Canada
Canadian development leans heavily on provincial and municipal planning acts. Ontario and BC, for instance, require a formal site plan approval process for anything beyond a single-family home, and stormwater runoff calculations are almost always mandatory given the country’s snowmelt and heavy rainfall patterns.
United Kingdom
In the UK, “planning permission” is the phrase you’ll hear constantly nothing significant gets built without it. Local planning authorities assess proposals against local development plans, and drainage strategies (SuDS Sustainable Drainage Systems) are now a standard requirement for most new developments.
Australia
Australian land development is governed by state-based planning schemes, with councils handling development applications (DAs). Bushfire risk assessments and stormwater management plans are common prerequisites, especially in states like New South Wales and Queensland where flooding and fire risk both shape approvals.
Switzerland
Swiss development is famously precise and slow-moving by design. Cantonal and municipal zoning laws are strict, public consultation is common for larger projects, and building setbacks are enforced with little flexibility a reflection of how tightly land use is controlled nationwide.
Germany
Germany’s Bebauungsplan (binding land-use plan) sets out exactly what can be built on a given parcel, down to roof pitch in some municipalities. Environmental impact assessments are taken seriously, and stormwater infiltration systems are frequently required rather than optional.
Norway
Norwegian municipalities issue detailed reguleringsplan (zoning plans) that developers must follow closely. Given the terrain and climate, drainage and snow-load considerations feature heavily in site planning approval, alongside strict environmental review for anything near protected coastline or forest.
New Zealand
New Zealand’s Resource Management Act underpins most development decisions, with councils issuing resource consents. Earthquake risk and stormwater management are both central to site assessment the country’s seismic activity means geotechnical reports are almost always part of the approval package.
Netherlands
Dutch development is inseparable from water management it’s a country largely built below sea level. Stormwater and flood control aren’t an afterthought here; they’re often the starting point of any site plan, with water boards (waterschappen) holding real authority alongside municipal planners.
Sweden
Sweden’s detaljplan system functions much like Germany’s binding plans, laying out exactly what a parcel can be used for. Environmental sustainability is woven into approvals, and stormwater systems increasingly favor green infrastructure retention ponds and permeable surfaces — over traditional piping.
Denmark
Danish municipalities issue lokalplan documents that govern local development in fine detail. Denmark has been a pioneer in sustainable urban drainage, and many new developments are required to demonstrate climate-adaptive stormwater handling as part of the approval process.
Ireland
In Ireland, planning permission is granted by local authorities under the Planning and Development Act, and public objection periods are a routine part of the process. Surface water drainage plans are typically required, particularly given how often heavy rainfall features in Irish weather.
Luxembourg
Luxembourg’s compact size means land is tightly regulated through communal development plans (PAG/PAP). Approvals move through municipal councils, and given limited land availability, subdivision and density rules are applied strictly to preserve both agricultural and green space.
Austria
Austrian development follows provincial building codes layered under federal planning principles. Alpine regions add extra requirements around slope stability and drainage, since runoff from mountainous terrain can quickly become a flooding or erosion issue if not properly planned for.
Singapore
Singapore runs one of the most centralized planning systems in the world through the Urban Redevelopment Authority (URA). Every development must align with the Master Plan, and given the country’s limited land and heavy rainfall, stormwater and drainage infrastructure is engineered to exacting national standards.
Belgium
Belgium splits planning authority across its regions Flanders, Wallonia, and Brussels each have their own rules. A stedenbouwkundige vergunning (urban planning permit) is generally required for new builds, and regional environmental codes increasingly push for on-site rainwater retention.
France
French development requires a permis de construire (building permit) issued by the local commune, guided by the Plan Local d’Urbanisme. Setbacks, height limits, and architectural harmony with surrounding buildings are taken seriously, particularly in historic or protected zones.
United Arab Emirates
In the UAE, development authorities like Dubai Municipality or Abu Dhabi’s DMT set strict master-planning requirements, often tied to large-scale free zone or estate developments. Given the desert climate, stormwater systems focus less on volume and more on flash-flood management during rare but intense rain events.
Finland
Finnish municipalities issue asemakaava (detailed zoning plans) that dictate land use down to plot level. Cold-climate drainage design accounting for frost heave and snowmelt is a standard part of site engineering, alongside strong environmental review for forested or lakeside parcels.
South Africa
South African development follows the Spatial Planning and Land Use Management Act (SPLUMA), with municipalities handling rezoning and subdivision approvals. Stormwater management has become a growing focus in urban areas prone to flash flooding, especially in fast-growing cities like Johannesburg and Cape Town.
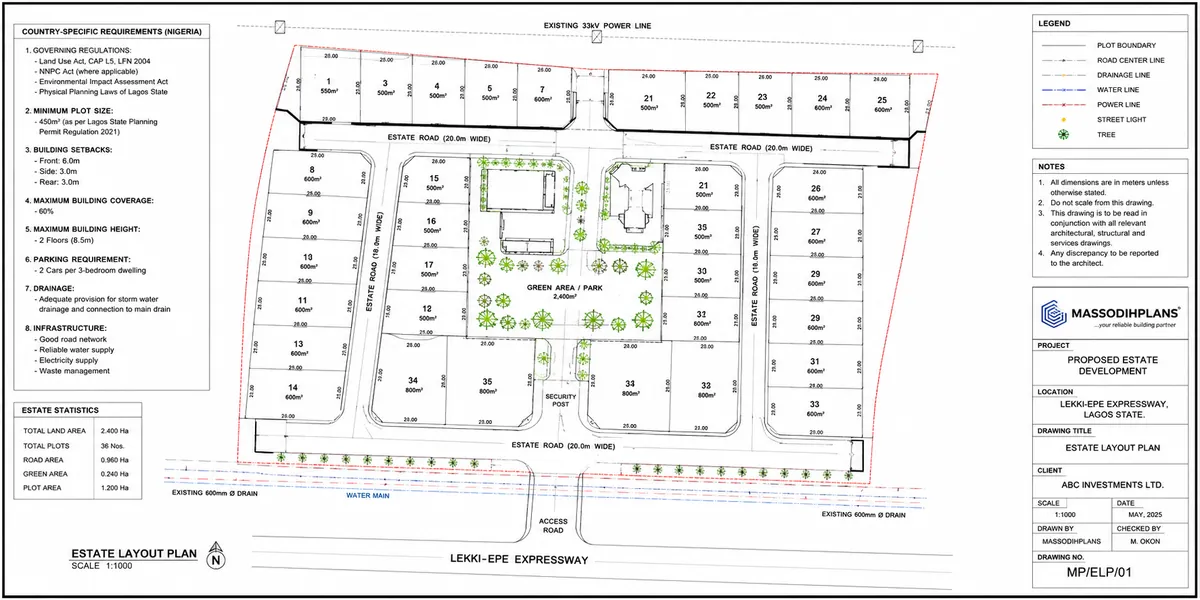
Estate Master Plan and Requirements by Country
What ties all twenty of these together and Nigeria, which we’ve woven through this entire guide is that no two planning systems are identical, but the underlying discipline is universal. Whether you’re navigating a UK local authority, a Dutch water board, or Nigeria’s state planning offices, the developer who invests early in site analysis, drainage, and proper approvals is always the one who avoids the expensive surprises down the line. Wherever your land sits, the same rule holds: understand it fully before you build on it. U.S. EPA — Green Infrastructure Planning, Design and Implementation.
Plan Your Estate Development With Confidence
Planning a successful real estate development requires more than dividing land into plots. From site layout and road networks to drainage, stormwater management, infrastructure, building setbacks, open spaces, and construction requirements, every element must work together to create a safe, functional, attractive, and sustainable development.
At MassodihPlans, we provide practical planning, architectural, landscape, GIS, mapping, and site-development solutions tailored to real-world projects. Whether you are developing a residential estate, planning a subdivision, preparing a site layout, or need professional guidance before construction begins, our team can help you turn your development concept into a clear and workable plan.
Ready to move from an idea to a properly planned development? Contact MassodihPlans today to discuss your project requirements and discover the professional planning and design services available for your estate or land development project.