AutoCAD House Plan Tutorial for Beginners: Learn to Draw Plans Step by Step
If you have ever opened AutoCAD, stared at that empty grid, and felt your chest tighten a little you are not alone, and you are not behind. In this guide, I am going to take you through exactly how to draw a simple, realistic house plan in AutoCAD, from your very first line to a finished layout you could actually hand to a builder. No jargon dump. No “watch this 3-hour video and figure it out yourself.” Just the steps, in order, the way I would explain it to a student sitting beside me.
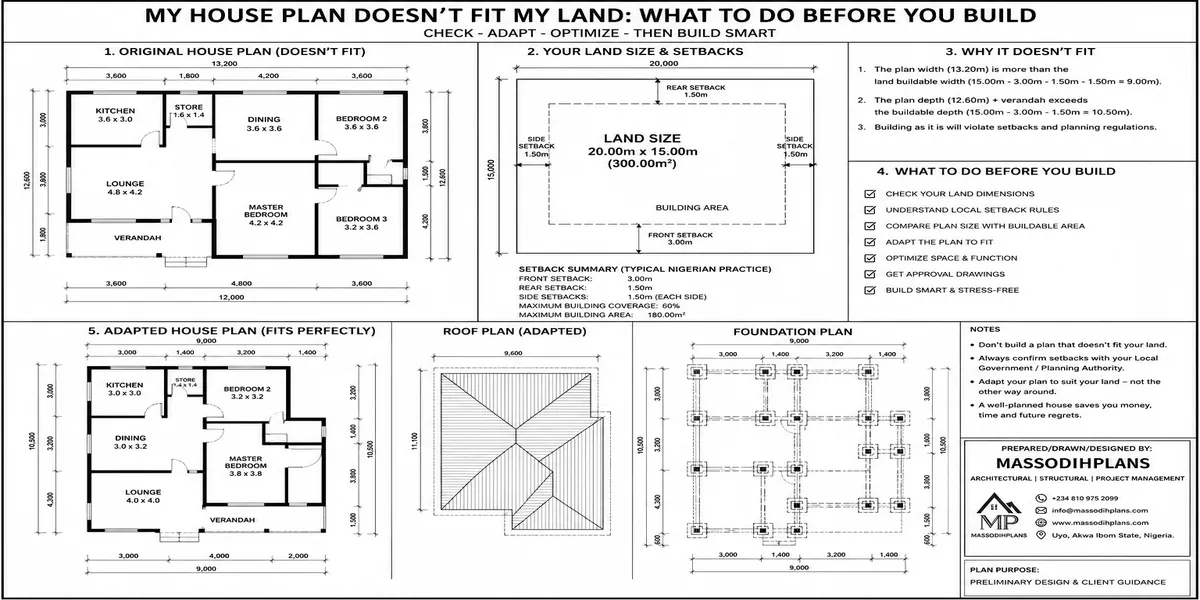
Before we go further, let’s deal with something a lot of beginners quietly worry about: small or narrow plots. Land is getting tighter almost everywhere cities are growing, plots are shrinking, and a lot of people assume a small or awkward plot means a poor house. That is not true, and by the end of this article you will understand exactly how to draw a plan that fits a tight plot without feeling cramped.
Quick Answer: To draw a house plan in AutoCAD as a beginner, you set your drawing units and scale first, draw your plot boundary and setbacks, lay out your walls using the LINE and OFFSET tools, place your rooms based on function and traffic flow, add doors and windows, then dimension and annotate the drawing. We will break down every one of these steps below.
Why AutoCAD Is Still Worth Learning (Even With All the Newer Tools Out There)
In my experience, people often ask why they should bother with AutoCAD when there are “easier” apps available. Here is the honest answer: AutoCAD gives you precision that most simplified apps cannot match. When a builder is standing on site with a tape measure, they need dimensions that are accurate to the centimeter, not an approximate sketch. Based on projects I have worked on, a plan drawn carelessly in an “easy” app has caused far more site confusion than a properly dimensioned AutoCAD drawing ever has.
This is not just theory. I have seen it happen: a contractor builds a wall 300mm off because a plan wasn’t dimensioned properly, and that single error cascades into a bathroom that won’t fit its fittings, or a corridor that feels too tight to walk through comfortably.
Step 1: Set Up Your Drawing Correctly Before You Draw Anything
This step is the one beginners skip, and it is the one that causes the most pain later.
- Set your units to millimeters. Type UNITS in the command line, choose millimeters, and set precision to 0 decimal places for architectural work.
- Draw at real-world scale (1:1). Never draw a wall as “10 units long” hoping it represents 10 meters. Draw everything at its true size — a 4-meter wall is drawn as 4000mm. Scaling happens only when you print, not when you draw.
- Create layers before you draw a single line. At minimum, create separate layers for Walls, Doors, Windows, Furniture, Dimensions, and Text. From what I have seen in practice, mixing everything on one layer is the number one reason beginner drawings become unreadable and impossible to edit later.
Common Beginner Mistake: Drawing without setting units first, then wondering why a “wall” that looks 10cm thick on screen is actually 10 meters thick. Always confirm your units before your first line.
Step 2: Draw Your Plot Boundary and Setbacks First
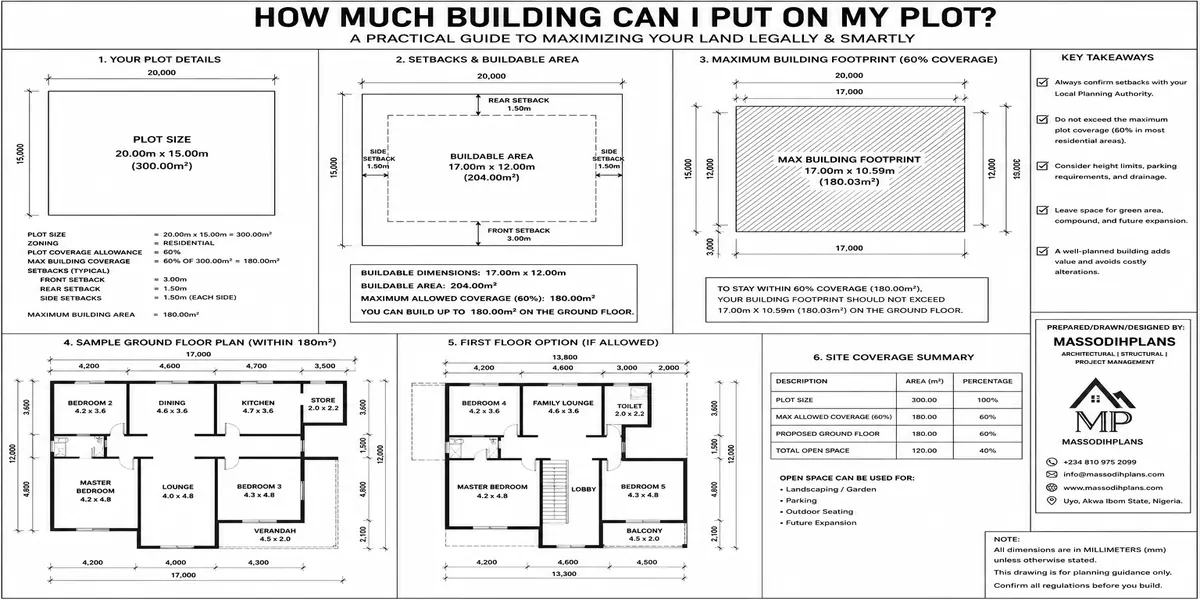
Many beginners jump straight into drawing rooms. That is backwards. The first thing you draw is your actual plot boundary, using the real dimensions of the land. Then you draw your setback lines — the required distance the building must sit back from the plot edges.
One challenge I repeatedly encountered with new designers is this: they design a beautiful house first, then try to force it onto the plot afterward. It almost never fits cleanly. Always draw the boundary and setbacks first; let the plot shape guide your layout, not the other way around.
How to Draw the Plot Boundary in AutoCAD:
- Use the RECTANGLE or PLINE command to trace the exact plot dimensions.
- Use OFFSET to bring the setback lines inward from each boundary edge based on your local building requirements.
- Lock this boundary layer once it’s drawn, so you don’t accidentally move it while designing rooms.
Step 3: Understanding Small Plot Optimization (This Is Where Most Guides Fail You)
If you are designing for a small or narrow plot, this section matters more than any other part of this article.
How Space Is Actually Maximized on a Tight Plot
From what I have seen in practice, the difference between a cramped small-plot house and a comfortable one usually comes down to four things:
- Circulation efficiency: Corridors should only exist where absolutely necessary. Every meter of hallway is a meter you are not using for living space. Aim to let one hallway serve multiple rooms instead of building separate access routes.
- Multifunctional spaces: A dining area that flows directly into a living area (rather than being walled off) feels larger and works harder for the square meters it occupies.
- Compact luxury concepts: A smaller home does not mean a lesser home. Vertical space (higher ceilings in key rooms), good natural light, and quality finishes can make a modest footprint feel premium.
- Narrow plot strategy: On long, narrow plots, arrange rooms in a linear sequence along one side, leaving a continuous strip for light and air on the other side, rather than placing rooms on both sides with a dark corridor between them.
Expert Note: I have worked with clients who assumed their plot was “too small” for the house they wanted. In most of those cases, the plot was fine the layout was the problem. Before assuming you need more land, look hard at your circulation and room adjacencies first.
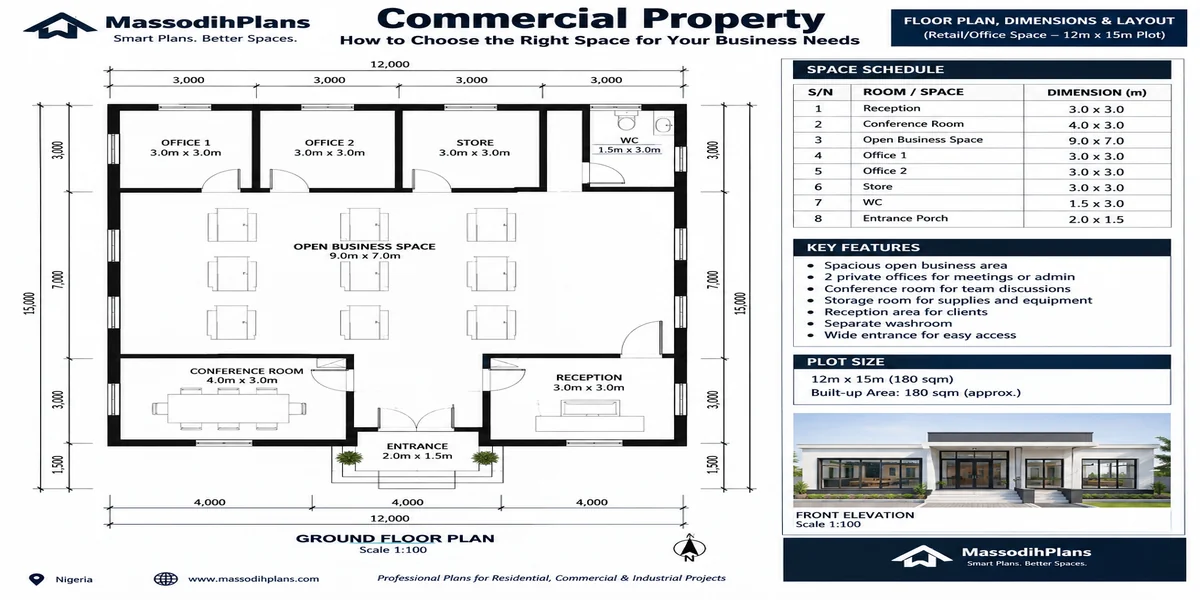
Step 4: Lay Out Your Rooms Based on Function and Movement
Now that your boundary and setbacks are set, start placing rooms. In one housing layout project, I remember spending far more time on this single step than on the actual drawing because room placement decides whether a house feels good to live in or not.
A Practical Room Arrangement Approach:
- Public zone first: Living room, dining area, and guest spaces near the entrance, so visitors don’t have to walk through private areas of the home.
- Private zone next: Bedrooms grouped together, ideally furthest from the entrance and street noise.
- Service zone: Kitchen, utility, and storage placed with easy access to the rear or side of the plot, close enough to the dining area for practical movement but separated enough to contain cooking smells and noise.
Family Lifestyle Considerations
During a design review I once handled, a client wanted the children’s rooms right beside the main entrance “for convenience.” I advised against it children’s movement is unpredictable, and rooms near the entrance get more noise and less privacy. From a planning perspective, I strongly recommend keeping children’s spaces slightly buffered, with easy sightlines from the living area, but not directly on the main traffic path.
If elderly family members will live in the home, place at least one bedroom on the ground floor near a bathroom with minimal steps. If you were advising a client today, this is the kind of detail that gets overlooked until it becomes a daily frustration.
Step 5: Draw Walls Using LINE and OFFSET
- Draw your outer wall lines using LINE, following your room layout sketch.
- Use OFFSET to create wall thickness typically 225mm for external load-bearing walls and 150mm for internal partitions, though this varies by structural design.
- Use TRIM and FILLET to clean up wall corners and junctions so they meet cleanly.
- Use MULTILINE (MLINE) as a faster alternative once you’re comfortable, since it draws both wall faces in a single action.
Common Beginner Mistake: Forgetting to trim wall intersections properly, leaving overlapping lines that make the drawing look messy and cause errors later when calculating wall areas or exporting for structural review.
Step 6: Add Doors, Windows, and Ventilation Openings
This is where a plan either “breathes” or feels stuffy on paper before it’s even built.
- Doors: Standard internal doors are typically 900mm wide; main entrance doors are often 1000–1200mm. Draw the door swing arc so you can immediately see if two doors will collide when opened.
- Windows: Place windows on at least two different walls per room wherever possible, to allow cross-ventilation rather than a single-direction airflow. During my training, I learned that cross-ventilation is one of the most under-appreciated design principles it affects comfort every single day the house is occupied, far more than most finishes people spend money on.
- Kitchen and bathroom ventilation: These rooms need dedicated openings or mechanical extraction; never rely on a single small window for a wet area.
Step 7: Staircase Planning (For Multi-Level Homes)
If you’re designing anything beyond a single story, the staircase deserves its own careful attention it is one of the most common places I have seen beginner drawings go wrong.
- A comfortable staircase typically needs a minimum of 1000mm width for a single flight in a family home.
- Standard rise is around 150–175mm and standard going (tread depth) around 250–300mm get this wrong and the staircase becomes exhausting or unsafe to use daily.
- Always check headroom clearance above the stair run; a beautiful stair on paper that clips a beam overhead is a mistake I have seen built before it was caught.
- Position the staircase early in your layout process, not as an afterthought it affects the room layout on every floor it touches.
Step 8: Dimension and Annotate Your Drawing
An undimensioned plan is not a usable plan it’s a sketch.
- Use the DIMLINEAR and DIMALIGNED commands to add dimensions to every wall, room, door, and window.
- Label every room clearly (Living Room, Kitchen, Bedroom 1, etc.) using the TEXT or MTEXT command on your dedicated text layer.
- Add a north arrow and orientation marker this single detail affects how much natural light and heat each room will receive throughout the day.
Orientation and Climate: The Layer Most Beginners Ignore Completely
The reality on the ground is often different from what a textbook diagram shows. Orientation is not just an academic exercise it directly affects how hot or comfortable a home feels every single day, and how much you’ll spend on cooling or lighting over the life of the building.
- In hot climates, avoid placing large unshaded windows on the side of the house that receives the most direct afternoon sun, unless you’re incorporating shading devices like overhangs or louvres.
- Position the kitchen and other heat-generating spaces away from bedrooms where possible, so cooking heat doesn’t affect sleeping comfort.
- Roof overhangs are not decorative extras they genuinely reduce heat gain and protect walls from driving rain. Having seen the consequences of skipping this detail, I always recommend a minimum overhang, even on tight budgets.
Roofing, Drainage, and Site Realities
A plan that looks perfect on screen can still fail on site if these are ignore:
- Roof type: Match your roof form to your local climate and rainfall intensity. Steeper pitches shed heavy rain faster; flatter roofs need more careful waterproofing and drainage detailing.
- Drainage: Always plan how rainwater will move away from the building footprint before finalizing ground floor levels. I have encountered this situation multiple times a beautifully drawn plan that floods at the entrance because drainage was an afterthought.
- Compound and utility space: Even on a small plot, try to reserve a corner for practical needs utility storage, water tank or backup power equipment space, and secure parking or storage near the entrance without blocking pedestrian flow.
Cost Estimate Considerations at the Drawing Stage
You cannot get an exact cost from a drawing alone, but your drawing decisions directly influence your final budget. Based on projects I have worked on, three drawing-stage decisions affect cost more than anything else:
- Footprint complexity: A simple rectangular or L-shaped footprint is significantly cheaper to build than a highly irregular shape with many corners and angles.
- Roof complexity: Every additional roof valley, hip, or change in roof plane adds material waste and labor time.
- Wet area clustering: Grouping your kitchen and bathrooms close together (even stacked vertically in multi-story designs) reduces plumbing runs significantly compared to scattering them across the plan.
This is one of the most common misconceptions I encounter: people believe cost is decided at construction stage. In reality, a huge portion of your final cost is already locked in by the decisions made in the drawing.
Common Mistakes Beginners Make in AutoCAD House Planning
- Drawing without confirming units and scale first
- Skipping the plot boundary and setback step
- Designing rooms before understanding traffic flow
- Ignoring cross-ventilation and orientation
- Under-sizing staircases and corridors
- Forgetting to dimension the drawing before sharing it
- Treating a small plot as a limitation instead of a design challenge to solve
Investment and Long-Term Value Considerations
If you are drawing this plan with resale, rental, or long-term family growth in mind, a few small decisions now pay off later:
- A layout with a clearly separable guest or rental unit adds flexibility and rental income potential later, even if you don’t need it immediately.
- Homes designed with clear zoning (public, private, service) tend to hold resale value better than awkward, undefined layouts.
- Leaving room in the plan for a future extension even just structurally, without building it now protects your options as your family grows.
Frequently Asked Questions
Do I need expensive software to start learning AutoCAD?
No. A student or trial license is enough to learn and practice everything covered in this tutorial before committing to a full license.
Can I design a full house plan with no prior drafting experience?
Yes, if you follow the sequence in this article units, boundary, layout, walls, openings, dimensions in that order. Trying to skip steps is what causes most beginners to feel stuck.
What is the biggest mistake beginners make?
Designing rooms before setting units, plot boundary, and setbacks correctly. It almost always forces a redesign later.
How do I know if my small plot can fit the house I want?
Look at circulation efficiency and room zoning before assuming you need a bigger plot see the small plot optimization section above.
Finally
I did not learn any of this from a textbook alone both classroom learning and real project experience support everything in this article. A house plan is not just lines on a screen; it is the difference between a home that works for a family every single day and one that quietly frustrates them for years. Take these steps one at a time, practice on a real plot size you actually have in mind, and don’t rush past the boundary and setback stage it decides everything that follows.
If you’d like to see these principles applied to real, ready-made designs, browse our plans library for layouts across different plot sizes, or explore our plan school section for more step-by-step design lessons like this one. If you’re working on your own project and want a second pair of expert eyes on it, our design services are there for exactly that. And if this is your first time here, start from our homepage to see everything we offer.
Read related articles to get full understanding of the lesson
- How Do You Design a Functional Mosque Building Plan Step by Step?
- How to Draw a Roofing Plan Step by Step (Manually and in AutoCAD): Complete Guide with Practical Examples
- How to Draw a Building Plan Section A-A, B-B: Step by Step Complete Beginner’s Guide
- How to Draw Building Elevations Step by Step (Manually and in AutoCAD): Complete Guide for Beginners
- How Is a Modern Court Building Designed for Safety and Efficiency? (Complete Guide)
- Nigerian Building Approval Checklist for Overseas Property Owners
- Survey Plan vs Deed of Assignment in Nigeria: The Complete Difference Explained
- Lost Survey Beacon in Nigeria: What to Do, Replacement Cost, and Legal Process
- Town Planning Services: Plans, Permits and Land Development
- How to Draw a Floor Plan Step by Step: A Complete Beginner’s Guide
- 7 Small Plot Design Mistakes Nigerians Make (And How to Fix Them)