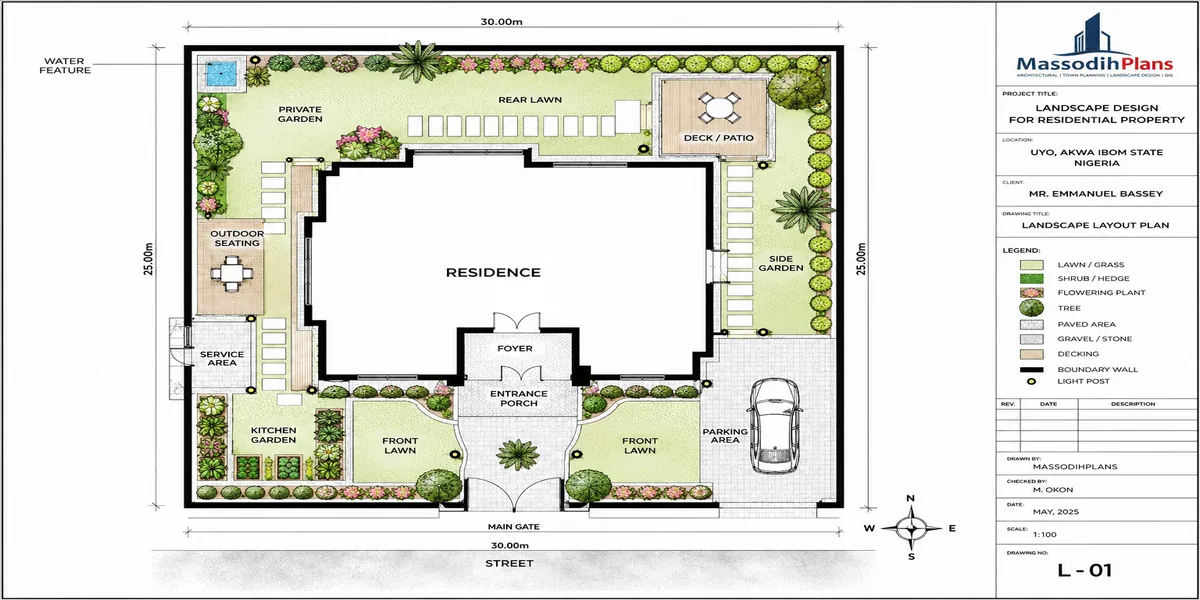
Landscaping to Design Ideas, Gardens, Yards and Outdoor Spaces
Let me tell you something I’ve learned after more than fifteen years of walking building sites across different state in Nigeria especially in Uyo, Akwa Ibom and Rivers States: the house is only half the story. I’ve watched clients pour everything into the walls, the roof, the tiles and then treat the compound as an afterthought. By the time the builders pack up, there’s no budget left, no plan, and the yard just becomes wherever the leftover sand and blocks get dumped. If you’ve ever felt that way about your own space, this guide is for you. We’re going to walk through landscaping the way I’d explain it to a student on site, one section at a time, so by the end you actually understand what you’re doing and why.
Landscaping
So, what is landscaping, really? At its simplest, landscaping is the deliberate shaping of outdoor space the ground, plants, structures, and pathways around a building so that it works for the people who use it and looks good doing it. It’s not just “planting flowers.” It’s function first, beauty second, and the two should never fight each other.
In my experience, landscaping does three jobs at once. First, it manages the land itself drainage, erosion control, soil grading. This matters a lot here in the South-South, where heavy rainfall can turn a beautiful compound into a swamp if the grading is wrong. I’ve seen expensive paved driveways crack and shift within two rainy seasons simply because nobody thought about water flow before laying them. Second, landscaping organizes movement how people walk from the gate to the door, where cars park, where children play. Third, it creates atmosphere shade, privacy, color, the feeling you get when you step outside your own house.
Mistakes in landscaping
Here’s the mistake I see most often: people separate “the house” from “the landscaping” in their minds, as if the compound is a decoration you add later. But good landscaping actually starts on the drawing board, alongside your building plan, not after the roof goes up. If you’re still in the planning stage of your project, this is the point where you should be thinking about it not six months after you’ve moved in and the cost of correcting soil levels has doubled.
Landscaping also isn’t one-size-fits-all across climate zones. What works in a dry, sandy compound in the North is different from what works in a humid, clay-heavy plot near the coast. Plant selection, paving material, and drainage design all shift depending on rainfall pattern, soil type, and sun exposure. This is one reason I always tell clients: don’t copy a landscaping photo from Pinterest and hand it to your gardener without adapting it to your actual site conditions. What looks stunning in a temperate country can rot, flood, or die within a year in our climate if it’s transplanted without adjustment.
What I am saying is that, before you plant a single tree, get your soil and drainage assessed. A one-time site evaluation early on saves you from expensive erosion repairs later this is something we help clients with through our Services.
The good news? Landscaping doesn’t have to be expensive to be effective. Some of the most beautiful compounds I’ve worked on used simple, locally available materials laterite paths, indigenous shrubs, hand-laid stone edging combined thoughtfully. It’s not about how much money you throw at it. It’s about intention. And that intention is exactly what we’ll build on as we move into landscaping design, where we start turning these principles into an actual plan.
Landscaping Design
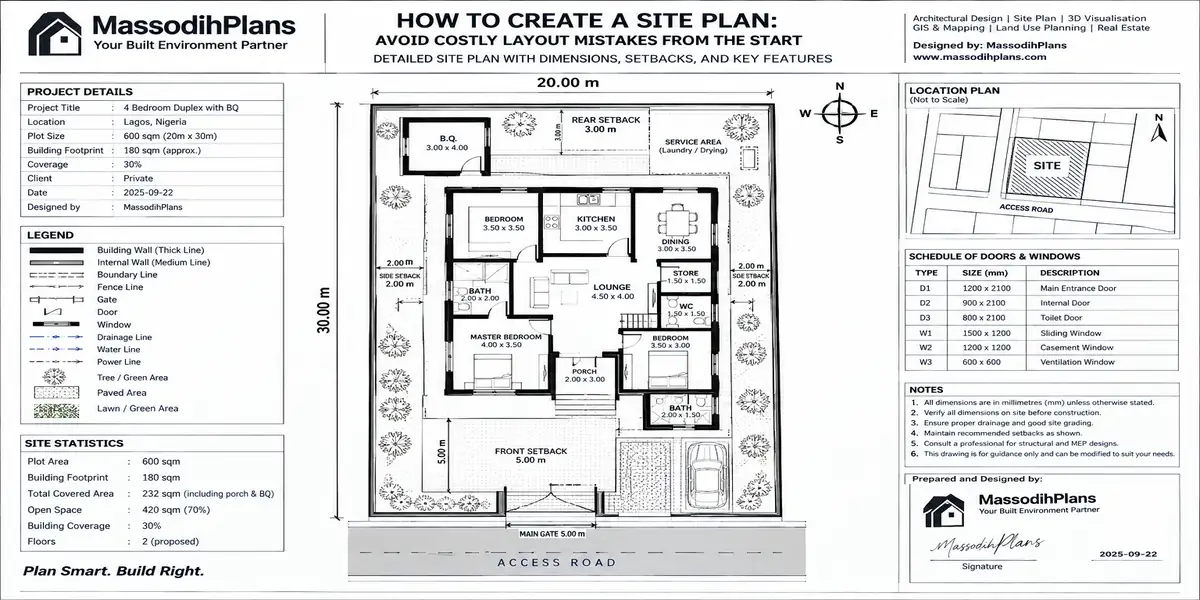
Now that you understand what landscaping is, let’s talk about landscaping design the process of turning that raw compound into an intentional, mapped-out space. Think of it this way: landscaping is the “what,” landscaping design is the “how.” It’s the stage where you sit down (ideally with a professional, but even a simple sketch on paper helps) and decide what goes where, and why.
When I sit with a client at this stage, I usually start with a base sketch of the plot boundaries, existing structures, entry points, sun direction. From there, we zone the compound. Zoning simply means dividing your outdoor space into purpose areas: a welcoming zone near the entrance, a service zone for parking or a generator house, a private zone for family relaxation, maybe a utility zone for laundry lines or a small kitchen garden. This sounds basic, but you’d be surprised how many compounds I’ve inspected where the septic tank access point is right under where the client wanted to plant a shade tree. Design catches these conflicts before they cost you money.
What Make a Good landscaping design
A good landscaping design also respects circulation the paths people and vehicles naturally take. I always tell my students: watch how people actually move before you decide where the walkway goes. If your gate is on the east side and your door faces west, don’t force a path that ignores the shortest natural route; people will just create their own footpath through your lawn anyway, and no amount of “please use the pavement” signage will stop them.
Scale and proportion matter too. A common error is planting large trees too close to the building beautiful now, but in ten years those roots are lifting your foundation or blocking your window light. Landscaping design thinks ahead. When I’m laying out a design, I’m not just picturing how the compound looks the week the sod is laid; I’m picturing it five, ten years down the line, when the trees have matured and the hedges have filled in.
Field Note
Always design for mature plant size, not nursery size. That small ornamental palm might be waist-high today, but check its full-grown spread before you plant it two feet from your perimeter wall.
Materials selection also belongs here pathway surfaces (interlocking pavers, natural stone, gravel), boundary treatments (hedges vs. fencing vs. low walls), and lighting placement. Each choice should serve the zoning decisions you already made, not fight against them. If you’re new to this process and want a structured way to learn how professionals actually build these plans step by step, our Plan School walks through it in more depth.
One more thing before we move forward: landscaping design is not a one-and-done event. Good design leaves room for the compound to evolve a spot for a future gazebo, room to expand a vegetable patch, flexibility as your family grows. Rigid, over-planned compounds tend to feel stiff after a few years. The best designs I’ve done always had a little breathing room built in.
With your zones mapped and your circulation understood, you’re ready for the next layer the technical backbone that makes all of this actually function on the ground: landscape design proper, where grading, drainage, and planting engineering come together.
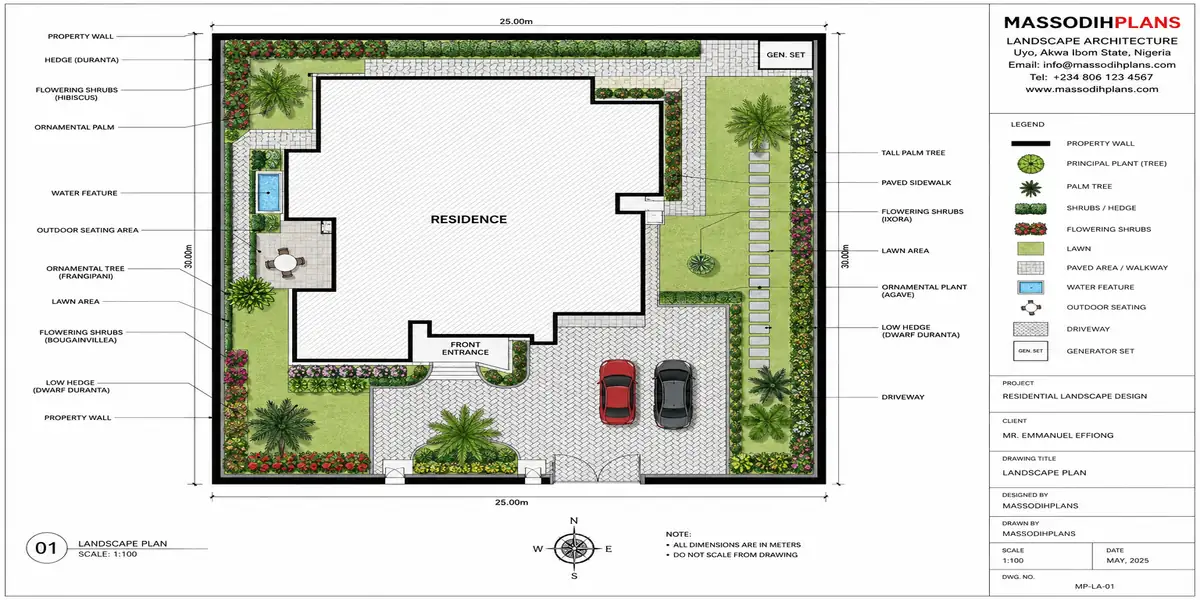
Landscaping Design Plans
Landscape Design
I know “landscape design” and “landscaping design” sound almost identical, and honestly, in casual conversation, people use them interchangeably. But if you want to think like a professional, it helps to separate them. Landscaping design (which we just covered) is about the layout and the creative arrangement of spaces. Landscape design goes a level deeper it’s the technical engineering that makes that layout physically work: grading, drainage, soil preparation, and the horticultural science of what actually survives and thrives where you’ve planted it.
Let’s start with grading, because this is where I’ve seen the most costly mistakes on Nigerian sites. Grading is simply shaping the ground so water flows away from your building, not toward it. I cannot stress this enough: your compound should have a gentle slope directing rainwater away from the foundation and toward a proper drainage channel or soak-away, never pooling near the walls. I’ve been called to inspect flooded compounds where the landscaper (not a trained one, unfortunately) graded the soil flat, or worse, sloped it toward the house because “it looked neater.” Within one rainy season, that mistake shows up as cracked plaster and a damp foundation.
Drainage design pairs directly with grading. In high-rainfall zones like ours, you need channels, French drains, or simple graded swales that carry excess water to a designated exit point a public drain, a soak pit, or a rain garden. A rain garden, by the way, is a fantastic, underused idea here: a shallow, planted depression that collects runoff and lets it soak in slowly, instead of just dumping stormwater onto your neighbor’s plot (which, trust me, causes disputes).
Design Insight
A 2% slope (about 1 inch of drop per 4 feet) away from your foundation is generally enough to keep water moving without eroding your topsoil. Steeper slopes need retaining structures or terracing.
Soil preparation is the next technical layer. Not all soil on your plot is equal construction often compacts or strips topsoil, leaving poor growing conditions behind. Before serious planting begins, the soil often needs amending: organic matter worked in, compacted zones aerated, and in some cases, topsoil brought in entirely. Skipping this step is why some newly landscaped compounds look lush for the first two months and then start dying back the plants simply ran out of nutrients in exhausted or compacted soil.
Then comes plant engineering matching root systems, mature canopy size, and water needs to your specific microclimate zones (shaded areas, full-sun areas, low-lying wet spots). This is genuinely where a background in environmental design and geography the kind of training I went through at the University of Uyo becomes practical rather than theoretical. It’s the difference between plants that survive and plants that genuinely flourish.
Get the landscape design fundamentals right, and everything you build on top the pretty ideas, the creative flourishes will actually last. Get them wrong, and no amount of styling saves a compound from erosion, standing water, or dying plants within a year or two. Now that the technical groundwork is solid, let’s have some fun and get into landscaping ideas the part everyone actually screenshots for inspiration.
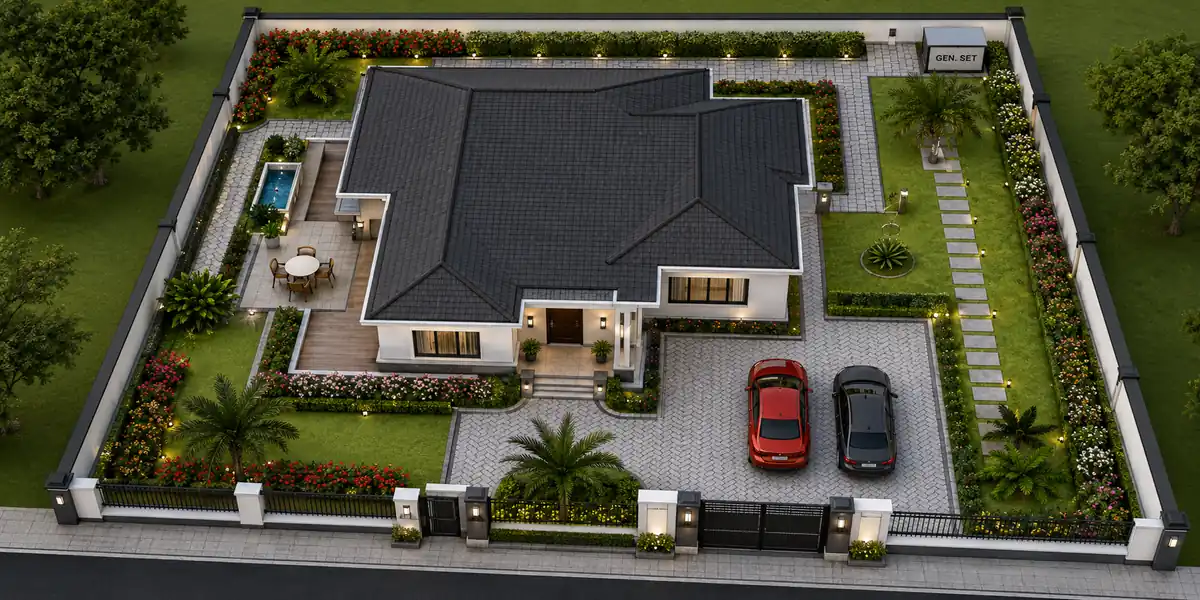
Landscape model plans
Landscaping Ideas
Alright, this is the section I know you’ve been waiting for the creative part. Once your grading, drainage, and soil work is sorted, this is where landscaping actually becomes enjoyable. Let me walk you through ideas I’ve genuinely used or recommended on real sites, not just stock inspiration photos that don’t survive contact with reality.
Layered planting beds
Instead of a single row of identical shrubs along your wall (which, honestly, is what most compounds default to), try layering taller shrubs or small trees at the back, mid-height flowering plants in the middle, and low ground cover or seasonal flowers at the front. This creates depth and looks intentional rather than decorative-as-an-afterthought.
Interlocking paver pathways with planted joints
Rather than solid concrete everywhere (which increases runoff and heat), interlocking pavers with small planted gaps allow water to seep through while still giving you a clean, walkable surface. It’s practical and it photographs beautifully.
A shaded seating corner
Every compound benefits from one deliberate “sit and breathe” spot under a pergola, beneath a mature tree, or beside a small water feature. This doesn’t need to be large. Even a 3×3 meter corner with two chairs, a small table, and some potted plants transforms how a family actually uses their outdoor space.
Try This
A simple pergola with a climbing plant like bougainvillea gives you shade within a year or two, without the decades-long wait for a full tree canopy.
Kitchen garden integration
I’m a big advocate for combining ornamental landscaping with functional planting a corner dedicated to scent leaf, pepper, ugu, or pawpaw doesn’t need to look messy if it’s bordered neatly and treated as part of the overall design rather than hidden behind the house.
Boundary softening
Bare concrete fences dominate too many compounds. A row of climbing plants, or a mixed hedge planted just inside the perimeter wall, softens the harshness without compromising security.
Lighting as design, not just utility
Solar-powered path lights, uplighting on a feature tree, or simple lantern-style fixtures near the entrance completely change how a compound feels at night, and they’re increasingly affordable.
Water features, used sparingly
A small fountain or reflective pool near an entrance adds calm and sophistication, but only if your drainage and mosquito-control plan accounts for it standing water in our climate needs active management.
Native and indigenous plant use
Don’t underestimate indigenous species. They’re adapted to our rainfall and soil, need less maintenance, and often have cultural or medicinal value your family will appreciate. Foreign ornamental plants can look impressive in photos but often demand more water, more care, and more replacement over time.
The common thread in every idea that actually works long-term: it respects the technical groundwork we discussed earlier, and it reflects how the household genuinely lives. Now, let’s get specific and apply these ideas intentionally starting with garden design, the layer that ties planting choices together into a cohesive picture.
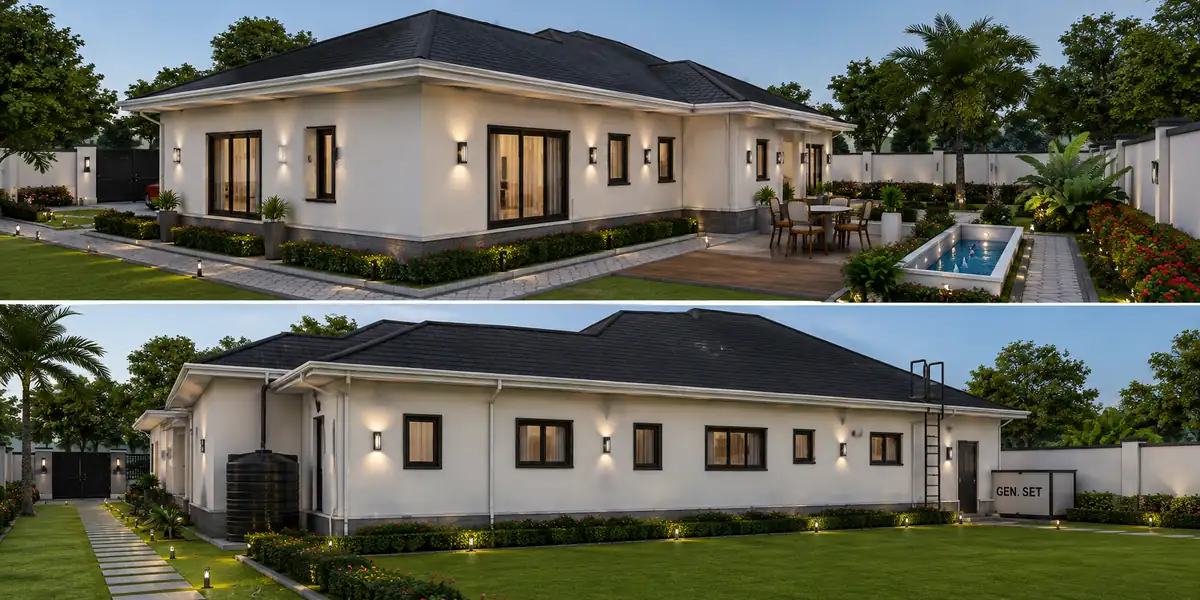
Landscape plans sides view
Garden Design
Garden design is where landscaping ideas stop being a loose collection of “nice things” and become a coherent composition. Think of it like this: if landscaping ideas are individual ingredients, garden design is the recipe that combines them into something that actually works together.
The first principle I teach here is the idea of a focal point. Every well-designed garden space has something that draws the eye first a specimen tree, a sculptural plant, a small structure and everything else is arranged to support and frame that focal point, rather than competing with it. Without a focal point, gardens tend to feel busy and directionless, no matter how many beautiful individual plants are in them.
Next is color theory, simplified for practical use. You don’t need to be an artist, but understanding a basic palette helps enormously. I usually recommend picking two or three dominant colors (plus green, which is always there) and repeating them throughout the garden in different plant forms. A garden with fifteen different flower colors scattered randomly reads as chaotic; a garden with a disciplined palette say, purple, white, and deep green reads as elegant, even with far fewer plant species.
Texture matters as much as color. Combining broad-leafed plants with fine, feathery foliage creates visual interest even when nothing is in bloom. This is especially important in our climate, where flowering seasons can be shorter than you’d like a garden that relies purely on flower color for interest looks bare for stretches of the year, while one built on varied textures and forms stays interesting year-round.
Design Rule of Thumb
Group plants in odd numbers (threes, fives) rather than pairs. Odd groupings read as more natural and less rigid to the human eye a small trick, but it genuinely changes how a bed feels.
Structure and hardscaping tie the garden together edging, low walls, defined bed borders. Without clear edges, even good planting looks like it’s spilling out uncontrolled. A crisp border, even a simple brick or stone edge, instantly makes a garden look intentional and maintained.
Maintenance realism is something I insist on discussing honestly with every client. A garden that looks stunning on installation day but requires daily watering, constant pruning, and specialist care is a garden that will look neglected within six months if your household doesn’t actually have the time for that. Design for the maintenance capacity you actually have, not the one you aspire to. I’d rather give a client a lower-maintenance design that stays beautiful for years than an ambitious one that collapses into weeds by the second dry season.
Finally, garden design should respond to how the family lives do you entertain often? Do you have young children who need open lawn space? Do you work from home and want a view from your window? These practical questions shape the design far more than any Pinterest board will.
With your garden composition principles in hand, let’s bring this down to earth and apply everything specifically to the part of your compound that greets every visitor first front yard landscaping.
Front Yard Landscaping
Your front yard is the handshake of your compound it’s the first impression, and in my experience, it’s also the section clients underinvest in the most, because they’re saving the “real” landscaping budget for the backyard where the family actually relaxes. I understand the instinct, but I’d encourage you to rethink it slightly, because front yard landscaping does real work: it affects property value, security perception, and honestly, your own daily mood every single time you drive or walk through your gate.
Let’s start with the driveway and entrance path, because this is the functional backbone of most front yards here. The path from your gate to your door should be clear, well-defined, and ideally lit at night. I often recommend a slightly curved path rather than a rigid straight line where space allows it slows the eye down and makes even a modest-sized front yard feel more considered. Pair this with low-growing border plants along the edges rather than tall shrubs that obscure sightlines; security matters, and dense tall planting right along a walkway can create hiding spots you don’t want near your entrance.
Symmetry near the entrance creates an immediate sense of order. A matched pair of potted plants flanking your front door, or symmetrical planting beds on either side of your main gate, is a simple, low-cost trick that reads as intentional and welcoming.
Practical Tip
Keep planting height under window level near the front of the house both for natural light and for visibility from inside, which matters for security awareness.
Lawn areas in the front yard should be proportionate not so large that they become a maintenance burden, not so small that the space feels cramped. If your front yard is compact, consider replacing a full lawn with a mix of hardscaping and structured planting beds; it often looks more polished and requires less water and mowing than people expect.
Boundary wall treatment deserves attention too. A bare, unadorned perimeter wall is one of the most common front-yard weaknesses I see. Climbing plants, a mixed hedge just inside the wall line, or even simple planted urns spaced along its length can transform a front yard from “functional” to “designed” without major structural work.
Don’t neglect house numbers, mailbox design, and gate detailing small architectural touches that, combined with good planting, elevate the whole entrance experience. These details are cheap relative to the impact they have.
If security is a priority and for most compounds here, it genuinely is thorny or dense hedge species along vulnerable boundary sections can serve as a natural deterrent while still looking attractive, doubling function with form.
Front yard landscaping sets the tone, but it’s really just the introduction. The real living happens behind the house, so let’s move to the section where families actually spend their time: backyard landscaping.
Backyard Landscaping
If the front yard is the handshake, the backyard is the actual conversation it’s where your family eats together, where children play, where you host friends on a Sunday afternoon, and honestly, where most of your landscaping budget should be thoughtfully directed, because this is the space you’ll use daily.
Start by defining zones within the backyard, the same way we discussed for the whole compound, but at a more intimate scale. A typical well-used backyard has a dining or entertaining zone (patio, table, maybe a grill area), a play or open lawn zone for children or pets, and a quiet retreat zone somewhere to sit alone with a book or a cup of tea. Trying to cram all three into a small space without clear boundaries between them just creates clutter; even simple visual cues like a change in paving material or a low planted divider can separate zones effectively.
Patios and paved seating areas are, in my experience, one of the best investments you can make in a backyard. A well-laid patio interlocking stone, poured concrete with texture, or natural stone extends your living space outdoors and dramatically increases how much use your family gets from the compound. Position it to catch morning or evening shade depending on your orientation; nobody wants to sit outside in full afternoon sun in our climate.
Comfort Tip
Orient your seating area to face away from direct afternoon sun (roughly west-facing exposure) unless you’re planning shade structures like a pergola or mature tree canopy.
Privacy matters more in backyards than front yards, since this is where family life genuinely unfolds. Tall hedging, strategically placed trees, or privacy screens along shared boundary walls with neighbors create the sense of enclosure that makes a backyard feel like a retreat rather than an exposed lot.
Play areas, if you have children, deserve dedicated thought soft ground cover like grass rather than hard paving in the play zone, and enough open space for actual movement rather than an obstacle course of planters and ornaments.
Don’t overlook practical features either: a small clothesline area, generator housing with proper ventilation and sound buffering through landscaping, or a compact vegetable garden. These utilitarian elements don’t have to be ugly thoughtful placement and screening keep them functional without ruining the aesthetic of the space.
Lighting in the backyard extends its usable hours dramatically. String lights over a dining area, path lighting, or simple uplighting on a feature tree turns your backyard into an evening space, not just a daytime one which, in our climate, where evenings are genuinely the most comfortable time to be outside, matters a lot.
With your front and back yards both thoughtfully designed, let’s zoom out one final time and look at the bigger picture how all your outdoor spaces work together as a complete, livable whole.
Outdoor Spaces
We’ve covered a lot of ground literally from the technical foundations of landscape design through to specific front and backyard strategies. Let’s bring it all together now by thinking about outdoor spaces as a whole, unified system rather than a collection of separate projects.
The compounds I consider truly successful are the ones where there’s a visible thread connecting every outdoor area consistent material choices, a coherent color palette, repeated design elements that appear in the front yard, side passages, and backyard alike. If your front yard uses grey interlocking pavers and your backyard suddenly switches to red brick with no relationship between them, the compound feels disjointed, like two different projects stitched together rather than one thoughtful design.
Transitional spaces deserve more attention than people usually give them. The side passage connecting your front and back yards, for instance, is often treated as pure utility bare concrete, forgotten. But even a narrow side passage can be elevated with simple gravel, potted plants along the wall, or better lighting, turning a neglected corridor into a pleasant, usable extension of your outdoor space rather than an eyesore you rush through.
Seasonal and climate resilience should guide your overall outdoor space planning. Given our rainy and dry seasons, think about how each area performs across both. A beautiful dry-season lawn that becomes an unusable swamp for four months of the year isn’t serving your household well. Build drainage and seasonal planning into every outdoor zone from the start, not as an afterthought when the first heavy rains arrive.
Whole-Compound Tip
Walk your entire compound after a heavy rain, before you finalize any landscaping plan. Where the water naturally collects tells you more about your site than any drawing will.
Sustainability is worth building in from day one rainwater harvesting integrated into your landscaping, native plant selection to reduce water demand, permeable paving where possible to reduce runoff. These choices reduce long-term maintenance costs and environmental impact simultaneously, which matters more each year as water and maintenance costs rise.
Finally, remember that outdoor spaces, like the rest of your home, should evolve. Don’t feel pressure to complete every element in year one. A phased approach get the grading and drainage right first, then hardscaping, then planting, then the finishing details is not only more financially manageable but often produces better results, because you learn how your family actually uses the space before committing to every final decision.
If there’s one thing I want you to walk away with from this whole guide, it’s this: good landscaping isn’t about copying a photo from the internet. It’s about understanding your land, respecting your climate, designing intentionally, and building in phases that match how your family actually lives. Get that right, and your outdoor spaces will serve you and grow more beautiful for decades, not just for the first rainy season.
If you’re ready to move from ideas to an actual working plan for your compound, browse our Plans Library for layouts that already integrate landscaping considerations, or reach out through our Services page and let’s walk your specific site together. And if you’re just starting to learn how all of this fits into the bigger picture of home design, head back to our Homepage to explore more guides like this one.
Landscaping Fundamentals: From Site Analysis to Property Value, A Field Guide
In the last guide, we walked through the big-picture ideas front yards, backyards, garden design, the inspiration side of things. But inspiration only gets you so far if the ground underneath it isn’t understood. This time, I want to take you deeper, the way I’d walk a student through an actual site visit, layer by layer, from the first day you step onto raw land to the day, years later, when that landscaping is quietly adding value to your property. Eighteen layers, one continuous thread. Let’s start where every good project starts before you touch a single spade.
Site Analysis
Before I let any client talk to me about plants, colors, or pretty pathways, I insist we do a proper site analysis first. Skipping this step is, honestly, the single biggest reason landscaping projects fail within a few years not bad taste, but bad information.
Site analysis simply means studying your land as it actually is, not as you imagine it to be. I walk the plot at different times of day to observe sun and shadow patterns, note existing vegetation worth keeping, check boundary lines against survey documents, and identify any existing structures, utility lines, or septic access points that future design has to respect. I also pay close attention to views both the views you want to preserve looking outward, and the sightlines from neighboring properties or the street looking in.
Topography comes next. Is the land flat, sloped, or does it have low-lying pockets that collect water? A quick walk after rainfall (if you can time it) tells you more honestly than any conversation with the previous owner. I’ve inspected plots where the client swore “there’s no flooding here,” only for a single rainy afternoon to reveal a natural collection point right where they wanted to build a gazebo.
Soil type gets a preliminary look here too not full lab testing yet, but a visual and tactile check: is it sandy, clayey, loamy? This shapes everything that follows, from drainage design to plant selection.
Practitioner Habit
I always photograph the site from all four corners and from the road before any work begins. Six months later, that “before” record is invaluable for both planning decisions and, honestly, for showing clients how far the project has come.
Access and circulation also matter at this stage how will construction vehicles, workers, and materials move through the site without damaging what you want to preserve? Poor access planning at the analysis stage often means avoidable damage to existing trees or structures during construction.
Finally, I document existing microclimate cues where wind seems to funnel, where the sun lingers longest, where shade pools in the afternoon. These small observations become critical in the next section, because a landscape designed against its microclimate is a landscape that fights you every single season. Speaking of which let’s go there next.
Climate & Microclimate
Climate is the big picture our general rainfall pattern, humidity, and temperature range across the South-South region. Microclimate is the small picture the specific conditions on your exact plot, which can vary surprisingly from what the regional weather report suggests. Understanding both is what separates landscaping that thrives from landscaping that limps along.
At the regional level, we’re working with a tropical monsoon climate: a long, heavy rainy season and a shorter dry season, high humidity year-round, and strong sun intensity. This immediately rules out plant choices and materials that work beautifully in temperate climates but rot, warp, or scorch here. I still see landscaping photos borrowed from foreign sites with plant palettes that simply cannot survive our humidity and rainfall load that mismatch is one of the most common (and expensive) mistakes I encounter.
But within that regional climate, your specific plot has its own microclimate and this is where the real design intelligence happens. A wall on the eastern boundary might create a hot, sun-baked strip in the morning. A cluster of mature trees might create a cool, damp shade pocket that stays wet longer after rain. A gap between two buildings might funnel wind in a way that dries out planting beds faster than expected, or conversely, traps still, humid air that encourages fungal issues.
Field Note
Walk your compound at 7am, 1pm, and 5pm on the same day and note where sun and shade fall each time. That simple exercise reveals more about your microclimate than any general climate chart.
Elevation and airflow matter too. Low-lying pockets stay humid and are prone to mosquito breeding and fungal disease in plants; slightly elevated, breezy spots dry faster and suit different species. Buildings themselves create microclimates reflected heat off a light-colored wall, or a cool shadow zone on the south side that barely sees direct sun.
Designing with your microclimate, rather than against it, means grouping shade-loving plants where shade naturally falls, choosing heat-tolerant species for exposed walls, and positioning seating areas where the airflow is naturally most comfortable rather than forcing comfort through expensive fans or shade structures. It’s free information, if you take the time to observe it.
Once you understand what’s happening above ground sun, wind, rain it’s time to understand what’s happening below it, because nothing you plan on the surface survives long without healthy soil beneath it.
Soil
If there’s one topic I wish more Nigerian homeowners understood before landscaping, it’s soil. Everyone wants to talk about plants and paving, but soil is the actual foundation everything else depends on and construction, unfortunately, is brutal on it.
During building construction, heavy machinery compacts the soil, topsoil often gets stripped and sold off or buried under debris, and what’s left near the finished structure is frequently poor-quality subsoil, full of construction waste, with terrible structure for plant growth. This is why so many newly landscaped compounds look great for two months and then start declining the plants are essentially trying to grow in exhausted, compacted ground.
A proper soil assessment looks at three things: texture (sandy, clay, loam, or a mix), drainage capacity (does water sit or move through it), and fertility (organic matter content, general nutrient health). You don’t always need a formal lab test for a residential compound, though for larger or commercial projects I recommend it. A simple hand test squeeze a moist handful; sandy soil falls apart, clay holds a tight ball, loam holds its shape but crumbles with a nudge tells you a lot.
Simple Test
Dig a hole about 30cm deep, fill it with water, and time how long it takes to drain. Under 4 hours is good drainage; over 8 hours signals a drainage problem you’ll need to address before planting.
Once you know your soil type, amendment becomes straightforward. Sandy soils need organic matter to hold moisture and nutrients longer. Clay-heavy soils need organic matter and sometimes coarse sand to improve drainage and prevent waterlogging. Compacted zones near the building need aerating sometimes literally breaking up the top layers mechanically before any amendment will help.
Topsoil sourcing matters too, especially where original topsoil was stripped during construction. Bringing in quality topsoil, ideally from a reputable local source rather than an unknown supplier, is often a worthwhile investment for planting beds and lawn areas.
Good soil isn’t glamorous, and nobody photographs it for their landscaping inspiration board. But it’s the layer every other decision rests on, which is exactly why we move next into shaping that soil correctly through grading because even perfect soil in the wrong shape will still flood your foundation.
Grading
And Grading is where I’ve personally seen more expensive mistakes than in almost any other part of landscaping mostly because it’s invisible once the grass grows over it, so poor grading gets missed until the rains expose it. Grading, simply, is shaping the land’s surface elevation to control where water goes.
The core principle is straightforward: water must move away from your building, never toward it or pooling against it. A general rule I use is roughly a 2% slope away from the foundation about an inch of drop for every four feet of horizontal distance for at least the first several meters around the structure. This is enough to keep water moving without being so steep it causes erosion on its own.
Where I see grading go wrong most often is at the interface between the building and the compound contractors focus so much on getting the house level and plumb that the surrounding ground gets graded as an afterthought, sometimes even sloping toward the foundation because it was simpler to level that way during construction cleanup. This single error causes damp walls, cracked plaster, and long-term foundation issues that cost far more to fix later than proper grading would have cost upfront.
Warning Sign
If you notice water pooling against any exterior wall more than a few hours after rain stops, that’s a grading problem, not a drainage system problem and it needs correcting at the source, not just patched with a drain.
Beyond the immediate building perimeter, grading also shapes how the rest of your compound functions. Gentle swales shallow, graded channels can direct water toward planting beds that benefit from extra moisture, or toward a designated drainage exit point, turning grading into a design tool rather than just a technical requirement.
On sloped plots, grading gets more complex. Steeper sites often need terracing a series of level platforms held by retaining structures both to control erosion and to create usable flat areas for lawns, patios, or planting beds. Terracing done well also adds visual interest, turning what could be an awkward slope into a series of attractive, functional levels.
Grading should always be finalized before any hardscaping or planting begins reshaping the ground after a patio is laid or trees are established is far more disruptive and costly. Get the grading right, and the next layer formal drainage design becomes much simpler to execute well.
Drainage
Grading handles the broad shaping of your land; drainage handles the specific engineering that captures, channels, and disposes of water in a controlled way. In our climate, with genuinely heavy rainy seasons, drainage isn’t optional it’s one of the most important technical layers of any landscaping project.
There are a few core drainage strategies I use regularly. Surface drains shallow, often concrete-lined channels collect and redirect water across paved or graded areas toward an exit point, usually a public drain or soak-away. French drains, which are gravel-filled trenches with a perforated pipe underneath, handle subsurface water and are especially useful along foundation perimeters or beneath areas prone to waterlogging. Soak-aways essentially pits filled with coarse aggregate that allow water to percolate slowly into the ground are useful where you can’t discharge to a public drain and need on-site absorption.
Rain gardens deserve special mention because they’re underused here despite being genuinely well-suited to our rainfall pattern. A rain garden is a shallow, planted depression positioned to collect roof or surface runoff, allowing it to soak into the ground slowly rather than rushing off as fast runoff which reduces erosion, reduces strain on public drainage systems, and gives you an attractive planted feature at the same time.
Design Insight
Position rain gardens at least 3 meters from your foundation, in a naturally low point of your graded compound, and plant them with species that tolerate both occasional standing water and dry spells.
Roof runoff deserves its own consideration too. Gutters and downspouts should discharge into a controlled drainage path, not simply dump water at the base of the wall where it will undermine your grading efforts. I often connect downspouts directly into a French drain or rainwater harvesting system rather than letting them splash freely onto bare ground.
Permeable paving is another drainage-conscious choice worth considering for driveways and paths materials like interlocking pavers with sand-filled joints, or gravel, allow some water to infiltrate rather than shedding 100% of it as fast runoff, reducing the burden on your formal drainage system.
Whatever combination you use, the goal is the same: control water, don’t just move the problem to your neighbor’s plot or the public road, which is unfortunately common practice and a frequent source of neighbor disputes. With water properly managed above and below ground, we’re finally ready to talk about what most people think of first when they hear “landscaping” the plants themselves.
Plants
Now we get to plant selection and I deliberately placed it here, after site analysis, climate, soil, grading, and drainage, because choosing plants without understanding those layers first is exactly how landscaping projects fail. Plants are not decorations you add at the end; they’re living systems that must match the conditions you’ve already studied.
Start with matching plants to your microclimate zones. Sun-loving, drought-tolerant species belong in exposed, hot areas; shade-tolerant, moisture-loving species belong in your cooler, damper pockets. Trying to force a sun-loving plant into permanent shade, or vice versa, guarantees a struggling plant regardless of how much care you give it.
Native and indigenous species deserve serious preference in most designs. Plants that evolved in our specific climate and soil conditions require less irrigation, less pest management, and less overall fuss than imported ornamentals, while still offering plenty of visual variety. I’m not saying avoid foreign species entirely some perform beautifully here but they should be the exception you choose deliberately, not the automatic default because a photo online looked appealing.
Selection Rule
For every plant you’re considering, check three things: mature size, water needs, and sun requirement. If any of the three doesn’t match your specific spot, look for an alternative rather than forcing the fit.
Layering plant heights tall canopy trees, mid-height shrubs, low ground cover creates both visual depth and ecological benefit, giving different species and even wildlife multiple zones to occupy. This layered approach also tends to require less overall maintenance once established, since ground cover naturally suppresses weeds that would otherwise compete for space.
Root system awareness prevents future structural problems. Large trees need to be planted well clear of foundations, underground pipes, and paved areas a mistake I see repeated constantly is planting fast-growing, large-canopy trees just a meter or two from a boundary wall, which inevitably causes structural issues within a decade.
Seasonal interest is worth planning for too a mix of plants that flower or change character at different times keeps the compound visually engaging year-round, rather than looking spectacular for one flowering season and static the rest of the year.
Finally, think about maintenance capacity honestly. A plant palette that requires more care than your household can realistically provide will decline, regardless of how well-chosen it was on paper. With your plant palette taking shape, let’s look at another living element that transforms outdoor spaces just as powerfully — water.
Water
Water features occupy an interesting place in landscaping used well, they add sophistication, sound, and a genuine sense of calm; used carelessly, they become maintenance headaches or, worse, mosquito breeding sites in our climate. Let’s talk about doing it right.
The first decision is scale and purpose. A small, contained fountain near an entrance serves a purely aesthetic and auditory purpose the sound of moving water is genuinely calming and also helps mask street noise. A larger reflective pool or pond, on the other hand, becomes a more significant design feature requiring more serious planning around circulation, filtration, and safety, especially in households with young children.
Moving water versus still water is a critical distinction in our climate. Still, stagnant water is an open invitation for mosquito breeding, which is both a health concern and, frankly, a fast way to make an outdoor space unpleasant to actually use. Any water feature you install should include circulation a small pump keeping water moving or should be sized and drained regularly enough to prevent stagnation.
Health Tip
If a still water feature is unavoidable, consider adding mosquito-eating fish like guppies, or use a simple, safe larvicide as part of routine maintenance don’t leave any standing water untreated.
Rainwater harvesting deserves mention here too, as a functional “water” element that pairs beautifully with landscaping design. Collecting roof runoff into a storage tank, then using that water for irrigation during drier stretches, reduces your dependence on borehole or municipal water for the garden while also reducing runoff pressure on your drainage system genuinely a win on both ends.
Placement matters as much as the feature itself. Water features work best near seating or gathering areas, where their sound and visual appeal can actually be experienced, rather than tucked in a corner nobody visits. Proximity to a power source (for pumps) and ease of maintenance access should factor into placement decisions early, not as an afterthought once installation is underway.
Material choice affects both appearance and upkeep natural stone features tend to age gracefully and blend with a garden setting, while overly ornate or foreign-styled fountains can look out of place against the wider landscape unless the whole design language supports that choice.
Used thoughtfully, water is one of the most sensory-rich elements you can add to an outdoor space. And speaking of sensory richness that leads us naturally into the broader living system your landscape is part of: ecology.
Ecology
This is a section I wish more people asked about, because ecology is where landscaping stops being just about how your compound looks and starts being about how it functions as a small living system one that affects, and is affected by, everything around it.
A landscape with ecological thinking behind it supports biodiversity: birds, pollinating insects, beneficial predatory insects that naturally keep pest populations in check. Achieving this doesn’t require a wild, untamed garden it simply means including a diversity of plant species (rather than a monoculture lawn and a handful of ornamental shrubs), and being thoughtful about pesticide use, which can wipe out the beneficial insects along with the pests you’re targeting.
Native plants, again, play a central ecological role here local birds and insects have co-evolved with indigenous species and generally derive far more genuine ecological value from them than from imported ornamentals that offer little in terms of food or habitat.
Ecology Tip
Leave a small, less-manicured corner of your compound if space allows a patch of native ground cover or a modest brush pile provides habitat that a perfectly manicured lawn simply cannot offer.
Soil ecology matters too, and connects directly back to our earlier soil discussion. Healthy soil isn’t just inert growing medium it’s alive with microorganisms, fungi, and earthworms that break down organic matter and cycle nutrients. Excessive use of chemical fertilizers and pesticides can degrade this soil ecosystem over time, making your landscape increasingly dependent on more chemical inputs just to maintain the same results a cycle worth avoiding from the outset.
Water management, which we covered earlier, is also fundamentally an ecological issue. Rain gardens, permeable paving, and reduced runoff don’t just protect your property; they reduce the burden of pollutants and erosion carried into shared drainage systems and, eventually, local waterways.
Thinking ecologically also means considering your landscape’s relationship to the wider neighborhood mature trees on your property provide shade and cooling benefits that extend beyond your boundary wall, and dense planting can reduce dust and noise for everyone nearby, not just your own household.
None of this requires sacrificing beauty or structure in fact, ecologically thoughtful landscapes often look richer and more textured than sterile, over-manicured ones. With the living system of your landscape considered, let’s shift to the built elements that give it structure starting with hardscape.
Hardscape
Hardscape refers to every non-living, built element in your landscape pathways, patios, retaining walls, steps, driveways, pergolas. If softscape (which we’ll cover next) is the living, growing part of your compound, hardscape is the bones that hold everything together and make the space usable.
Material selection is the first major decision, and it should be guided by both climate suitability and maintenance realism. Interlocking pavers remain a favorite in our region because they’re durable, relatively affordable, allow for repair of individual sections without redoing the whole surface, and can incorporate permeable joints for better drainage. Natural stone offers a more premium, textured look but comes at a higher cost and sometimes requires more careful installation to prevent shifting. Poured concrete is economical and versatile but can crack over time, especially if grading and soil movement beneath it weren’t properly addressed first.
Material Tip
Whatever paving material you choose, insist on a properly compacted sub-base beneath it. Skipping this step is the single most common cause of cracked, uneven paving within just a year or two.
Scale and proportion apply to hardscape just as much as to garden beds. A patio that’s too small feels cramped and underused; one that’s oversized relative to the rest of the compound can feel sterile and disconnected from the planting around it. I generally recommend sizing hardscaped areas based on actual furniture and activity needs — measure your intended dining set or seating arrangement first, then design the paved area around it with reasonable circulation space, rather than guessing.
Retaining walls, where a sloped site requires them, should be engineered properly not just stacked blocks without adequate drainage behind them, which is a recipe for wall failure once hydrostatic pressure builds up during heavy rains. A properly built retaining wall includes drainage provisions (weep holes or a gravel backfill) specifically to relieve that pressure.
Steps and level changes deserve careful attention to rise-and-run proportions for safety and comfort too steep, and they become a hazard; too shallow, and they feel awkward to walk.
Hardscape sets the structural framework your softscape then fills in and softens which is exactly where we’re headed next.
Softscape
If hardscape is the skeleton, softscape is everything living that fills it in lawns, planting beds, hedges, climbing vines, ground cover. Softscape is what makes a landscape feel alive, seasonal, and connected to nature rather than purely architectural.
The relationship between hardscape and softscape is really the heart of good landscape composition. Too much hardscape without enough softening greenery feels harsh, exposed, and hot in our climate, since paved surfaces absorb and radiate heat. Too much softscape without any structural hardscape can feel unkempt and directionless, lacking the clear paths and defined areas that make a space genuinely usable. The best compounds strike a deliberate balance generally, I aim for hardscape to define function and circulation, while softscape provides texture, seasonal interest, and softens every hard edge.
Lawn areas deserve honest evaluation. A large, pristine lawn looks appealing in photos but demands significant water and mowing maintenance in our climate before committing to extensive lawn area, consider whether a mix of lawn, ground cover, and planting beds might actually serve your household’s realistic maintenance capacity better.
Balance Tip
As a general guideline, aim for roughly 40 to 60 percent softscape coverage in most residential compounds enough greenery to soften the space, without so much that maintenance becomes overwhelming.
Hedging and vertical softscape climbing plants on walls, trellises, or pergolas add another dimension, softening otherwise flat vertical surfaces and improving privacy simultaneously, which we’ll discuss more in a later section.
Ground cover deserves more credit than it usually gets. In areas where grass struggles (deep shade, high foot traffic, slopes prone to erosion), low-growing ground cover plants can fill the gap attractively while also suppressing weeds and protecting exposed soil from erosion.
Seasonal softscape planning choosing a mix of evergreen structure plants alongside seasonal flowering species keeps the landscape visually interesting throughout the year rather than peaking for a few weeks and looking static the rest of the time.
With both the built and living layers of your landscape established, it’s time to think about how the space performs after dark which brings us to lighting.
Lighting
Lighting is one of the most transformative, and most underused, elements in residential landscaping here. A well-lit compound doesn’t just look attractive at night it extends the actual usable hours of your outdoor space, improves safety, and adds a layer of atmosphere that daytime landscaping alone can’t achieve.
I like to think about landscape lighting in three functional layers. First, safety and wayfinding lighting illuminating paths, steps, and level changes so people can move through the compound confidently after dark. This is non-negotiable; poorly lit steps or uneven paving at night is a genuine hazard, not just an aesthetic gap. Second, security lighting brighter, often motion-activated fixtures covering entry points, boundary walls, and vulnerable access areas. Third, ambient and accent lighting softer, decorative lighting that highlights feature plants, water features, or seating areas, creating atmosphere rather than pure function.
Layering Tip
Don’t rely on one bright floodlight to do all three jobs. Combine soft path lighting, targeted security lighting at entry points, and gentle accent lighting on features for a result that’s both safer and more beautiful than a single harsh light source.
Solar-powered fixtures have become increasingly practical and affordable here, and I recommend them particularly for path lighting and accent lighting, where consistent brightness matters less than ambiance they reduce both installation complexity and ongoing electricity costs, which matters given how frequently power supply can be inconsistent.
Uplighting a specimen tree or a textured wall creates dramatic shadow and highlight effects that dramatically change the character of a space after sunset, often for a relatively modest cost compared to the visual impact achieved.
Fixture placement should always consider glare lights aimed directly at eye level or into windows create discomfort rather than ambiance. Aim for lighting that illuminates surfaces and features rather than shining directly outward toward where people will be standing or sitting.
Wiring and power planning should be considered early in the design process, ideally alongside your hardscape installation, rather than retrofitted afterward, which often means unsightly surface-mounted cabling or compromised fixture placement. With your compound now functional day and night, let’s address a concern closely tied to lighting and layout alike privacy.
Privacy
Privacy is something almost every client mentions eventually, even if it isn’t the first thing they bring up. In increasingly dense residential areas, well-designed landscaping is one of the most effective and attractive ways to create a genuine sense of enclosure and personal space without relying purely on tall, harsh boundary walls.
Vertical softscape does a lot of the heavy lifting here. Hedges, planted screens, and climbing vines on trellises or walls create living privacy barriers that soften what might otherwise be a stark concrete boundary. Unlike a solid wall, planted privacy screens also improve airflow and reduce the “boxed-in” feeling that a fully enclosed compound can create.
Strategic tree placement offers another layer, particularly useful for screening upper-level views from neighboring multi-story buildings a growing concern as plot sizes shrink and buildings get taller in many of our urban areas. A well-placed tree canopy can screen a second-floor window’s sightline in a way that ground-level hedging alone cannot achieve.
Privacy Layering
Combine at least two heights of screening a taller tree or vine-covered structure for upper sightlines, and a mid-height hedge or planted screen at eye level for genuinely comprehensive privacy rather than a single, thin barrier.
Zoning your outdoor space also contributes to a sense of privacy, even within your own compound. A seating area tucked slightly out of direct view from the main gate or the street, screened by planting rather than fully hidden, feels more intimate and personal than one positioned in full open view of every visitor and passerby.
Pergolas, screens, and slatted fencing offer architectural privacy solutions that pair well with softscape a slatted wooden or composite screen with climbing plants growing through it, for instance, achieves both structural definition and a living, softened appearance simultaneously.
Balance is important here too privacy shouldn’t come at the total expense of natural light, airflow, or an oppressive, closed-in feeling. The goal is a considered sense of enclosure, not an isolated fortress. And speaking of protection, privacy naturally leads us into a closely related, equally important consideration: security.
Security
Security and privacy are close cousins in landscaping, but they’re not identical privacy is about controlling visibility, while security is specifically about controlling and deterring unauthorized access. In our context, where security is a genuine, practical daily concern for most households, landscaping has a real role to play here beyond just walls and gates.
Thorny or dense hedge species along vulnerable boundary sections particularly stretches of wall that are lower, less visible, or adjacent to public access points can serve as a natural, attractive deterrent that’s far harder to breach discreetly than a bare wall alone. This isn’t about replacing formal security measures, but about adding a genuinely effective supplementary layer.
Sightline management works both ways in security planning. While privacy sometimes calls for screening views, security calls for maintaining clear sightlines around entry points, along boundary walls, and near ground-floor windows dense planting immediately beside a vulnerable window or gate can actually create concealment for an intruder rather than protection for the household. This is exactly why I emphasize, earlier in this guide, keeping planting height below window level near entrances.
Security Balance
Use dense, thorny planting along boundary lines to deter access, but keep planting near windows, doors, and gates low and sparse enough to maintain clear visibility and avoid creating hiding spots.
Lighting, which we covered earlier, is one of the most cost-effective security investments in landscaping well-lit entry points, boundary walls, and previously dark corners remove the concealment that opportunistic intrusion typically relies on.
Gate and entrance landscaping also plays a subtle security role clear, unobstructed access for security personnel or visitors to approach and identify themselves, combined with a design that doesn’t provide convenient hiding spots near the point of entry.
CCTV and motion-sensor integration increasingly intersect with landscaping design too camera sightlines should be considered when placing trees or tall shrubs, ensuring mature plant growth won’t eventually block coverage of key areas years down the line.
Security-conscious landscaping, done thoughtfully, doesn’t have to look fortress-like or unwelcoming it can remain beautiful while quietly doing its protective work. Now let’s turn to a layer of design that’s too often overlooked entirely: accessibility.
Accessibility
Accessibility in landscaping means designing outdoor spaces that genuinely work for everyone who uses them including elderly family members, people with mobility challenges, young children, and visitors who may not move through the space as easily as the primary homeowner does. It’s a layer I actively push clients to consider, even when they haven’t asked about it, because needs change over time, and retrofitting accessibility later is far more disruptive than designing for it from the start.
Pathway design is the foundation of accessible landscaping. Paths should be wide enough for comfortable two-person passage, or for a wheelchair or walker if that’s a current or future household need, with stable, even, non-slip surfaces. Loose gravel, while attractive, can be genuinely difficult for anyone with mobility challenges to navigate safely I generally recommend firmer surfaces like compacted interlocking pavers for primary circulation routes, reserving looser materials for secondary or purely decorative paths.
Level changes deserve particular care. Where steps are unavoidable, gentle, well-proportioned risers with secure handrails make a real difference. Where possible, gradual ramped transitions alongside or instead of steps accommodate a much wider range of users, and thoughtful design can make these ramps feel like an intentional design feature rather than a purely functional add-on.
Accessible Design
A gentle ramp gradient (roughly 1:12, meaning 1 inch of rise per foot of ramp length) is comfortable and safe for most users, including those using mobility aids.
Seating placement matters too including rest points along longer garden paths, particularly in larger compounds, gives elderly family members or visitors natural opportunities to pause without feeling like they’re holding up a walk through the garden.
Lighting, again, plays a role here consistent, glare-free illumination along paths and steps is especially important for older family members whose night vision may be reduced, reinforcing just how interconnected these different landscaping layers really are.
Designing accessibly from the outset doesn’t compromise beauty in fact, the wider paths, gentle grading, and thoughtful rest points that accessibility requires often produce a more comfortable, more usable landscape for absolutely everyone, not just those with specific mobility needs. With your design now genuinely inclusive, let’s move from planning into the practical reality of getting it built: construction.
Construction
All the planning in the world means little if construction execution falls short and this is genuinely where I see well-designed landscaping plans go wrong most often, not because the design was flawed, but because the build phase wasn’t managed carefully.
Sequencing matters enormously. Grading and drainage infrastructure should be completed first, before any hardscaping goes down, and hardscaping should generally be completed before final planting, to avoid damaging new plants with construction traffic and material staging. I’ve seen beautifully planted beds get trampled or compacted by workers moving pavers across them simply because the sequence wasn’t planned properly.
Sourcing quality materials matters as much as the design itself. Substandard pavers, poorly cured concrete, or nursery stock that’s been sitting stressed in poor conditions will undermine even the best design on paper. I always recommend clients personally inspect plant material before it’s installed, rather than accepting whatever a supplier delivers unseen root health, pest presence, and overall vigor are easy to assess with a quick visual check.
Site Management Tip
Protect existing trees and any completed grading or drainage work with barriers or clear boundaries during the remaining construction phases it’s far easier to prevent damage than to repair it afterward.
Sub-base preparation, which we touched on under hardscape, deserves construction-phase discipline compacting each layer properly, rather than rushing to lay the visible surface, is the difference between paving that lasts a decade and paving that cracks within two years.
Planting technique matters too. Proper hole sizing (generally twice the width of the root ball, same depth), correct backfill with amended soil, and adequate initial watering during establishment all significantly affect a plant’s long-term survival rushed, careless planting is a common reason newly landscaped compounds lose plants within the first few months.
Timing your construction around the season also helps planting immediately before the rainy season, for instance, gives new plants a natural establishment advantage with less need for manual irrigation. Get construction right, and the landscape you’ve designed on paper actually becomes the landscape you live with. But even flawless construction eventually needs ongoing care which brings us to maintenance.
Maintenance
I’ll be honest with you: maintenance is the section clients least want to think about during the excitement of planning and installation, and it’s exactly why so many beautiful landscapes decline within a few years. A landscape isn’t a one-time purchase it’s an ongoing relationship, and planning for that relationship honestly is part of good design.
Realistic maintenance planning starts at the design stage itself, which is why I keep returning to this theme throughout the guide. Choosing plants and layouts that match your household’s actual available time and interest in gardening prevents the common cycle of an ambitious install followed by gradual, disappointing decline.
Routine tasks fall into a few clear categories: watering (especially critical during establishment and dry season), pruning and shaping (both for aesthetics and plant health), weeding (particularly in planting beds before ground cover fills in), and lawn care if you have significant grass areas. Establishing a simple, realistic schedule for each rather than an ad hoc “whenever we remember” approach makes a measurable difference in how a landscape looks a year or two down the line.
Maintenance Reality Check
If your household genuinely doesn’t have time for weekly hands-on garden care, design around low-maintenance native plants, mulched beds, and reduced lawn area from the outset, rather than fighting an unrealistic maintenance burden every season.
Mulching deserves special mention as a maintenance-reducing tool a proper layer of organic mulch around planting beds suppresses weeds, retains soil moisture, and moderates soil temperature, meaningfully reducing both watering frequency and weeding effort.
Seasonal maintenance shifts matter in our climate specifically rainy season maintenance focuses more on drainage checks, pruning for airflow to prevent fungal issues, and managing rapid growth; dry season maintenance focuses more on irrigation management and mulch renewal to retain moisture.
Hiring help, whether a part-time gardener or a periodic professional service, is a legitimate and often cost-effective choice rather than something to feel guilty about the value of a consistently maintained landscape, in both enjoyment and long-term property value, generally outweighs the modest cost of regular professional care. Which brings us naturally to a broader financial question worth addressing directly: cost and lifecycle.
Cost & Lifecycle
Let’s talk honestly about money, because I find most landscaping conversations either avoid the topic entirely or focus only on upfront installation cost, missing the bigger financial picture entirely.
Landscaping costs unfold across a lifecycle, not just a single installation moment. There’s the initial design and installation cost, ongoing maintenance costs over the years, periodic renewal or replacement costs (as plants mature, hardscape ages, or design preferences evolve), and eventually, the value the landscaping contributes back to your property, which we’ll explore fully in the next section.
Thinking in phases, as I mentioned earlier under construction, is genuinely one of the smartest financial strategies for most households. Prioritizing grading, drainage, and soil preparation first even if it means delaying the more visually exciting planting and hardscaping phases protects your investment far better than rushing straight to an impressive-looking install that sits on inadequate technical foundations and requires expensive correction later.
Budgeting Tip
As a rough guideline, allocate your landscaping budget across grading and drainage first, hardscape structure second, and planting and finishing details last resist the temptation to reverse this order for faster visual gratification.
Material choice significantly affects lifecycle cost, not just upfront price. A cheaper paving material that needs replacing within five years can end up costing more over a decade than a slightly pricier, more durable option installed correctly once. The same logic applies to plant selection inexpensive, fast-growing but short-lived or high-maintenance species can cost more in ongoing care and eventual replacement than a well-chosen, slower but more durable species.
Phasing your project over time, rather than attempting everything at once, is a legitimate and often financially wiser approach for many households complete the technical foundation first, then add hardscape and planting in stages as budget allows, rather than either overspending immediately or, worse, cutting corners on the technical layers to afford visible finishes sooner.
Understanding true lifecycle cost helps you make smarter decisions at every stage of this guide we’ve walked through together and it sets up naturally the final, and perhaps most convincing, argument for taking landscaping seriously in the first place: property value.
Property Value
We’ve come a long way together from reading raw land through soil, grading, drainage, plants, and every layer in between. Let’s close with the question that often matters most to homeowners making a financial case for investing properly in landscaping: does it actually add value to your property? In my professional experience, the answer is a confident yes, though the details matter.
Well-executed landscaping consistently improves a property’s perceived value and market appeal. Curb appeal largely driven by front yard landscaping, which we covered earlier creates the crucial first impression that shapes a potential buyer’s or tenant’s overall perception before they even step through the door. I’ve seen otherwise comparable properties command noticeably different interest levels purely based on how well the compound was presented.
But property value from landscaping goes beyond first impressions. Mature trees, properly established gardens, and functional outdoor living spaces represent years of growth and investment that a buyer would have to wait years to replicate themselves if starting from scratch this “head start” value is genuinely difficult to fake and tends to be recognized, consciously or not, by anyone evaluating the property.
Value Insight
Technical elements like proper grading and drainage rarely get complimented directly by a buyer, but their absence damp walls, flooding, cracked paving actively damages perceived value. Invest in what’s invisible; it protects what’s visible.
Functional outdoor spaces a genuine usable patio, a well-designed front yard, a private, comfortable backyard retreat increasingly factor into how buyers and renters evaluate a property, particularly as more people spend meaningful time at home and value quality outdoor living space as a real extension of the house itself, not merely decoration around it.
Low-maintenance, well-planned landscaping also signals lower ongoing costs to a prospective buyer, which is a genuine financial consideration a landscape requiring excessive water, labor, or frequent replacement is a liability a knowledgeable buyer will factor into their offer, whether or not it’s ever stated explicitly.
Ultimately, every layer we’ve walked through in this guide from the first careful site analysis to the final maintenance routine contributes to this compounding value. Landscaping done properly isn’t an expense you write off after installation; it’s a long-term asset that continues paying dividends in daily enjoyment, in resilience against our climate, and eventually, in genuine market value, for as long as you own the property.
If you’d like help working through any of these layers on your own site, our Services page connects you directly with our team. For structured, step-by-step learning on applying these principles yourself, explore our [Plan School]. And if you’re ready to see how landscaping integrates into a full building plan from the ground up, browse our Plans Library, or return to our Homepage to continue exploring guides like this one.
External Citation Reference
For further technical reading on soil compaction, drainage, and residential grading standards, the U.S. Department of Agriculture’s Natural Resources Conservation Service offers detailed guidance on soil and site assessment practices (nrcs.usda.gov).
Related Articles
- Landscaping & Landscape Design: Complete Guide to Landscape Architecture
- Urban Planning & Urban Design: Complete Guide to Modern Cities, Development and Renewal
- Real Estate Development & Site Planning: Guide to Planning, Construction, Infrastructure and Stormwater Management
- Urban Planning & Urban Design: Complete Guide to City Planning, Zoning and Land Development
- Building Regulations by Country: Permits, Zoning, Codes and Property Development Rules
- Land Development Guide: Permits, Planning, Zoning, Costs and Approval Process Explained
- Building Regulations and Codes: Complete Guide to Requirements Worldwide
- Zoning Laws and Regulations for Property Development: Complete Guide
- Building Setback Requirements: Complete Guide to Front, Side and Rear Setbacks
- House Construction Approval Process: Planning, Permits, Inspections and Final Approval
- Building Permit Documents: Complete Checklist of Requirements for Building Approval
- Planning Permission and Building Permits for Residential Construction: Complete Guide