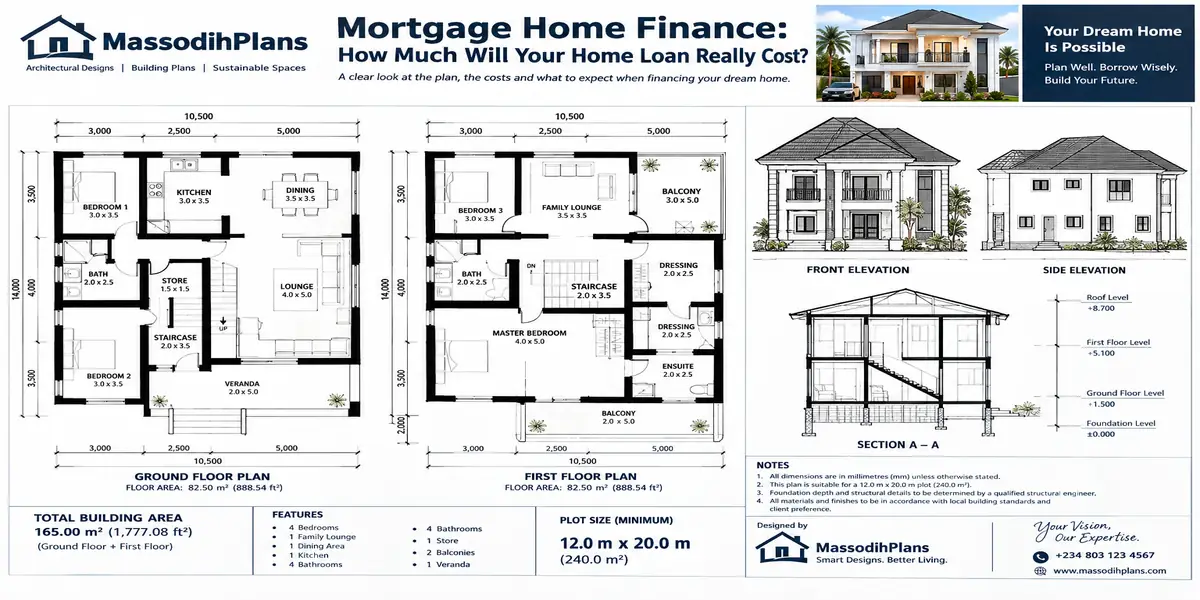
Landscape Design vs Landscaping Services: The Complete Buyer’s Guide
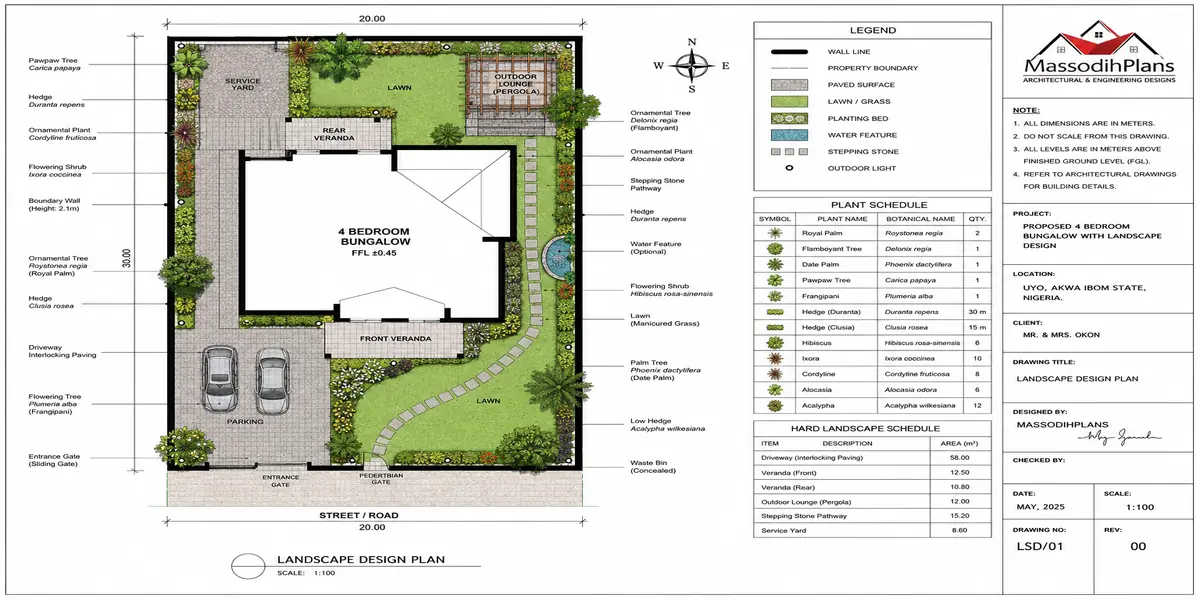
Landscape Design vs Landscaping Services The Complete Buyer’s Guide
By now, if you’ve read through our earlier guides, you understand the “who” architects, landscape architects, designers, landscapers. This time, I want to walk you through the practical, on-the-ground realities of actually commissioning, planning, and living with a landscape project. Let’s start with something that trips up almost every first-time client: understanding exactly what you’re paying for when you hire a landscaping company.
Landscape Design vs Landscaping Services: Know What You Are Actually Buying
I can’t tell you how many disputes I’ve mediated, or been called in to fix, simply because a client and a contractor had completely different understandings of what was included in the agreed price. “Landscaping services” is a vague umbrella term, and unless it’s broken down clearly, you’re buying blind.
Conceptual design
Is the creative and technical planning stage site analysis, layout, planting selection, drawings. This is thinking work, not physical work, and should be priced and delivered as a distinct phase with tangible drawings you can keep, regardless of who eventually builds the project.
Installation
Is the physical execution grading, planting, laying hardscape, building structures. This is where most of the visible cost sits, and it should be quoted against specific quantities and materials, not a vague lump sum.
Maintenance
Is the ongoing care after installation watering, pruning, weeding, lawn care. Some companies bundle a short establishment-period maintenance window into installation cost; ongoing maintenance beyond that is typically a separate, recurring service.
Buyer Tip
Always ask explicitly whether your quote includes a plant establishment period (usually 3–6 months of watering and care) or whether you’re responsible for that from day one of planting.
Hardscaping
Covers all built, non-living elements patios, walls, paths. This is often subcontracted by landscaping companies to specialist paving or masonry crews, so ask directly who’s actually executing this portion and whether it’s included or an add-on.
Irrigation
Is the watering system design and installation pipes, sprinklers, drip lines, timers. This is frequently underestimated in basic quotes; confirm whether it’s a full automated system or simply manual hose access.
Drainage
Covers grading, drains, and water management infrastructure arguably the most commonly omitted or underspecified item in budget landscaping quotes, despite being the layer that protects your entire investment.
Red Flag
If a landscaping quote doesn’t mention grading or drainage at all, that’s not a good sign it usually means the contractor is planning to work with whatever grade exists, problems included.
Project management
Is coordination sequencing trades, managing timelines, handling unforeseen site issues. On larger projects, this deserves its own line item; on smaller residential jobs, it’s often absorbed into the overall service but should still be someone’s clearly assigned responsibility.
What a landscaping company should deliver, at minimum:
- A written scope separating design from installation
- Clear material and plant specifications, not vague descriptions
- Explicit drainage and grading treatment, even on simple sites
- A defined maintenance handover point
- A named point of contact for project coordination
Understanding these separations turns a vague, one-line “landscaping” quote into something you can actually evaluate and hold a contractor accountable to. With this buyer’s vocabulary in place, let’s walk through exactly how a raw, empty plot becomes a fully realized landscape plan, from first site visit to finished design.
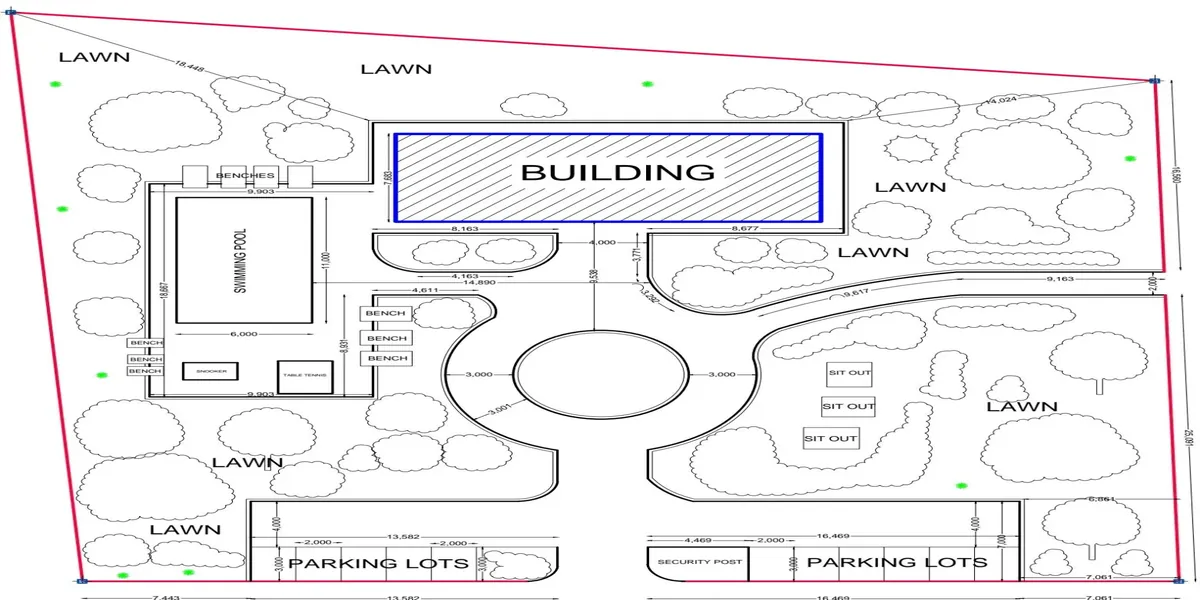
How to Turn an Empty Plot Into a Complete Landscape Plan
An empty plot is both exciting and intimidating I’ve watched clients stand on bare, freshly cleared land and genuinely not know where to begin. Let me walk you through the sequence I actually use, step by step, so you can follow or guide a professional through this exact process.
Site inventory
Before any creative thinking happens, document what’s actually there: boundaries, existing vegetation, slope, sun exposure, soil type, existing structures or utilities. This is the raw material every later decision depends on.
Opportunities and constraints
Translate that inventory into design language a mature tree becomes an opportunity for a shaded seating area; a low-lying corner becomes a constraint requiring drainage attention, or an opportunity for a rain garden. Every site has both, and naming them clearly focuses the design process.
Practical Exercise
Sketch your plot boundary on paper, then mark every opportunity in green pen and every constraint in red. This simple visual exercise reveals your site’s natural design logic before you plant a single idea.
Circulation
Map how people and vehicles will actually move through the space from gate to entrance, between activity zones, to service areas. Circulation should be decided before activity zones are placed, since paths connect zones rather than the reverse.
Activity zones
With circulation established, define distinct functional areas entrance zone, parking, entertaining space, private retreat, utility area, children’s play space if relevant. Each zone gets a rough footprint and general location based on the opportunities and constraints already identified.
Planting
Only now, with structure established, does plant selection begin matched to each zone’s specific microclimate, function, and the site’s soil and drainage characteristics covered in our fundamentals guide.
Hardscape
Paths, patios, and structural elements get finalized in coordination with the planting layout hardscape defines the “bones,” planting fills and softens them.
Drainage
Grading and drainage infrastructure get engineered around the finalized layout, ensuring every zone, path, and planting bed has appropriate water management rather than retrofitting drainage as an afterthought.
Sequencing Reminder
Drainage should be considered at every stage above, not just at the end but the final engineering detail gets locked in once the overall layout is settled, so pipe routes and grading match the actual built plan.
Lighting
With the full spatial plan resolved, lighting gets layered in path lighting along circulation routes, accent lighting on planting and hardscape features, security lighting at entry points.
Maintenance
Finally, honestly assess the maintenance demand of everything you’ve planned, and adjust where necessary simplifying a planting palette or reducing lawn area if the realistic maintenance capacity doesn’t match the ambition of the plan.
This sequence inventory, opportunities and constraints, circulation, zones, planting, hardscape, drainage, lighting, maintenance isn’t arbitrary. Each stage depends on the one before it, which is exactly why skipping ahead (choosing plants before understanding circulation, for instance) produces disjointed results. Before you can execute this sequence well, though, you need to understand certain hidden site conditions that can undermine even the best-sequenced plan which is exactly where we’re headed next.
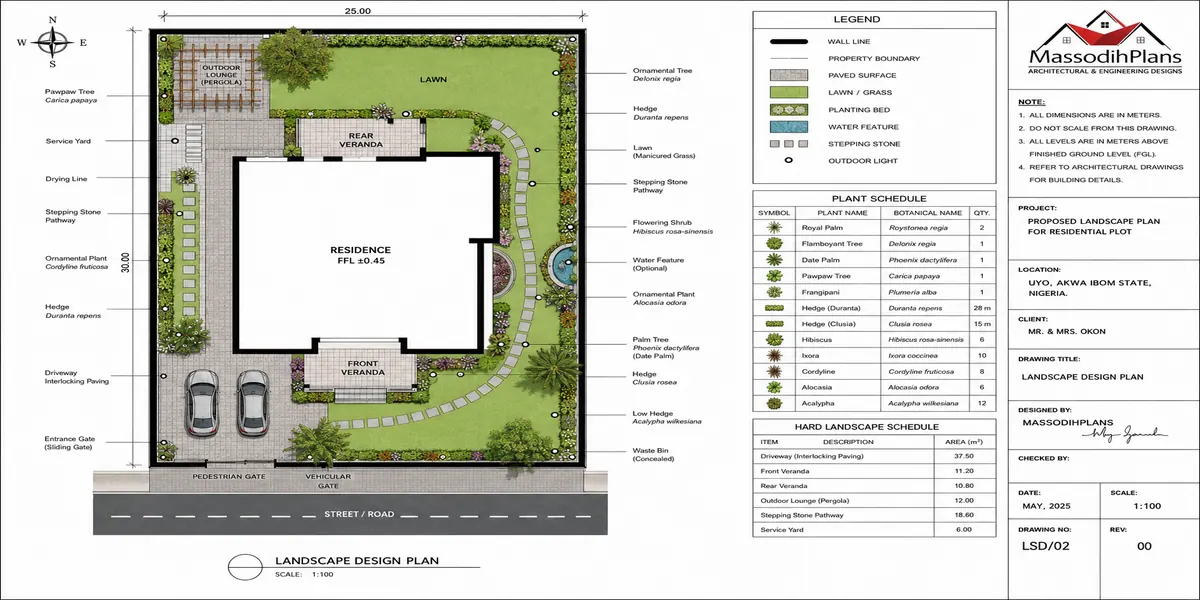
How to Turn an Empty Plot Into a Complete Landscape Plan
The Hidden Site Conditions That Can Make or Break Your Landscape
Some site conditions announce themselves immediately an obvious slope, a visibly waterlogged corner. Others hide quietly until a year or two into your landscape’s life, when they suddenly cause problems that seem to come from nowhere. Let’s uncover the ones I’ve learned, often the hard way through site inspections, to check for before any design work begins.
Soil
We’ve covered this extensively already, but it bears repeating as a “hidden” risk specifically because soil problems are invisible from the surface. Compacted subsoil left by construction equipment, buried construction debris, or poor fertility won’t show themselves until plants start struggling months after installation.
Slope
A gentle-looking slope can carry surprising volumes of water during heavy rain, and an unnoticed low point can become a flooding hazard that only reveals itself during the first serious storm after landscaping is complete which is exactly why observing your site after actual rainfall matters more than a dry-season walk-through.
Hidden Risk Check
Walk your site during, or immediately after, the heaviest rain you can manage before finalizing any design. What you see in those hours reveals more than months of dry-season observation.
Existing vegetation
Established trees and shrubs can hide root systems extending far beyond their visible canopy, root systems that can interfere with new hardscape, foundations, or underground utilities if not properly assessed before construction begins nearby.
Drainage
Beyond visible pooling, subsurface drainage issues a high water table, or clay layers trapping water below the surface can cause root rot and plant failure even when the surface appears to drain fine.
Sun exposure
Sun patterns shift seasonally, and a spot that seems shaded during a single site visit might receive intense, damaging sun exposure during a different season, catching newly planted shade-loving species off guard months later.
Wind
Wind funneling between buildings or across open boundaries can desiccate plants far faster than expected, or physically damage tall, unstaked young trees a factor easy to miss without deliberate observation.
Groundwater
A genuinely hidden condition a high water table close to the surface can waterlog root systems, undermine foundations, and complicate any excavation work, and it’s often only discovered when digging begins, unless deliberately investigated beforehand.
Groundwater Check
If you’re in a low-lying area or near a water body, a simple test hole dug during the rainy season, left open for a day, can reveal whether groundwater is a genuine concern before you commit to major excavation or planting.
Utilities
Underground cables, pipes, or septic infrastructure not clearly marked on any available documentation can be struck during grading or planting, causing damage and safety risk if not properly located beforehand.
Neighboring properties
Runoff from an adjacent, higher property can flow directly onto your site regardless of how well you grade your own land, and conversely, poor grading on your side can create real disputes with neighbors downhill from you.
Uncovering these hidden conditions before design begins is exactly why proper site analysis, covered in depth in our earlier guide, isn’t a box-ticking formality it’s genuine risk management for your entire investment. With these hidden risks understood and accounted for, let’s move into one of the most important spatial design skills in the entire discipline: balancing hardscape and softscape so your landscape feels neither bare nor overwhelming.
Hardscape–Softscape Balance: How to Prevent a Landscape From Feeling Too Bare or Too Crowded
We touched on hardscape and softscape individually in our fundamentals guide, but the real design skill lies in how they work together spatially and getting this balance wrong is one of the most common reasons a landscape feels “off” even when every individual element looks fine on its own.
A landscape that’s too bare dominated by paving, walls, and open lawn with minimal planting feels harsh, exposed, and in our climate, genuinely hot, since hard surfaces absorb and radiate heat with little relief. A landscape that’s too crowded dense planting with no clear paths, no open breathing room, no defined hardscape structure feels chaotic and, practically speaking, becomes difficult to navigate and maintain.
The balance comes from thinking in terms of enclosure and openness working together, not competing. Hardscape defines the “rooms” of your outdoor space a patio is a room, a path is a hallway connecting rooms. Softscape furnishes and softens those rooms the way furniture, curtains, and rugs do indoors.
Spatial Principle
Think of your paved and open areas as the “floor plan” of your outdoor space, and your planting as the “walls, furnishings, and decor.” A floor plan with no furnishing feels empty; furnishing with no floor plan feels chaotic.
Scale relationships matter enormously here. A large open lawn benefits from a strong anchor a specimen tree, a defined bed at its edge to prevent it from feeling like undefined empty space. Conversely, a small courtyard benefits from restraint a few well-chosen larger plants rather than many small ones, which can make a compact space feel cluttered and busy rather than lush.
Vertical layering helps enormously in achieving balance. Combining ground-level paving or lawn, mid-height shrubs and planting beds, and taller trees or vertical structures creates depth without requiring dense coverage at any single level this layered approach reads as rich and considered rather than either sparse or overwhelming.
Negative space deliberately unplanted, unpaved areas is a genuine design tool, not a failure to fill space. Every element in a landscape needs visual breathing room around it to be appreciated; a landscape with zero negative space, every inch covered in planting or paving, tends to feel exhausting to look at rather than beautiful.
Balance Guideline
As a starting reference, aim for roughly 40–60% softscape coverage relative to hardscape and open lawn combined in most residential compounds enough greenery to soften and cool the space, without overwhelming its functional structure.
Repetition and rhythm repeating certain plant species, materials, or colors at intervals create cohesion across a balanced design, preventing a landscape from feeling either monotonously bare or randomly crowded with too much unrelated variety competing for attention.
Getting this balance right transforms a landscape from a collection of individually nice elements into a genuinely cohesive, comfortable space. And since water is one of the forces most likely to undo a beautifully balanced design if ignored, let’s turn to a topic I consider a genuine differentiator in landscape planning here: drainage design for heavy rainfall climates.
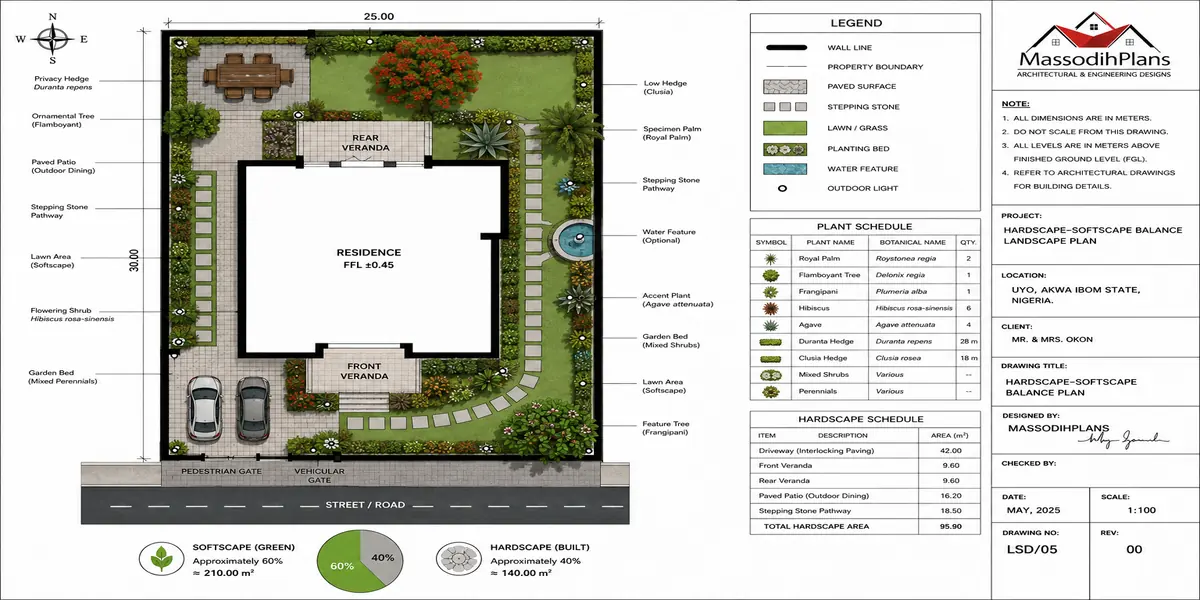
Hardscape–Softscape Balance
Landscape Drainage: Designing Outdoor Spaces That Survive Heavy Rain
I’ve said this throughout our guides, and I’ll say it again here because it deserves emphasis: in our climate, drainage isn’t a technical footnote it’s one of the most important design decisions you’ll make, and getting it wrong undermines every other beautiful choice in your landscape.
Grading
Is the foundation of all drainage design, covered in depth in our fundamentals guide shaping the land so water moves away from structures and toward designated exit points, generally at a gentle 2% slope near the foundation, more pronounced where the site allows.
Runoff routes need to be deliberately planned, not left to chance. Every hard surface roofs, patios, driveways sheds water somewhere, and a proper design traces exactly where that water goes: toward a swale, a drain, a rain garden, or a public drainage connection, rather than simply flowing wherever gravity happens to take it.
Swales are shallow, graded channels sometimes subtly built into the landscape’s contours, sometimes more visibly planted that carry surface water along a controlled path toward a drainage exit point. A well-designed swale doubles as an attractive planted feature rather than reading as purely functional infrastructure.
Design Insight
A swale doesn’t have to look like a drainage ditch. Planted with moisture-tolerant grasses or ground cover and gently contoured, it can read as an intentional landscape feature rather than obvious infrastructure.
Permeable surfaces interlocking pavers with sand-filled joints, gravel, permeable concrete allow a portion of rainfall to infiltrate directly into the ground rather than becoming fast-moving surface runoff, reducing both erosion risk and the burden on formal drainage systems.
Drains surface channel drains, French drains, catch basins handle water that swales and permeable surfaces can’t manage alone, particularly around foundation perimeters and low points where water naturally concentrates.
Rain gardens as covered in our fundamentals guide are shallow, planted depressions specifically designed to collect and slowly absorb runoff, doubling as an attractive, ecologically valuable landscape feature rather than pure infrastructure.
Erosion control ties directly into drainage design ground cover planting, mulching, and careful grading on slopes all prevent the soil loss that concentrated, poorly managed runoff otherwise causes, particularly during our heaviest rainy season storms.
Heavy Rain Readiness Checklist
☐ Grading directs water away from all structures
☐ Runoff routes traced for every hard surface (roof, driveway, patio)
☐ Swales or channels handle surface flow across the site
☐ Permeable surfaces used where feasible to reduce runoff volume
☐ Drains positioned at genuine low points and foundation perimeters
☐ Rain garden or soak-away provides on-site water absorption
☐ Slopes stabilized against erosion with ground cover or mulch
The connection to landscape design is direct and inseparable: every planting bed, patio, and path we’ve discussed throughout these guides needs to sit within this drainage logic, not be designed independently and hope drainage works itself out afterward. A landscape that survives heavy rain year after year is a landscape that was engineered for water from the very first grading decision. With water management addressed, let’s turn to another circulation-critical layer: how people, vehicles, and daily life actually move through your property.
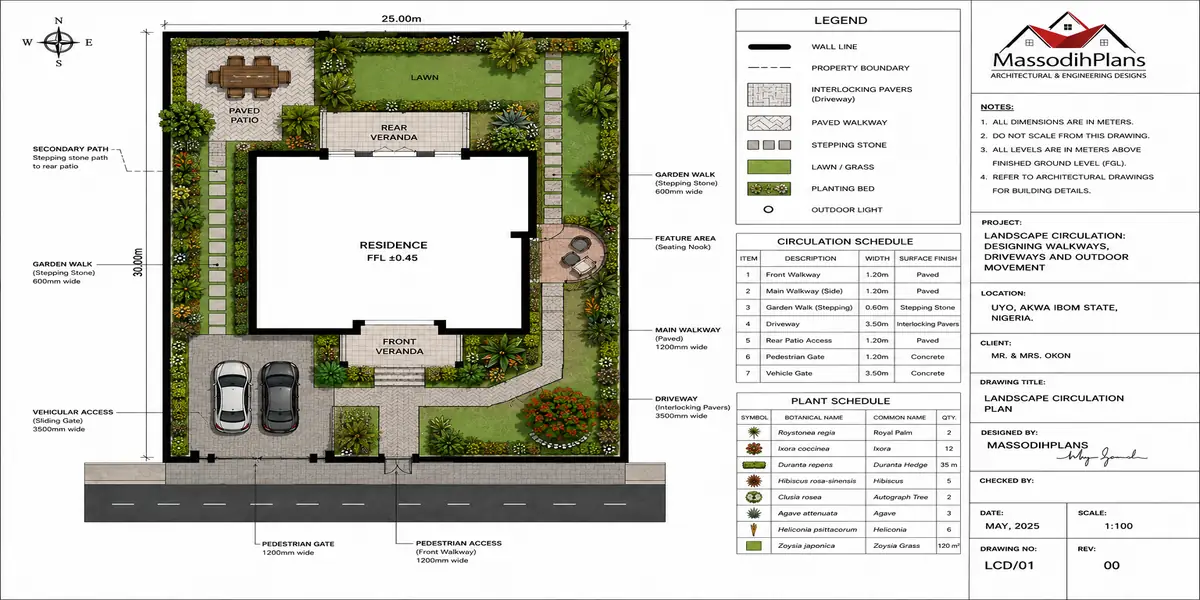
Landscape Circulation: Designing Walkways, Driveways and Outdoor Movement
Circulation is one of those design layers that, done well, becomes completely invisible you simply move through your property naturally, without thinking about it. Done poorly, it becomes a source of daily friction: awkward path routes, parking conflicts, children’s play areas crossing vehicle paths. Let’s design it properly.
Pedestrian movement
Should follow genuinely natural paths the shortest sensible route between key points, generally: gate to entrance, entrance to parking, entrance to garden or entertaining areas. As I mentioned in our earlier guide, watch how people actually walk before finalizing path placement; forced, unnatural routing gets abandoned in favor of informal footpaths across your lawn.
Vehicle circulation needs generous enough turning space and a driveway width appropriate to your household’s actual vehicle count and size, with clear, unobstructed sightlines at entry and exit points onto the street for safety.
Design Tip
Design driveways with enough width for a car door to open fully without the door edge hitting a wall, planting bed, or parked second vehicle a small detail that makes daily use meaningfully more comfortable.
Children’s movement deserves specific consideration if relevant to your household play areas should be positioned away from direct vehicle circulation paths, with clear sightlines from common household vantage points (kitchen window, main seating area) so children can be supervised without deliberate effort.
Service access space for waste collection, generator maintenance, gardening equipment, or deliveries needs a dedicated, considered route that doesn’t require crossing through primary living or entertaining zones, both for convenience and to keep utilitarian activity visually separated from your main outdoor living spaces.
Emergency access is often overlooked in residential landscape planning but genuinely matters ensure at least one clear, sufficiently wide route exists for emergency vehicles or personnel to reach the building directly, unobstructed by dense planting, narrow gates, or parked vehicles.
Circulation Conflict Check
Walk through a typical day mentally arriving home, unloading groceries, children playing, waste collection, a visitor arriving. If any of these scenarios require crossing paths awkwardly or squeezing past an obstacle, your circulation plan needs revision.
Path width and surface should match their function primary pedestrian paths need enough width for two people to walk comfortably side by side (roughly 1.2 to 1.5 meters), while secondary paths can be narrower; surfaces should be stable and non-slip, particularly for primary routes used daily.
Avoiding conflict points is the underlying goal throughout the driveway shouldn’t cross the primary pedestrian entrance path at an awkward angle, the children’s play area shouldn’t border the vehicle turning zone, and service access shouldn’t require walking through a formal entertaining space.
Well-designed circulation makes a property feel effortless to live in day after day, precisely because you never have to think about it. With movement through the property resolved, the next essential decision layer is what actually grows within that circulation framework which brings us to a genuinely practical system for choosing the right plants.
Landscape Circulation: Designing Walkways, Driveways and Outdoor Movement
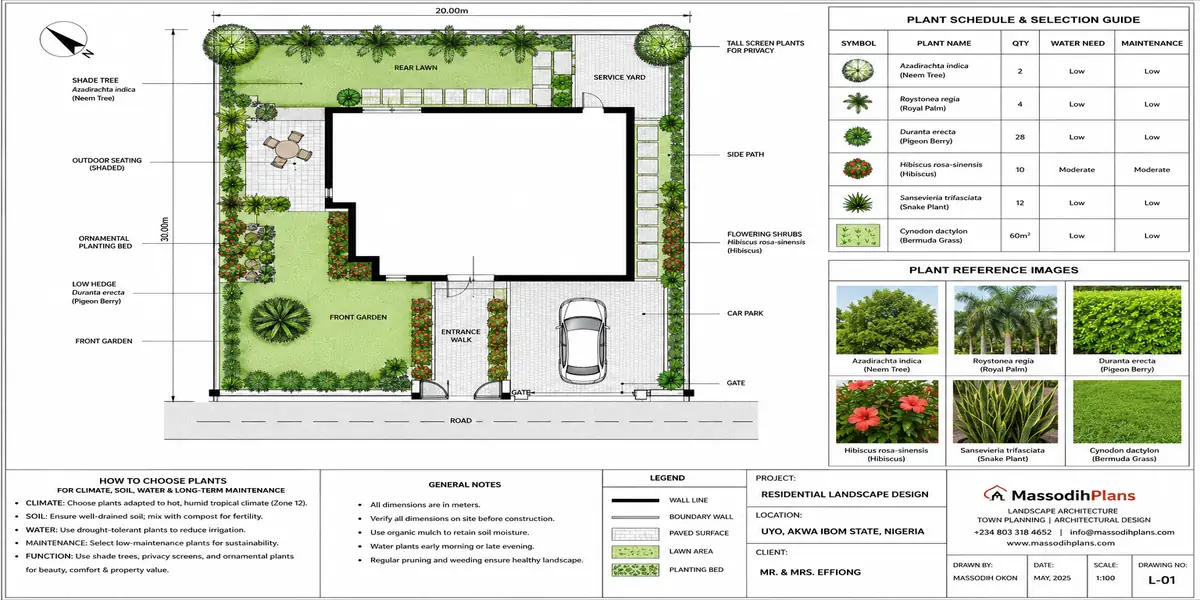
How to Choose Plants for Climate, Soil, Water and Long-Term Maintenance
I deliberately avoid giving clients a simple list of “recommended plants” without context, because the right plant for one spot in your compound might be entirely wrong for another spot just meters away. Instead, let me give you the actual decision system I use a series of questions that narrows down the right choice for any specific location.
Question one
What’s the climate and microclimate of this specific spot? As covered in our fundamentals guide, this isn’t just regional climate it’s the specific sun, shade, wind, and moisture pattern of the exact location you’re planting. A plant thriving three meters away in different light conditions may fail here.
Question two
What’s the soil condition? Sandy, clay, loam, well-drained, or prone to waterlogging this immediately rules out or confirms candidate species, since a plant needing sharp drainage will struggle in a heavy clay pocket that holds water.
Decision Shortcut
If you’ve completed the soil drainage test from our earlier guide (fill a hole with water, time the drainage), use that result directly under 4 hours drainage suits a wider range of species; over 8 hours narrows you toward moisture-tolerant plants only.
Question three
What’s the sunlight exposure? Full sun, partial shade, or full shade, observed across the actual day rather than assumed this is one of the most common mismatch errors, planting a shade-loving species in a spot that receives hours of direct afternoon sun.
Question four
What are the water requirements, realistically? Match plant water needs to both the site’s natural moisture pattern and your household’s realistic irrigation capacity a beautiful but thirsty species in a spot with no easy watering access is a maintenance problem waiting to happen.
Question five
What’s the plant’s mature size? Always design for the plant’s full-grown spread and height, not its nursery size this single consideration prevents the majority of the “why is this tree touching my roof” problems I get called to assess years after installation.
Question six
What’s the root system like? Aggressive, spreading root systems need distance from foundations, pipes, and paved areas; more contained root systems offer flexibility closer to structures.
Plant Selection Decision Path
- Assess this specific spot’s sun, shade, and microclimate
- Check soil type and drainage at this exact location
- Confirm realistic water access and irrigation capacity
- Shortlist species matching all of the above
- From the shortlist, check mature size against available space
- Check root system against nearby structures and utilities
- Confirm maintenance demand matches your household’s realistic capacity
- Only then, choose based on aesthetic preference among remaining options
Question seven
What’s the maintenance demand? Pruning frequency, pest susceptibility, seasonal cleanup requirements weigh this honestly against your household’s actual available time and interest, not an idealized version of your gardening ambitions.
Question eight
What’s the purpose? Shade, privacy screening, ornamental focal point, ground cover, edible or medicinal useclarifying purpose narrows your options meaningfully before you even reach aesthetic preference.
Only after working through these questions in order does aesthetic preference color, flower form, foliage texture become the deciding factor among an already well-matched shortlist. This system takes more thought upfront than simply picking attractive plants from a nursery, but it’s exactly why some landscapes thrive effortlessly for decades while others struggle from year one. With your planting decisions grounded in this system, let’s turn to how your landscape transforms and functions after the sun goes down.
Landscape Lighting, Security and Night-Time Outdoor Design
We introduced landscape lighting in our fundamentals guide, but it deserves a more complete treatment here, because lighting genuinely changes how a landscape is perceived and used often more dramatically than any single daytime design decision.
Pathway lighting
Guides safe movement along walkways at a low, unobtrusive level ideally illuminating the path surface itself rather than glaring outward at eye level, spaced consistently enough to avoid dark gaps between fixtures.
Entrances
Deserve slightly brighter, more deliberate lighting than general pathways, since this is both a safety priority (identifying visitors, avoiding trip hazards) and a first-impression design moment worth treating with intention.
Steps
Absolutely require dedicated lighting this is a genuine safety non-negotiable, not an aesthetic preference, since unlit level changes are one of the most common causes of outdoor falls after dark.
Safety Priority
If your lighting budget is limited, prioritize steps and level changes first, entrances second, and purely decorative accent lighting last. Safety-critical lighting should never be the item cut to save cost.
Trees and focal points
Benefit from uplighting a fixture positioned at the base, aimed upward through branches or foliage creating dramatic shadow patterns and texture that transform how a specimen tree or feature reads after dark, often more dramatically than during the day.
Security-sensitive areas
Boundary walls, gates, previously dark corners benefit from brighter, sometimes motion-activated lighting specifically to remove the concealment that opportunistic security risks typically rely on, as discussed in our fundamentals guide.
Glare
Is the enemy of good landscape lighting fixtures aimed directly outward at eye level create discomfort and actually reduce visibility by causing pupils to constrict, rather than helping people see clearly. Well-designed lighting illuminates surfaces and features, not the viewer’s eyes directly.
Energy efficiency
Matters both financially and practically, given inconsistent power supply in many areas solar-powered fixtures for path and accent lighting reduce both running cost and dependency on grid or generator power, while LED fixtures for security lighting offer longer life and lower consumption than older lighting technology.
Three-Layer Lighting System
Layer 1 — Safety: paths, steps, level changes (non-negotiable)
Layer 2 — Security: entry points, boundary walls, dark corners (motion-activated where useful)
Layer 3 — Ambiance: accent lighting on trees, features, seating areas (purely atmospheric)
How lighting changes perceived landscape after dark: A landscape that reads as spacious and open during the day can feel completely different at night good lighting design maintains a sense of scale and orientation, while poor lighting (either too little, or harsh and glaring) can make even a beautifully designed daytime landscape feel disorienting or unwelcoming after sunset.
Thoughtful lighting effectively gives you two landscapes for the price of one a daytime landscape and a genuinely different, atmospheric nighttime version. With design, drainage, circulation, planting, and lighting all covered, let’s move into genuinely practical territory: how to evaluate the contractor quotes you’ll eventually receive for all of this work.
How to Compare Landscaping Quotes Without Choosing the Wrong Contractor
This is where I want to save you real money and genuine frustration, because comparing landscaping quotes on price alone is one of the most common and most costly mistakes I see clients make. Two quotes with wildly different prices might represent completely different scopes of work, not simply different levels of profit margin.
Scope
Start by confirming each quote covers the exact same scope design, installation, drainage, irrigation, maintenance period. A dramatically cheaper quote often simply excludes items a more complete quote includes, rather than genuinely offering better value.
Quantities
Check that plant counts, paving area, and material quantities match across quotes for the same design a lower price sometimes reflects fewer plants or a smaller paved area than what you actually requested, not more efficient pricing.
Comparison Tip
Request an itemized breakdown from every contractor, not just a lump sum. If a contractor resists providing this, treat that reluctance itself as useful information about how they operate.
Materials
Confirm exactly which paving material, plant grade, and soil amendment quality each quote specifies “pavers” and “premium interlocking pavers” are not the same product, and vague material descriptions often hide lower-grade substitutions.
Plant specifications
Check exact species, size at installation, and quantity “trees” as a line item tells you nothing; “3 x indigenous shade trees, 2-meter height at planting” tells you what you’re actually purchasing.
Drainage
As emphasized throughout this guide, confirm drainage and grading treatment is explicitly included and specified, not glossed over this is precisely the item budget quotes most commonly omit or under-specify.
Irrigation
Confirm whether irrigation is a full automated system, a basic manual setup, or excluded entirely this significantly affects both price and your long-term maintenance burden.
Labor
Understand who’s actually doing the work the contracting company’s own crew, or subcontracted labor and their relevant experience, since labor quality directly affects installation outcomes regardless of design quality on paper.
Warranties
Ask specifically what’s warrantied and for how long plant survival guarantees, hardscape workmanship warranties and get warranty terms in writing, not just verbal assurance.
Quote Comparison Checklist
☐ Same scope confirmed across all quotes (design, installation, drainage, irrigation, maintenance)
☐ Plant and material quantities match the same design
☐ Specific material grades and plant specifications listed, not vague terms
☐ Drainage and grading explicitly included and detailed
☐ Irrigation scope clearly defined
☐ Labor source and experience understood
☐ Warranty terms specified in writing
☐ Exclusions clearly listed, not left ambiguous
Maintenance. Confirm what maintenance period, if any, is included post-installation, and what ongoing maintenance would cost separately if you choose to continue with the same contractor.
Exclusions. Perhaps most important ask every contractor directly what’s explicitly excluded from their quote. A quote’s exclusions often reveal more about true cost than its inclusions, since excluded items become your responsibility or a costly change order later.
Comparing quotes this thoroughly takes more time upfront than simply picking the lowest number, but it protects you from the far more expensive experience of a project that stalls, disappoints, or requires costly correction because the scope was never genuinely comparable in the first place. With your project properly commissioned and executed, let’s close with a perspective I consider genuinely essential and too often missing from landscaping conversations: how your landscape will actually change over time.
The Landscape Lifecycle: Designing for Installation, Growth, Maintenance and Future Change
The Landscape Lifecycle: Designing for Installation, Growth, Maintenance and Future Change
This is, honestly, the section I most want you to internalize from this entire guide, because it addresses a blind spot in how most people think about landscaping. A landscape is not a finished product on installation day it’s a living system that will look meaningfully different at every stage of its life, and designing with that trajectory in mind is what separates landscapes that improve with age from ones that peak on day one and decline afterward.
At installation
Your landscape will look sparse, almost deliberately so young plants, small in scale relative to their eventual mature size, with visible gaps between them. This is normal, and it’s the correct way to plant: giving each specimen room to grow into rather than overcrowding for an immediately “full” look that becomes genuinely overcrowded within a few years.
Set Expectations Early
If your landscape looks sparse on installation day, that’s not a failure that’s correct spacing for long-term health. A landscape that looks completely full on day one is usually overplanted and will need thinning within a couple of years.
At one year
Plants have begun establishing root systems, ground cover has started filling in, and the landscape starts to feel more integrated, though still visibly young. This is the critical establishment period where consistent watering and care most directly determine long-term success corners cut here often show up as plant losses or stunted growth later.
At three years
Shrubs and mid-sized plants typically approach a more mature form, ground cover has generally filled in completely, and the overall composition starts to read as intentional and designed rather than newly planted. This is often when a landscape starts genuinely resembling the vision from the original design drawings.
At five years
Faster-growing trees begin providing meaningful shade and structure, hedges have typically filled into solid screening, and the landscape generally reaches a comfortable, established equilibrium though this is also when the first round of active management becomes necessary: pruning overgrown areas, thinning overcrowded planting, addressing any plants that have outperformed or underperformed expectations.
Five-Year Check-In
This is a good point to reassess your entire landscape honestly what’s thriving, what’s struggling, what’s outgrown its space and make deliberate adjustments rather than letting minor issues compound silently for another five years.
At ten-plus years
Slower-growing trees reach genuine maturity, providing substantial canopy and shade that fundamentally changes the site’s microclimate compared to installation day often shifting previously sunny areas into shade, which may require adjusting understory planting that was originally selected for sun exposure.
Throughout this entire trajectory, several ongoing realities deserve honest acknowledgment. Plant replacement is inevitable even well-chosen plants have a lifespan, and budgeting mentally (and financially) for periodic replacement, rather than treating any plant loss as a design failure, keeps expectations realistic. Maintenance demand generally decreases as ground cover matures and suppresses weeds, though pruning and management demand for larger trees and shrubs increases with their size. Irrigation needs often decrease as root systems establish more deeply and plants become more drought-resilient, though this varies significantly by species. Future construction an extension, a new structure, a driveway expansion should ideally be anticipated at the original design stage where possible, since retrofitting new construction into a mature landscape is far more disruptive than accommodating future flexibility from the outset.
Designing with this full lifecycle in mind rather than optimizing purely for how a landscape looks on the day photos are taken for installation completion is, in my professional opinion, the single biggest mindset shift that separates a landscape you’ll love more each year from one that quietly disappoints you by year three. Every principle covered across this guide and our earlier ones site analysis, drainage, plant selection, hardscape balance ultimately serves this same goal: a landscape engineered not just to look good on day one, but to genuinely mature into something better over time.
Call to Action
If you’re ready to plan a landscape with this full lifecycle in mind from the very first site visit, our Services page connects you directly with our team for a proper site consultation. To build your own technical understanding of everything covered across this guide, explore our Plan School. For house plans already designed with landscape integration in mind, browse our Plans Library, and for more practical guides like this one, return to our Homepage.
External Citation Reference: U.S. Environmental Protection Agency’s green infrastructure resources offer additional supporting detail
Related Articles
- Landscape Architect: What They Do, What They Design and When You Need One
- Landscaping: Complete Guide to Design Ideas, Gardens, Yards and Outdoor Spaces
- Landscaping & Landscape Design: Complete Guide to Landscape Architecture
- Urban Planning & Urban Design: Complete Guide to Modern Cities, Development and Renewal
- Real Estate Development & Site Planning: Guide to Planning, Construction, Infrastructure and Stormwater Management
- Urban Planning & Urban Design: Complete Guide to City Planning, Zoning and Land Development
- Building Regulations by Country: Permits, Zoning, Codes and Property Development Rules
- Building Regulations and Codes: Complete Guide to Requirements Worldwide
- House Construction Approval Process: Planning, Permits, Inspections and Final Approval
- Building Setback Requirements: Complete Guide to Front, Side and Rear Setbacks
- Land Development Guide: Permits, Planning, Zoning, Costs and Approval Process Explained
- Building Permit Documents: Complete Checklist of Requirements for Building Approval
- Zoning Laws and Regulations for Property Development: Complete Guide
- Planning Permission and Building Permits for Residential Construction: Complete Guide
- How to Apply for a Building Permit: Requirements, Documents, Costs & Process
- Building Permit Requirements by Country: Complete Global Guide
- House Plans: Complete Guide to Floor Plans, Building Drawings, Home Designs & How to Design a House
- House Plan Selection Guide: How to Choose the Right House Plan for Your Land, Budget and Lifestyle
- Land-Buying Checklist: 100+ Things to Check Before Buying Land in Nigeria