A client once sent me photos of his newly finished bungalow in Uyo beautiful tiling, nice paint job, generator house already fenced off and then, almost as an afterthought, a video. The video showed brown water sitting against his foundation wall after a thirty-minute downpour, climbing visibly up the plinth. He hadn’t asked me a single question about drainage during design. He’d asked about room sizes, about roofing sheets, about the kitchen layout. Drainage never came up until the water did.
That gap between how much attention drainage gets before construction and how much damage it causes after is the entire reason I’m writing this. I trained in Geography and Urban and Regional Planning before I ever picked up an architectural pencil, and drainage is one of those topics that sits exactly at the join between those two disciplines. It’s not glamorous. Nobody shows you drainage design in a house-plan Instagram reel. But it decides, more reliably than almost any other single factor, whether the house you build will still be dry and structurally sound in fifteen years.
So let’s actually work through it properly not as a vague “make sure your compound drains well” tip, but as a planned system with numbers you can check against your own plot.
First, What Is Drainage Actually Planning For?
Drainage planning has one job: get water that falls on or flows toward your site to leave it again, in a controlled direction, before it can pool, saturate the ground, or push against your foundation. That’s it. Everything else slopes, pipes, swales, soakaways is just the mechanism for doing that job reliably.
The water you’re managing comes from two sources, and conflating them is where a lot of homeowners go wrong:
Stormwater is rain that falls directly onto your roof, compound, and any paved surfaces on your plot.
Surface runoff is water that falls elsewhere on a neighbour’s roof, on the street, on higher ground nearby and flows across or into your plot because gravity sends it there.
A drainage plan that only accounts for your own roof while ignoring what’s flowing in from the street or the plot next door is, by definition, an incomplete plan. This is exactly where the geography training comes in useful: you have to read the land as a catchment, not just a building site.
Moving from that basic distinction, let’s build the system in layers, because that’s genuinely how drainage should be designed not as one drainage pipe at the end, but as a sequence of zones that each do a specific job.
The Five-Zone Drainage Framework
I use this framework with every client now, because thinking in isolated fixes (“add a gutter,” “dig a soakaway”) misses how water actually travels. Water moves through five zones, in order, from the moment it falls to the moment it leaves your plot for good.
Zone 1 Roof. Where stormwater is first collected, via gutters and downpipes.
Zone 2 The apron (0–1.5 metres from the building). The ground immediately around your foundation, which must shed water away from the structure.
Zone 3 The compound (the rest of your plot). Where water is channelled across open and paved areas toward an exit point.
Zone 4 The plot boundary and road frontage. Where your compound’s water meets the public drainage system.
Zone 5 The catchment beyond your plot. The wider area whose runoff may flow toward or past your site regardless of what you build.
Each zone needs its own slope, its own capacity, and its own discharge point and a failure in any one zone undermines the zones after it, no matter how well the others are designed. A perfectly sloped compound (Zone 3) means nothing if the public drain it discharges into (Zone 4) is silted up and backing water up onto your land. Let’s go through each zone properly.
Zone 1: Roof Drainage
Your roof is the single largest hard surface on most residential plots, and it’s the first point where stormwater becomes a managed quantity rather than falling rain.
Gutter sizing depends on your roof area, not guesswork. A standard rule of thumb for a half-round gutter in a tropical high-intensity rainfall zone is roughly 1 square metre of roof area for every 1cm² of gutter cross-section, though for anything beyond a simple bungalow roof, this should be checked against actual local rainfall intensity rather than assumed.
Downpipe spacing should generally not exceed 10–12 metres along a gutter run; beyond that, water pools at the far end of the gutter faster than it can drain, especially during heavy tropical downpours where rainfall intensity spikes well above what temperate-climate gutter guidance assumes.
Downpipe discharge is where I see the most common and most damaging mistake: downpipes dropping water straight onto the ground right beside the foundation. Every downpipe should discharge either into a channel that carries the water at least 1.5 metres away from the wall, or into a properly connected underground pipe never directly onto bare soil at the base of the building.
If your roof drains onto bare ground beside your foundation, you are actively saturating the soil your footing sits in, every single time it rains. This is one of the quiet, slow-motion causes of foundation settlement and cracking that only becomes visible years later by which point it’s a structural repair, not a drainage fix.
Zone 2: The Apron — Grading Around the Building
This is the zone that decides whether water pushes toward your foundation or away from it, and it’s governed by a simple, checkable number: slope.
The formula for slope is:
S (%) = (Rise ÷ Run) × 100
Where Rise is the vertical drop and Run is the horizontal distance over which that drop happens.
For the first 1 metre away from your building, the ground should fall at a minimum of 2% meaning a drop of 2cm for every 1 metre you move away from the wall. For the next stretch, out to about 3 metres, a gentler 1% minimum slope (1cm drop per metre) is generally sufficient to keep water moving away without creating an awkward, overly steep apron close to the house.
Here’s a worked example. Say your compound is fairly flat and you want to check if your current grading is adequate for a 2-metre apron:
- Required minimum fall over 2 metres at 2% = 2m × 0.02 = 0.04m = 4cm
If your ground only drops 1cm over that same 2 metres, your apron slope is 0.5% less than a quarter of what it needs to be and water will sit there rather than moving away, especially once the soil is saturated and can’t absorb more.
Check your apron slope with nothing more than a spirit level and a tape measure before you plaster your external walls. It’s far cheaper to add fill and re-grade at this stage than to dig up a finished compound later because water is pooling against the wall.
Zone 3: Compound Drainage
Once water is moving away from the building, it needs a planned path across the rest of your compound toward an exit point not just “somewhere that seems lower.”
Surface channels (open concrete or paved drains) across a compound should maintain a minimum longitudinal slope of about 0.5%, and ideally closer to 1–2% where your plot’s levels allow it. Below 0.5%, water moves too slowly, silt and debris settle inside the channel, and the drain gradually stops functioning even though it looks structurally fine.
Paved versus unpaved surfaces behave very differently, and this is where the Rational Method a formula every planning and civil engineering student learns, and one I think every serious self-builder should at least understand the logic of becomes genuinely useful even at house-plot scale.
The Rational Method formula:
Q = (C × i × A) ÷ 360
Where:
- Q = peak runoff rate, in cubic metres per second (m³/s)
- C = runoff coefficient (a number between 0 and 1 describing how much of the rain actually runs off versus soaks in)
- i = rainfall intensity, in millimetres per hour (mm/hr)
- A = catchment area, in hectares
- 360 = a unit conversion constant for this combination of units
Typical runoff coefficients (C values) you’ll actually use:
| Surface Type | Runoff Coefficient (C) |
|---|---|
| Concrete/paved compound | 0.85 – 0.95 |
| Roof (any material) | 0.85 – 0.95 |
| Compacted gravel/laterite | 0.40 – 0.60 |
| Lawn/grassed open ground | 0.10 – 0.25 |
| Bare sandy soil | 0.20 – 0.35 |
Worked example: Take a small urban plot the kind this site focuses on of 450 square metres (0.045 hectares), fully paved, with C = 0.9, during a heavy local storm with rainfall intensity of 100mm/hr (a realistic short-duration intensity for many Nigerian cities, though your local intensity-duration-frequency data should ideally confirm this):
Q = (0.9 × 100 × 0.045) ÷ 360
Q = 4.05 ÷ 360
Q = 0.01125 m³/s, or about 11.25 litres per second
That’s the peak flow your drainage channel needs to be capable of carrying away during a heavy storm a number you or your contractor can actually check a proposed drain against, instead of just eyeballing a channel and hoping.
Once you know roughly how much water (Q) you need to move, you need to know whether your planned channel can actually carry that much which is where Manning’s equation comes in.
Manning’s Equation (for flow in an open channel):
V = (1 ÷ n) × R^(2/3) × S^(1/2)
Where:
- V = flow velocity (m/s)
- n = Manning’s roughness coefficient (roughly 0.013 for smooth concrete, 0.025 for a rough earth channel)
- R = hydraulic radius (channel cross-sectional area ÷ wetted perimeter)
- S = channel slope (as a decimal, e.g., 1% = 0.01)
Once you have velocity, discharge capacity is simply:
Q = V × A (where A here is the channel’s cross-sectional area)
You don’t need to run this calculation for every metre of drain on a small residential plot, but understanding that a channel’s capacity depends on its roughness, its cross-section, and its slope not just “how big it looks” explains why a wide, shallow, poorly sloped concrete drain can carry less water than a smaller, steeper, smoother one.
Zone 4: Where Your Plot Meets the Road and the Public Drain
Now that water has crossed your compound, it needs somewhere legitimate to go and this is where private drainage planning runs directly into public infrastructure, road drainage, and, frankly, into other people’s property rights.
Road drainage basics worth understanding
Road drainage basics worth understanding, even as a homeowner rather than an engineer: roads are built with a camber or crown a slight peak along the centre or a consistent cross-fall specifically so rainwater sheds off the road surface into side drains rather than pooling on the carriageway. Side drains running along a road should have a continuous fall toward a defined outfall point (a culvert, a larger public drain, or a natural watercourse) a side drain with no consistent fall is really just a long, narrow pond waiting to happen.
Where your compound drain discharges matters legally, not just hydraulically
Where your compound drain discharges matters legally, not just hydraulically. Your drain should connect into the public drainage system at a point designed to receive it typically a culvert crossing under the road frontage of your plot not directly onto a neighbour’s land, and not into a drain that was never sized to handle your plot’s additional flow. In many Nigerian cities, including areas I’ve worked across in Akwa Ibom and Rivers States, this exact issue a new building’s drainage discharging onto a neighbour’s compound or into an undersized street drain is one of the most common sources of boundary disputes I get asked to help resolve.
Before finalizing where your compound drain will discharge, physically check the public drain or culvert at your road frontage. Is it clear of silt and refuse? Is it actually connected through to a functioning outfall, or does it just end abruptly a few plots down? A drainage plan that discharges perfectly into a blocked or disconnected public drain has not actually solved your flooding risk it’s just relocated it to your gate.
Zone 5: The Catchment Beyond Your Plot
This is the zone almost nobody plans for, because it feels like it’s not their problem and it’s exactly why so many well-built houses still flood.
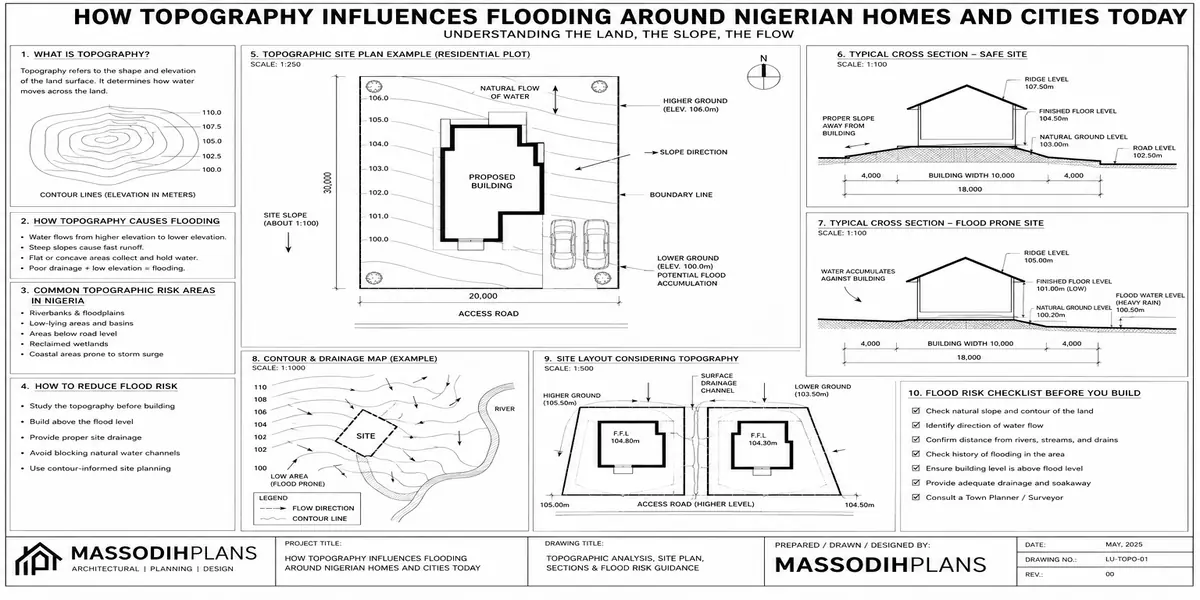
Before you finalize any drainage design, you need to answer one question honestly: is your plot lower than the land around it, in the direction water naturally flows from? If your plot sits at the base of a slope, or downstream of a larger catchment that hasn’t been developed yet, you are not just managing your own roof and compound water you’re managing everyone else’s runoff too, whether you planned for it or not.
This is a direct application of basic catchment geography to a single plot, and it’s the single biggest reason “my house keeps flooding even though I built it well” complaints happen. The house was built well. The catchment it sits in wasn’t accounted for.
Practical catchment checks before you build:
- Walk the area around your plot after a heavy rain and observe where water is actually moving, not where you assume it moves
- Check whether any larger drain, stream, or natural watercourse passes near your plot, and whether it has capacity for upstream development that hasn’t happened yet
- Ask long-term residents or neighbours where flooding has historically occurred on that street, before you commit to a building design
Surface Runoff, Flooding, and Why They’re Connected But Not the Same Problem
Surface runoff becomes flooding only when the rate of water arriving exceeds the rate at which it can be carried away or absorbed. That sounds obvious written out, but it has a very practical implication: flooding isn’t caused by “too much rain” in isolation it’s caused by a mismatch between rainfall intensity and drainage capacity at some specific point in the system.
This reframes how you should think about flood risk on your own plot. The relevant questions aren’t “does it rain heavily here?” (it probably does, wherever you’re building) but:
How much impervious surface (roof, paving, concrete) have I added to this plot, and how much more runoff does that generate compared to the original bare ground?
Does my drainage system’s capacity gutters, channels, the public drain I discharge into actually match the peak flow my development now generates?
Has anything changed upstream in my catchment (new construction, blocked drains, filled wetlands) that increases the flow reaching my plot compared to when drainage was last assessed?
Urban development itself changes the runoff coefficient of an entire area over time bare ground with a C value of 0.2 becomes paved compound and rooftop with a C value of 0.9, multiplied across every plot in a growing neighbourhood. That citywide shift in surface cover is a major, underappreciated driver of urban flooding, and it’s happening across most fast-growing Nigerian cities right now, independent of any single homeowner’s choices.
Where Should Rainwater Actually Discharge?
This question has a hierarchy of acceptable answers, not one universal answer, and the right choice depends on your soil, your plot size, and what’s available at your road frontage.
Option 1: A soakaway (infiltration pit)
Where soil permeability allows it generally sandy or loamy soils, not heavy clay or waterlogged ground a soakaway lets roof and compound water infiltrate back into the ground on your own plot rather than discharging elsewhere. This is increasingly the preferred option where public drainage capacity is limited, and it reduces how much stormwater your plot pushes onto the street in the first place.
Option 2: A connected public drain or culvert
Where soakaways aren’t suitable (clay soil, high water table, very small plot with no room for infiltration), your drain should discharge into the designated public drainage system at your road frontage, at a point actually built to receive it.
Option 3: A French drain to a lower point
Where your plot has nowhere nearby to discharge into directly, a perforated pipe laid in a gravel-filled trench, sloped continuously toward an outfall, can move water underground to a point where it can finally be released useful for awkward plot shapes or levels.
What you should never do
Discharge directly onto a neighbour’s plot without an agreed easement, discharge into a drain with no confirmed outfall, or simply let water find its own way across your compound with no defined path at all. Each of these either creates a legal problem, a flooding problem, or both.
Drainage Planning for Small Urban Plots Where This Actually Gets Harder
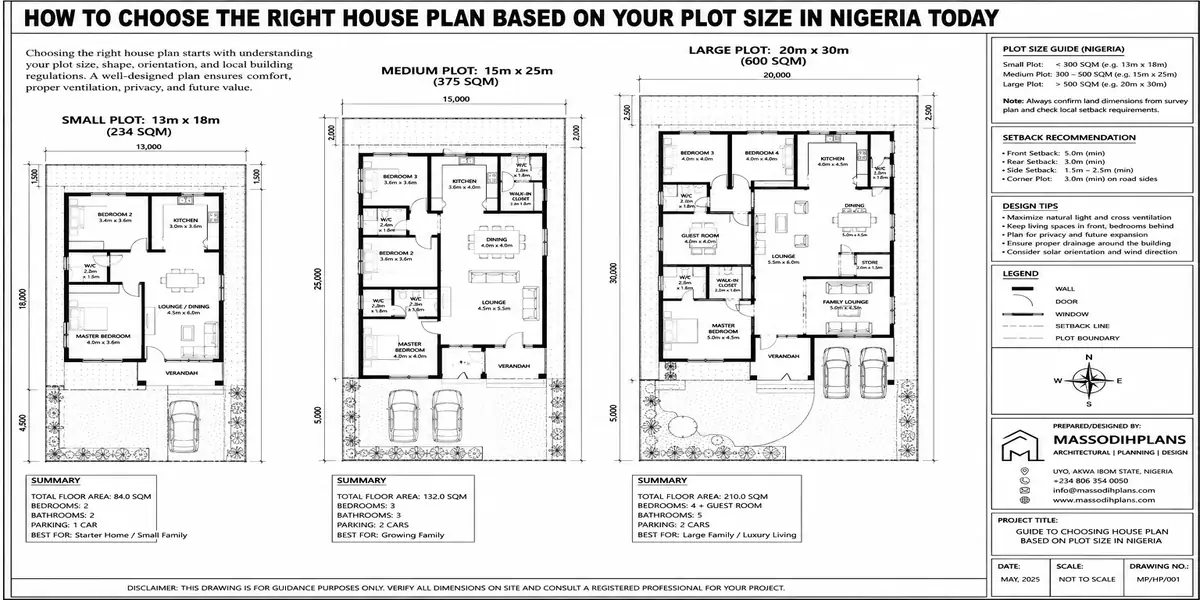
Here’s where I want to connect this back directly to what this site exists to help with: Nigerian house plans and building design on small plots. Drainage theory from large civil engineering manuals assumes you have generous setbacks and open ground to work with. A huge number of urban Nigerian plots 450 to 650 square metres, often less in older, more built-up parts of cities simply don’t.
On a small, tightly built plot, three constraints compound on each other:
Reduced apron space. If your setback is tight, you may not have the 2–3 metres of graded apron described in Zone 2 above. Where space is this limited, a surface channel immediately against the building, properly sloped and covered with a grate, can substitute for an open graded apron but it must be planned at the foundation design stage, not added afterward.
Higher effective runoff coefficient. Small urban plots tend to be almost entirely paved or built on, pushing your plot’s overall C value toward the 0.85–0.95 range described earlier. This means a small plot often generates a disproportionately high peak runoff relative to its size, which your drain sizing needs to reflect rather than assume is automatically small because the plot is small.
Less room for a soakaway. Infiltration pits need both adequate soil permeability and physical space, and a tightly built small plot may not have enough clear ground to fit one that actually works. On genuinely constrained plots, this often pushes the design toward Option 2 (connected public drain) as the realistic choice rather than Option 1.
This is precisely why drainage has to be part of the initial floor plan and site layout conversation on a small plot, not a detail added after the building footprint is fixed. On a generous plot, you can often retrofit drainage around whatever building position you chose. On a small plot, the building position and the drainage path frequently have to be decided together, or one of them loses.
A Drainage Planning Checklist You Can Actually Use
- Identify where water currently flows across your plot before construction, by observing it during real rainfall if possible
- Get a soil assessment even a basic one to know whether infiltration (a soakaway) is realistic for your ground conditions
- Plan your building’s finished floor level relative to the surrounding ground and road level, not just relative to your own compound
- Design gutters and downpipes sized to your actual roof area, with downpipes discharging at least 1.5m from the foundation
- Grade your apron to a minimum 2% fall for the first metre, tapering to 1% over the next two to three metres
- Plan a continuous-fall compound drain (minimum 0.5%, ideally 1–2%) from the building toward a defined discharge point
- Physically inspect the public drain or culvert at your road frontage before assuming it can receive your flow
- Confirm, in writing where possible, any discharge arrangement that involves a neighbour’s land or a shared drain
- Check upstream is your plot at the bottom of a catchment that could send someone else’s runoff your way, regardless of what you build?
- Have your drainage layout reviewed alongside your architectural and structural drawings, not as an afterthought once the building design is finished
How This Differs Around the World
If you’re reading this from outside Nigeria and a good number of this site’s readers are in the US, UK, Germany, UAE, Canada, Australia, Singapore, and across the Gulf and Nordic regions the underlying physics above (slope, the Rational Method, Manning’s equation) applies everywhere water and gravity exist. What changes by country is regulation, rainfall intensity, and the specific drainage culture you’re building into.
| Region | What Typically Differs |
|---|---|
| US / Canada | Detailed municipal stormwater manuals (often requiring on-site detention for new development); freeze-thaw considerations affect pipe depth |
| UK | Strong emphasis on Sustainable Drainage Systems (SuDS) — soakaways and permeable paving are often required, not optional, for new builds |
| Germany / Switzerland | Rigorous engineered stormwater separation (often separate systems for roof/surface water versus foul water), strict runoff coefficient documentation |
| UAE / Qatar | Drainage planning focuses more on flash-flood events from rare but intense rainfall, plus managing extremely high summer evaporation versus sudden storm loads |
| Iceland / Luxembourg | Smaller-scale, highly regulated municipal drainage integration; snowmelt timing is a factor alongside rainfall |
| Australia | Strong focus on both flash flooding and prolonged drought cycles, with water-sensitive urban design increasingly standard |
| Singapore | Among the most engineered drainage infrastructure in the world, with mandatory on-site detention tanks for many developments due to extremely high-intensity tropical rainfall arguably the closest international comparison to Nigerian rainfall intensity |
Wherever you’re building, the same five-zone logic applies: your roof, your apron, your compound, your boundary discharge point, and the catchment beyond you. Only the specific numbers minimum slopes, required coefficients, mandatory detention change by jurisdiction, so always check your local building control or municipal drainage requirements against the general principles here.
Frequently Asked Questions
What is the minimum slope for drainage around a house?
A minimum of 2% fall for the first metre away from the foundation, tapering to around 1% over the next two to three metres, is a reliable general standard. Compound drainage channels should maintain at least 0.5%, with 1–2% preferred where site levels allow.
How do I calculate how much rainwater runoff my plot will generate?
The Rational Method formula, Q = (C × i × A) ÷ 360, gives you peak runoff in cubic metres per second using your surface type’s runoff coefficient (C), local rainfall intensity (i) in mm/hr, and your plot area (A) in hectares.
Where should rainwater from my roof go?
Ideally into a soakaway if your soil permeability allows it, or into a properly connected public drain or culvert at your road frontage if it doesn’t never directly onto bare soil against your foundation.
Why does my compound flood even though I built on high ground?
Usually because the drain you discharge into is undersized, blocked, or disconnected further downstream — or because upstream development has increased the runoff reaching your area beyond what the local drainage system was originally designed to handle.
Can I plan drainage myself, or do I need a professional?
Basic grading and gutter sizing are things an informed homeowner can check personally using the slope and coefficient figures here. For discharge point design, soakaway sizing, and anything involving shared or public drainage, get it reviewed by a qualified planner or engineer before construction the cost of a review is far smaller than the cost of a flooded foundation.
Finally
Drainage planning isn’t a finishing-stage detail it’s a site-level decision that belongs in the same conversation as your floor plan, your foundation design, and your building’s position on the plot. The five-zone way of thinking about it roof, apron, compound, boundary, catchment is what turns “make sure water doesn’t collect near the house” from a vague instruction into something you can actually check with a spirit level, a tape measure, and the formulas above.
If you’re planning a build on a small urban plot and want drainage designed into your layout from the start rather than fixed after the fact, our Services page covers how we handle site and drainage planning alongside the architectural design itself. Browse our Plans Library for house plans developed with Nigerian plot sizes and drainage realities already accounted for, or visit Plan School to understand how site planning and building approval fit together before you commission a design. You can also explore more planning and building guides on our Homepage.
Related Articles
- Where Should a Borehole Go? Safe Water Source Placement in Nigeria
- Where Should Septic Tank and Soakaway Go? Location, Distance, Size & Site Plan Guide
- Should I Buy This Property as an Investment? Check These Risks First
- How Much Parking Space Do I Need? Sizes, Layout & Nigerian Standards
- Can I Put a Duplex on My Plot? Check Nigerian Land Size Rules First
Massodih Okon is a Nigerian built-environment professional with academic and professional experience in urban and regional planning, geography, architectural design, Landscape Design, GIS and land development.
He holds a Master’s degree in Urban and Regional Planning from the University of Uyo and a first degree in Geography and Regional Planning.
Through MassodihPlans, he publishes practical guides on Nigerian house plans, building design, physical planning, site planning, development approval and residential construction. Read the full author profile →