Duplex Drawing and Design for Small Plots
Most people who say they want to learn architectural drawing never actually sit down and draw anything.
They read articles. And they watch videos. They download floor plans from the internet and save them in a folder. But they never pick up a scale rule, never work out a setback calculation on paper, and never feel the real frustration of trying to fit four bedrooms, a staircase, a kitchen, parking, and a service compound into a plot that seems too small to carry all of it.
This guide is for the person who is ready to actually do it.
I am not going to give you theory. And I am going to walk you through the exact practical process that a working designer uses when a client brings a small plot and asks for a duplex. I will show you the tools, the dimensions, the room arrangement decisions, the ventilation thinking, the staircase logic, the roof planning, the site layout, and the Nigerian construction realities that will either save your design or destroy it.
If you follow this guide properly and do the work as you read, by the time you reach the last section, you will have the foundation of a complete duplex drawing set. Not a concept. Not a sketch. A real, buildable plan.
That is what this is about.
What You Must Settle Before You Draw a Single Line
Many students and first-time designers approach duplex design backwards. They start thinking about how the building will look before solving how it will work.
A good duplex is not about drawing many rooms or producing an impressive elevation sketch. A successful duplex must fit the plot properly, respect setbacks, allow airflow, solve circulation problems, provide parking, manage drainage, and satisfy real family lifestyle needs.
Professionals solve functionality first. Appearance follows from good functional decisions, not the other way around.
If you internalize that principle before touching a pencil or opening AutoCAD, your designs will immediately become more practical and more buildable. Clients do not live in elevations. They live in floor plans. Get the floor plan right and the elevation will take care of itself.
There is one more thing to understand before we begin. A small plot does not mean a cramped building. It means a disciplined design. Every room must earn its space. And every corridor must serve a purpose. Every wall you draw must have a reason. Designing for a small plot is actually harder than designing for a large one, and that is exactly why most beginners get it wrong.
Tools You Need to Start Drawing
Start with manual drawing before depending on software. Software makes a competent draughtsman faster. It does not make a poor designer better. The discipline of hand drawing builds spatial thinking in ways that clicking a mouse cannot replicate.
Manual Drawing Tools
Drawing Board
Use an A2 or A1 board. It supports sheet stability, keeps your lines straight, and allows you to spread out a full drawing layout without running out of space at the edges. Do not draw on a table without a proper board. The results will show.
T Square
Used for all horizontal lines, layout alignment, and wall positioning. A good wooden or aluminium T square is not optional. A warped T square produces crooked drawings, and crooked drawings produce confused contractors.
Set Squares
You need two:
- 45 degree set square
- 30 and 60 degree set square
These handle vertical lines, angle construction, staircase layouts, and roof slope drawings. They work in combination with the T square. Learn how to use both together before moving to digital tools.
Architectural Scale Rule
This is the single most important tool on your drawing table. At 1:100 scale, one centimetre on paper represents one metre on the actual building. This is the standard scale for duplex floor plans.
| Scale | Use |
|---|---|
| 1:100 | Floor plans |
| 1:50 | Detailed room drawings |
| 1:200 | Site plans |
Get comfortable reading your scale rule before you draw anything. Beginners who cannot read a scale rule quickly produce drawings with random dimensions that make no physical sense when a contractor tries to build from them.
Pencils
| Pencil Grade | Use |
|---|---|
| 2H | Construction and layout lines |
| HB | General drawing |
| 2B | Final bold outlines |
Start construction lines lightly. You will move walls, adjust rooms, and revise dimensions many times before a plan is resolved. Light construction lines erase cleanly. Heavy lines from the start create a mess.
Eraser and Erasing Shield
An erasing shield lets you clean up one line without smudging the lines around it. This small tool saves hours of frustration on detailed drawings.
Technical Pens
Used for final presentation. They produce clean, consistent line weights that make drawings readable and professional. Common weights used are 0.25mm, 0.35mm, and 0.5mm for different line types.
Software Tools
Once you understand manual drawing, develop digital skills alongside it.
AutoCAD is the industry standard for floor plans, sections, elevations, and dimensioning. This is what most architectural firms and drawing offices use. Learn it.
SketchUp is excellent for beginners learning to understand massing, roof shapes, and three-dimensional space before committing to a full plan. It helps you visualize what your flat drawing will actually look like when it becomes a building.
Revit is used for BIM workflow and three-dimensional modelling at a more advanced level. This is where the industry is moving.
Lumion is used for rendering and realistic client presentation once the design is fully resolved.
For the practical exercises in this guide, I will describe everything in terms that apply to both manual drawing and digital drafting. The principles are the same regardless of your tool.
Understanding the Plot Before Drawing Begins
For this tutorial, I am using a 15 metre by 30 metre plot. This gives you 450 square metres of land and is one of the most practical urban residential plot sizes for a duplex design. It is small enough to teach discipline and large enough to produce a genuinely functional four-bedroom building.
Apply Setbacks Before Anything Else
Setbacks are the mandatory clear distances between your building and your plot boundary. They are not negotiable. You cannot build in your setbacks. Every regulatory authority in Nigeria specifies them, and they exist for good reasons: light, ventilation, emergency access, and privacy between neighbouring properties.
Standard residential setbacks to work with:
| Boundary | Recommended Setback |
|---|---|
| Front | 4 metres |
| Rear | 3 metres |
| Left side | 1.5 metres |
| Right side | 1.5 metres |
After applying these setbacks to a 15 by 30 metre plot, your buildable envelope is approximately:
- Width: 12 metres
- Depth: 23 metres
Your building footprint will sit within this envelope. You will not use all of it for the building itself. Some of it becomes driveway, rear service compound, and side maintenance paths.
For students who want to go deeper on plot analysis and setback calculations across different regulatory zones, the Plan School section covers this as a standalone topic with worked examples.
Step 1: Draw the Plot Boundary
This is the first physical act of drawing. Everything else depends on getting this right.
Practical Procedure
Using 1:100 scale on your A1 sheet:
- Draw the plot rectangle. Your 15 metre width becomes 15 centimetres on paper. Your 30 metre depth becomes 30 centimetres on paper.
- Label all four boundary dimensions clearly outside the boundary lines.
- Add a north arrow in a corner of the sheet. Orientation matters for ventilation and solar access.
- Mark which boundary faces the road.
- Measure and draw your setback lines inside the boundary using your scale rule:
- 4 centimetres from the front boundary
- 3 centimetres from the rear boundary
- 1.5 centimetres from each side boundary
- Lightly hatch or shade the setback zones. The remaining interior rectangle is your buildable area. This is where your building lives.
Nothing permanent goes outside your buildable area. Mark it clearly and respect it throughout the entire design process.
Step 2: Establish the Building Footprint
Before arranging rooms, establish how much of the buildable area your building footprint will cover.
On a 15 by 30 metre plot, a well-proportioned duplex footprint sits at approximately:
- Width: 10 to 11 metres
- Depth: 8 to 10 metres
This gives roughly 80 to 110 square metres of footprint per floor and a total built area of 160 to 220 square metres across both floors. Within that envelope you can fit four bedrooms, living and dining spaces, a kitchen, bathrooms, a staircase, storage, and a balcony without cramming the layout or sacrificing ventilation.
The remaining area outside the footprint within the buildable zone becomes:
- Front compound depth of 10 to 12 metres for parking and entrance
- Rear compound depth of 10 to 12 metres for the service area
- Side margins for ventilation, maintenance access, and drainage
Draw your building footprint rectangle lightly on the site plan. You will refine it as the floor plan develops, but having a footprint boundary before you start placing rooms prevents the most common beginner mistake of allowing the building to grow in all directions until it has eaten the entire plot.
Step 3: Plan the Ground Floor Layout
The ground floor handles everything that happens publicly in a family home. Receiving guests, daily cooking, family movement through the building, and access to the service area at the back.
Think about how a Nigerian family actually uses this floor. Not how a European textbook says a ground floor should function. The living room in a Nigerian home is not just for the immediate family. It receives extended family visits, handles business conversations, and creates the first impression guests form of the home. Design it accordingly.
Ground Floor Spaces to Include
For a four-bedroom duplex on this plot, your ground floor should contain:
- Entrance porch with covered landing
- Living room
- Dining area in open-plan connection with the living room
- Kitchen with rear access
- Guest bedroom
- Visitor toilet and bathroom
- Family toilet
- Staircase with under-stair storage
- Short entrance corridor
The Living Room
The living room controls ground floor circulation. Position it near the front entrance so it forms a natural buffer between the entrance and the private areas deeper in the building.
Recommended dimensions: 4.5 metres by 5.5 metres
At 1:100 scale this is 4.5 centimetres by 5.5 centimetres on your sheet.
At this size, the room comfortably accommodates a standard three-piece sofa set, a centre console, a wall-mounted television, and still leaves healthy circulation space. Position it to receive morning or evening natural light from the front of the building, which reduces dependence on artificial lighting during the day.
Wall thickness: Use 225mm for external walls and 150mm for internal partition walls. On your drawing at 1:100, external walls appear as double lines 2.25mm apart and internal walls as double lines 1.5mm apart. Get into the habit of drawing wall thickness accurately from the start.
The Dining Area
Connect the dining to the living room in an open-plan arrangement. On a compact plot, removing the wall between these two spaces makes both feel larger than their individual measurements suggest and accommodates the flexible nature of Nigerian family living: gatherings, celebrations, and work-from-home days all happen in these combined spaces.
Recommended dimensions: 3 metres by 3.5 metres
The Kitchen
Place the kitchen at the rear of the ground floor. This is a deliberate decision, not a default. Rear kitchen placement keeps cooking smells and heat away from the living and dining areas. It allows kitchen traffic, which means grocery deliveries, waste removal, and gas cylinder changes, to use the back door without crossing the main living space. It gives direct access to the rear compound where the generator, borehole, and service area sit.
Recommended dimensions: 3 metres by 4 metres
Include a back door opening directly to the rear compound, a window above the sink, a ventilation opening or extractor fan position directly above the cooking area, and a small pantry or storage shelf alongside the kitchen. Without a dedicated kitchen exhaust position, cooking heat and steam travel up the staircase and into the first-floor bedrooms. Resolve that in the drawing stage, not after the building is finished.
The Guest Bedroom
A ground-floor bedroom is practically essential in Nigerian household design. It accommodates elderly parents or visitors without requiring stair navigation and sits close to a ground-floor toilet.
Recommended dimensions: 3.3 metres by 3.6 metres
Include a wardrobe, a ventilation window on an external wall, and direct access to either a small en-suite or the adjacent visitor toilet.
The Staircase
The staircase is the most important single decision in duplex design. Poor staircase placement destroys the entire circulation logic of a building. Resolve it before you finalise any room positions.
Position the staircase centrally rather than at the end of a long corridor. Central placement means every room on both floors is reachable within a few steps from the landing. It eliminates dead-end passages that waste space and make the house feel cramped.
Recommended staircase type for a compact plan: Straight-flight or U-shaped
A U-shaped staircase is space-efficient, fits naturally within a compact plan, and provides a usable intermediate landing.
Practical staircase dimensions:
| Component | Dimension |
|---|---|
| Tread depth | 300mm |
| Riser height | 150mm |
| Clear stair width | 1.2 metres minimum |
| Landing width | Equal to stair width at minimum |
Never allow anyone to narrow the staircase below 900mm clear width to save a few blocks. A narrow staircase makes furniture movement to the upper floor nearly impossible and reduces the habitability of the entire first floor.
Drawing procedure:
- Draw the staircase enclosure box on plan
- Divide into flights and landing
- Add the directional arrow showing direction of ascent
- Number each riser
- Draw the conventional diagonal cut line showing where the horizontal plan section passes through the stair
Under-stair storage: Fully enclose and fit the space beneath the staircase as a storage cupboard. On a compact plot, every square metre matters. This space handles cleaning equipment, spare cylinders, luggage, and bulk storage without claiming any room.
Step 4: Plan the First Floor Layout
The first floor is the private floor. Keep it for the family: bedrooms, the master suite, a family lounge or study, and spaces that reflect how modern Nigerian households actually function.
First Floor Spaces
- Master bedroom with en-suite bathroom
- Bedroom 2
- Bedroom 3
- Shared family bathroom
- Family lounge or study
- Landing corridor
- Front-facing balcony
The Master Bedroom
The master suite is the most financially important room in the entire building. A well-executed master suite, with proper dimensions, an attached bathroom, and natural light, is the single feature that most affects both rental price and resale value in Nigerian middle-income housing. Buyers and tenants inspect this room first and most carefully. Do not compromise here.
Recommended dimensions: 4 metres by 5 metres
This accommodates a king-size bed, two bedside tables, and a full-width built-in wardrobe with comfortable movement space remaining.
Master bathroom minimum: 2.4 metres by 2.5 metres
This gives you a full bathtub or walk-in shower cubicle, a WC, and a vanity basin. That combination is what clients and tenants in modern Nigerian housing now expect as standard. Cut corners on this room and you reduce the investment value of the entire building.
Additional Bedrooms
Bedroom 2: 3.5 metres by 3.6 metres
Bedroom 3: 3.3 metres by 3.5 metres
Every bedroom must have a window on an external wall for ventilation and natural light. No habitable room should depend entirely on mechanical cooling. If power fails, the room must still be liveable.
The Family Lounge or Study
This space earns its place in modern Nigerian household design. During the week it functions as a working-from-home area. In the evenings it becomes a family gathering space upstairs. It also serves as a children’s reading area or a home prayer room depending on the family.
Recommended dimensions: 3 metres by 4 metres
The Balcony
Include a front-facing balcony accessible from the master bedroom or the first-floor landing. When designed into the structure from the beginning, it simultaneously shades the ground-floor entrance from direct afternoon sun, extends the usable area of the first floor, allows cross-ventilation through the master bedroom, and gives the building a strong architectural identity that distinguishes it from generic construction on neighbouring plots.
Recommended projection: 1.5 metres Width: 3.5 to 4 metres
A well-detailed balcony raises the perceived value of a property measurably in photographs and at physical inspection. Design it in from the start, not as an afterthought.
Browse completed duplex designs showing balcony integration and upper floor layouts across different plot sizes in the Plans Library.
Step 5: Windows and Ventilation
This is where many student designers fail. Ventilation is not decoration. It is function. A house plan that does not actively address ventilation will be expensive to cool, uncomfortable to live in, and will show material deterioration faster than it should.
Most of Nigeria sits in a humid tropical climate. Average temperatures run from 24 to 33 degrees Celsius and relative humidity regularly exceeds 80 percent during much of the year. You are designing for that climate, not for the mild temperate conditions that most imported textbooks assume.
Cross-Ventilation
Design every habitable room with at least one window on an external wall. Position windows on opposite walls of the same room where possible so that air flows through rather than entering and stagnating.
Orient the building with its longer face along the north-south axis where the plot allows, so that prevailing south-westerly winds can flow through laterally. Use casement windows rather than fixed louvres. Casement windows capture and direct wind far more effectively.
Practical Window Dimensions
| Window Type | Recommended Size |
|---|---|
| Bedroom window | 1.2m by 1.5m |
| Living room window | 1.8m by 1.5m |
| Kitchen window | 1.2m by 1.2m |
| Toilet ventilator | 600mm by 450mm |
High-Level Windows
In the living room and bedrooms, install a second row of smaller windows above standard window height. Hot air rises. If you give it an exit near the ceiling, it leaves the room naturally and carries heat with it. This single feature costs almost nothing to implement during construction and noticeably reduces indoor temperature without electricity.
The Staircase as a Thermal Chimney
A centrally positioned staircase does more than solve circulation. Hot air rises naturally through the stairwell and draws cooler air in from ground-floor windows. This is passive ventilation working without any mechanical assistance. A traditional tropical architecture technique that belongs in every duplex on a compact plot.
Roof Ventilation
Specify a ventilated roof void. A poorly ventilated roof traps solar heat throughout the day and radiates it into the top-floor ceiling all through the night. Ventilated fascia boards, ridge vents, or a roof ventilator tile reduce this significantly. Include at least one of these in your specification.
For deeper reading on passive ventilation strategies for tropical housing design, the Plan School section covers this as a standalone topic.
Step 6: Draw the Roof Plan
Many students avoid roof plans because they feel complicated. Once you understand drainage direction and ridge formation, roof planning becomes logical and straightforward.
Recommended Roof Types
Hip Roof (Primary Recommendation)
A hip roof, where all four sides slope downward, is structurally strong under wind and rain. It offers no flat gable ends for wind pressure to act against, sheds water efficiently in every direction, and produces clean modern geometry. Specify a 20 to 25 degree pitch for a two-storey duplex: enough to drain stormwater quickly without making the roof visually heavy on the building.
Flat Roof with Parapet (Terrace Option)
A flat roof with a raised parapet creates usable outdoor terrace space and a strong contemporary roofline. However, flat roofs require very careful waterproofing treatment and regular maintenance. Without proper treatment, water pooling causes ceiling damage within two to three rainy seasons. Choose this option only if you are committed to maintaining it properly.
Roofing Material
For the hip roof, use long-span aluminium roofing sheets at a minimum 0.55mm gauge in a rib-type or step-tile profile. Dark charcoal or terracotta colouring ages well and complements modern render finishes. Do not accept under-gauge sheets. Thin aluminium corrodes faster in humid coastal conditions and creates significant noise during heavy rain.
For premium construction, stone-coated steel tiles offer excellent durability and long-term value. The upfront cost is higher, but the maintenance cost over twenty years is considerably lower.
Practical Roof Drawing Steps
- Draw the roof outline, extending slightly beyond the wall face as an overhang of at least 450mm all around
- Identify and draw the ridge lines at the peak positions
- Show slope direction with arrows pointing downward from ridge to eave
- Add gutters along all eave lines
- Mark downpipe positions at appropriate corners
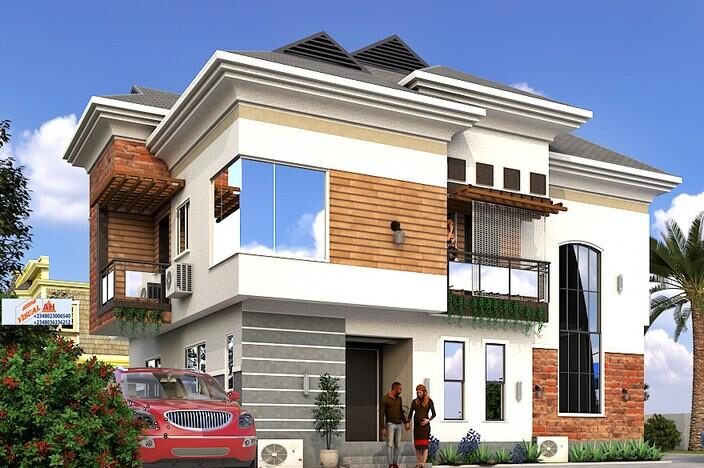
Step 7: Draw the Elevations
Elevations show the exterior appearance of the building from each face. Prepare a minimum of four: front, rear, left side, and right side.
Elements to Include in Every Elevation
- Window positions and sizes matching the floor plan exactly
- Door positions and designs
- Roof lines and overhang depths
- Wall texture or render finish indication
- Balcony railings with realistic proportions
- External columns or pilasters where included
- Parapet height where applicable
Design Guidance for Modern Nigerian Duplexes
Use large windows that communicate quality and modernity. And use a modern parapet wall or clean roof termination. Use neutral render colours that photograph well in bright sunlight. Keep proportions realistic. Avoid excessive ornamental decoration that adds cost without adding spatial value. The clean, well-proportioned building consistently outperforms the heavily decorated one in both resale value and practical livability. Clients who live in it for five years will thank you for the restraint.
Step 8: Draw Building Sections
Sections are cut-through drawings that help builders understand floor heights, foundation depth, roof structure, and staircase levels. Without sections, a contractor is guessing at critical relationships.
Draw your primary section through the staircase. A section through the staircase shows the floor-to-floor height, stair geometry, headroom clearance above each step, and the structural relationship between ground and first floor, all in a single drawing.
Standard Height Dimensions
| Space | Recommended Height |
|---|---|
| Ground floor ceiling | 3 metres |
| First floor ceiling | 3 metres |
| Parapet above roof slab | 1 metre |
| Foundation depth | Based on soil test |
Foundation depth should never be guessed. Commission a basic soil test before specifying your foundation type. Soil conditions vary significantly across short distances. Getting the foundation wrong is one of the most expensive mistakes in construction and in some cases cannot be properly remediated after the fact.
Step 9: Prepare the Site Plan
The site plan positions your building within the plot and shows all external development. It is required for regulatory approval and essential for the contractor working on compound and service areas.
What the Site Plan Must Show
- Plot boundary with all dimensions
- Building footprint positioned within setbacks
- Driveway and parking arrangement
- Compound wall and gate position
- Guard room position
- Generator pad and enclosure position
- Borehole headwork position
- Overhead water tank position
- Septic tank and soakaway positions with minimum separation distances
- Surface drainage channels
- Planting areas
Parking on a Compact Plot
A comfortable double driveway requires 5.5 to 6 metres of width. On a plot with a usable width of approximately 12 metres after setbacks, this leaves space for the driveway, a narrow planting strip on one or both sides, and a side access path to the rear compound, which you need for service and maintenance.
Front compound: Keep it paved or gravelled with minimal raised planters. Elaborate landscaping consumes parking space. Keep the front functional and clean.
Rear compound: This is your service area. Position the generator housing on a concrete pad with a louvred enclosure, the borehole headwork, and the septic tank access here. Maintain at least 2 metres of clearance between the rear of the building and the boundary wall for maintenance access and ventilation.
Gatehouse: A full gatehouse on a small plot consumes driveway width. Build a guard room into the compound wall near the entrance instead: a small 2 by 2.5 metre structure with a viewing window facing the gate. Compact, functional, and it does not compromise the driveway.
Step 10: Compile Your Drawing Set
Recommended Sheet Arrangement
Sheet 1
- Site plan at 1:200
- Ground floor plan at 1:100
- First floor plan at 1:100
No. 2 Sheet
- Roof plan at 1:100
- Building sections at 1:100
- Front and rear elevations at 1:100
Sheet 3
- Side elevations
- Three-dimensional perspective or rendered view
- Material finish schedule
This arrangement is standard for regulatory submission drawing packages and professional client presentations. For a complete walkthrough of drawing package requirements for building approval, visit the Plan School section where regulatory submissions are covered in detail.
Nigerian Reality Planning That Cannot Be Ignored
Flooding
Poor drainage planning can destroy a building over five years. Always raise the finished floor level at least 600mm above surrounding ground level. Install perimeter drains around the compound wall draining to the street gutter. Allow at least 30 percent of the rear compound to remain permeable through gravel, grass paver, or planted areas.
Before construction begins, visit the site during or immediately after a heavy rainstorm and observe what happens to the water. If it pools significantly, factor drainage engineering into the project cost before the first block is laid.
Power Supply
Plan for the power supply you actually have, not the one you wish you had. Your building must include a concrete generator pad and louvred enclosure at the rear, a dedicated changeover switch in the electrical panel, and conduit routing for solar panel cabling installed during construction. Routing the conduit costs almost nothing at construction stage and saves significant money when you are ready for solar installation.
Never place the generator close to bedroom windows. Provide adequate ventilation around the enclosure and clear maintenance access.
Water Supply
Budget for a borehole and overhead storage tanks with a minimum 3,000-litre capacity. Position the water storage tank at the rear of the plot. Maintain a minimum distance of 15 metres between the borehole and the septic tank or soakaway to prevent water contamination. This is not optional. It is a health matter.
Security
Design security into the building from the beginning:
- Perimeter wall minimum 6 feet with a finished wall cap
- Conduit for security lights at all four wall corners and above the gate, installed during construction
- Steel or reinforced door frames for all external doors
- Security grilles on all ground-floor windows designed as part of the building aesthetic, not screwed on as afterthoughts
Common Mistakes to Avoid
Oversized rooms: Large rooms waste plot space. A 15 square metre bedroom does the same job as a 25 square metre bedroom when properly planned with wardrobe space and natural light. Know the practical minimum dimensions and design to them.
Poor staircase placement: Resolve the staircase position before placing any other room. Everything else arranges itself around it.
Ignoring ventilation: Every habitable room must breathe naturally. Design it that way from the first plan.
Copying foreign plans without adaptation: Climate, plot size, family lifestyle, and construction conditions in Nigeria differ significantly from Europe or North America. Adapt every imported reference to local conditions before using any element of it.
Skipping the soil test: Commission a soil test before specifying foundation type. The cost is small. The cost of getting it wrong is not.
Accepting substandard blocks: Test blocks before accepting them on site. Specify from a certified supplier and put it in your contract.
Skipping waterproofing treatment: Apply waterproof additive to all substructure concrete and blockwork below floor level. The cost of skipping it during construction is small. The cost of remediation three years later is not.
Building Dimensions Summary
| Item | Measurement |
|---|---|
| Plot size | 15m by 30m |
| Building footprint | approx. 10m to 11m by 8m to 10m |
| Ground floor built area | approx. 90 to 110 sq m |
| First floor built area | approx. 90 to 110 sq m |
| Total built area | approx. 180 to 220 sq m |
| Total bedrooms | 4 |
| Bathrooms and toilets | 4 |
| Parking capacity | 2 cars |
| Balcony | Yes, first floor, front-facing |
| Study or home office | Yes |
| Rear compound service area | Yes |
Cost Reference for This Build
Construction costs shift with material prices, exchange rates, and labour availability. These figures are for orientation, not for signing contracts. Always get at least three site-specific quotes from registered builders.
| Component | Estimated Cost |
|---|---|
| Foundation and substructure | 4,500,000 to 6,500,000 naira |
| Blockwork and columns, both floors | 6,000,000 to 9,000,000 naira |
| Roofing, hip roof, long-span | 3,500,000 to 5,500,000 naira |
| Electrical installation | 1,800,000 to 3,000,000 naira |
| Plumbing, internal and external | 2,000,000 to 3,500,000 naira |
| Tiling, floors and bathrooms | 2,500,000 to 4,500,000 naira |
| Doors and windows | 2,000,000 to 4,000,000 naira |
| Plastering and painting | 2,000,000 to 3,500,000 naira |
| Staircase, concrete and finish | 900,000 to 1,800,000 naira |
| Compound wall and gate | 1,500,000 to 3,000,000 naira |
| Total Estimate | 26,700,000 to 43,800,000 naira |
This excludes land cost, professional fees which are typically 5 to 8 percent of total project cost, regulatory approval fees, and furniture.
Practice Assignment for Students
If you are working through this guide as a learning exercise, here is your practical assignment.
The task: Prepare a complete drawing set for a four-bedroom duplex on a 15 metre by 30 metre plot.
Design requirements:
- Apply correct setbacks before placing any room
- Include parking for two cars
- Provide a functional rear service compound
- Show a correctly drawn staircase with movement arrow and numbered risers
- Demonstrate cross-ventilation in every habitable room
- Include a first-floor balcony
- Prepare a front elevation with realistic proportions
Required drawings:
- Site plan at 1:200
- Ground floor plan at 1:100
- First floor plan at 1:100
- Roof plan at 1:100
- Front and rear elevations at 1:100
- One building section at 1:100
When complete, review your drawings honestly. Does the plan breathe? Does it park two cars without awkwardness? Is the staircase correctly drawn? Does the rear compound have a proper service area? Does every habitable room have a window on an external wall? If the answer to any of those is no, revise before considering the exercise finished.
For more structured drawing exercises and step-by-step tutorials covering floor plan drafting, section drawing, roof planning, and elevation design, visit the Plan School section.
What to Supervise Closely During Construction
If you cannot be on site daily, hire a resident site foreman with verifiable experience. These are the stages where direct supervision or third-party inspection is non-negotiable:
- Foundation excavation and base preparation
- Reinforcement cage arrangement before any concrete pour
- Column casting: any honeycombing or inadequate concrete vibration must be identified and corrected immediately, not plastered over
- Slab reinforcement inspection before the first-floor concrete pour
- Roof truss and purlin installation
- Waterproofing application on all bathroom floors and the kitchen before tiling begins
On payment: never pay more than 30 to 40 percent of any stage cost before visible and verifiable work has been done. Structure payment milestones around site progress, not contractor requests.
Reference Material
For regulatory guidance on development control standards, setback requirements, and plot coverage ratios applicable across Nigerian states, the Nigerian Institute of Architects maintains professional references and updated resources that are useful for both practising designers and students preparing work for regulatory submission.
Frequently Asked Questions
Can a small plot carry a four-bedroom duplex?
Yes, provided the design is disciplined. On a 15 by 30 metre plot after setbacks, a four-bedroom duplex with parking, a rear service compound, and a balcony is achievable. What makes it work is not the plot size but the quality of the planning decisions.
What scale should I use for a duplex floor plan?
1:100 is the standard scale for residential floor plans. It gives you enough detail for construction and fits comfortably on an A1 sheet. Use 1:200 for the site plan and 1:50 for detailed room or bathroom drawings.
How do I decide where to put the staircase?
Resolve the staircase before you position any room. The staircase should sit centrally so that every room on both floors is reachable within a few steps from the landing. Never push it into a corner to save space. A poorly positioned staircase destroys the circulation of the entire building.
What is the minimum practical bedroom size?
A single bedroom can function at 3 metres by 3 metres. A double bedroom works well from 3.3 by 3.6 metres. A master bedroom should be a minimum of 4 by 4.5 metres to accommodate a king-size bed, wardrobes, and comfortable movement. Do not go smaller than these minimums and expect a satisfied client.
How important is ventilation in Nigerian housing design?
It is not optional. In a humid tropical climate, a poorly ventilated house is expensive to cool, uncomfortable to live in, and deteriorates faster physically. Every habitable room must have a window on an external wall and, where possible, windows on opposite walls for cross-ventilation. Design it in. Do not leave it for the contractor to figure out.
What roofing material works best for a small plot duplex?
Long-span aluminium roofing sheet at 0.55mm minimum gauge in a rib or step-tile profile is the standard recommendation. Stone-coated steel tiles are the premium option for durability and long-term value. Never accept under-gauge aluminium. It corrodes faster in humid conditions and produces significant noise during rain.
Overall Building Footprint: Approx. 10.5m × 9m
Space Arrangement
| Space | Approx. Size |
|---|---|
| Entrance Porch | 2.0m × 3.0m |
| Living Room | 4.5m × 5.5m |
| Dining Area | 3.0m × 3.5m |
| Guest Bedroom | 3.3m × 3.6m |
| Kitchen | 3.0m × 4.0m |
| Store/Pantry | 1.5m × 1.8m |
| Visitor WC/Bath | 1.5m × 2.1m |
| Staircase Hall | 2.8m × 4.5m |
| Under-Stair Store | 1.2m × 2.0m |
Ready to Go Further?
This guide gives you the full practical framework for designing a four-bedroom duplex on a small plot. But reading is not the same as doing. The next step is putting pencil to paper or opening your software and working through the process yourself.
Browse finished duplex plans across multiple plot sizes in the Plans Library to see how these principles produce real completed designs. If you want structured drawing tutorials that take you through each drawing type step by step, the Plan School section is where to go next. And if you need a custom plan prepared for your specific plot and requirements, visit Services to find out how to commission a design package ready for regulatory submission.
If this guide helped you understand the design process more clearly, share it with a fellow student or a homeowner preparing to build. Most people make expensive design and construction mistakes simply because they never had access to clear, honest, practical information.
That is exactly what this platform is here to change.
About the Author
Massodih Okon Effiong is a Built Environment Expert and Senior Researcher based in Nigeria. He has a Master’s degree in Urban and Regional Planning, a first degree in Geography and Environmental Management, and professional certificates in Architectural Design, Landscape Design, and GIS. With over 15 years of hands‑on experience in architecture, town planning, GIS, and building economics across Nigerian residential and institutional projects, he understands the real challenges Nigerians face when planning and building homes.
At MassodihPlans, Massodih shares practical Nigerian building guides, modern bungalow and duplex house plans, and built environment resources created specifically for Nigerian homeowners, developers, and property investors. His work is based on real‑life conditions in Nigeria, climate‑responsive design, and cost‑effective planning, aimed at helping everyday Nigerians make smarter, more confident building decisions.
Related Practical guides
- Smart House Design Ideas for 50×100 Plots in Nigeria
- Building Materials Price Guide in Nigeria (Full Cost Guide)
- Best Roofing Sheets for Nigerian Weather: Complete Guide
- Bungalow vs Duplex: Which is Better to build in Nigeria Today?
- 7 Small Plot Design Mistakes Nigerians Make (And How to Fix Them)
- Cost of Building a 4 Bedroom Duplex in Lagos (Complete Guide)
- Modern Duplex House Plan for 50×100 Plot in Lagos
- Home