How to Actually Plan a City That Works: The MegaRegion FlowPlan Explained
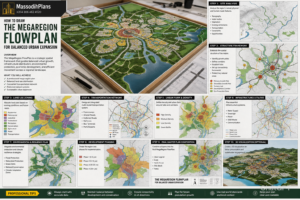
MegaRegion FlowPlan: Balanced Urban Expansion Guide
There is a gap that nobody in planning education talks about openly. Students sit through four or five years of physical planning, urban design, and GIS courses. They write dissertations, pass studio critiques, and graduate with strong academic records. Then they walk into their first planning consultancy, government department, or development firm and they cannot draw a master plan from scratch. They cannot calculate land use percentages. And they do not know how wide a collector road reserve should be. They have never actually delineated a drainage catchment using GIS. This gap is real, it is widespread, and it costs governments, developers, and communities enormously.
The MegaRegion FlowPlan was developed to close that gap directly. It is a practical master planning framework and studio tutorial system designed for town planning students, graduate interns, planning researchers, GIS learners, architectural graduates moving into planning, and government staff who need to understand how physical development plans are actually prepared, drawn, calculated, and submitted for approval. And it is not another theoretical overview. It is a step-by-step working guide grounded in African and developing-country planning realities.
If you have ever stared at a blank CAD canvas or an empty GIS project and wondered where to begin, this is the tutorial you need.
What the MegaRegion FlowPlan Is and Why It Matters
The MegaRegion FlowPlan is a structured master planning and physical development framework that operates at the scale of a region, city extension, or large urban precinct. At the studio tutorial level, it functions as a complete worked example of how a real master plan is assembled. From the first site visit and base map preparation, through land use allocation, zoning designation, circulation design, infrastructure planning, and drainage strategy, all the way to final plan presentation and report writing.
The framework is built around the planning realities of rapidly growing cities in sub-Saharan Africa, South Asia, and comparable developing-country contexts. It does not assume perfect data, unlimited budgets, functioning cadastral systems, or reliable utility infrastructure. It teaches planners how to work with what they have and how to produce credible, defensible, and implementable plans even under resource-constrained conditions.
Three principles govern the entire framework:
- Balanced growth: Population, land use, infrastructure, and services are expanded in proportion to each other, not in the fragmented, reactive pattern that characterises most informal urban growth.
- Functional connectivity: Every part of the plan area is connected to every other part through a logical road hierarchy, pedestrian network, and utility corridor system.
- Institutional viability: The plan is designed to be approved, financed, implemented, and maintained within the governance and fiscal capacity of the responsible planning authority.
You can explore fully worked master plan examples, layout plans, and planning documentation sets in the MassodihPlans Plans Library, which provides a growing archive of real planning outputs across different scales and contexts.
Step One: Understanding the Planning Brief and Site Context
Every master plan begins with a brief. In professional practice, the planning brief is issued by the client, a government authority, a private developer, a land agency, or a community body. And in studio practice, the brief is issued by your tutor or examiner. In both cases, your first task is to read the brief carefully and extract the following critical parameters:
- The plan area boundary and approximate total hectarage
- The planning horizon (10 years, 15 years, 20 years)
- The planning objectives and any specific requirements
- The expected population to be accommodated
- Any known constraints flood zones, utility easements, existing settlements, protected areas
- The approval pathway and the relevant planning legislation or policy framework
Once you have the brief, you prepare your planning base. This is the foundational spatial document on which every subsequent planning decision is mapped. A weak base produces a weak plan.
How to Prepare Your Planning Base
In a GIS environment, your base preparation involves the following workflow:
- Source the most current satellite or aerial imagery for the plan area. Google Earth Pro provides free historical imagery at usable planning scales. For professional work, commission drone photogrammetry or procure current satellite imagery.
- Georeference your imagery to the correct coordinate system for your jurisdiction. In Nigeria, the coordinate system is typically Minna / Nigeria Mid Belt (EPSG 26391 or 26392). In Kenya, use Arc 1960 / UTM Zone 37S. Always confirm with the relevant survey authority.
- Digitise the plan boundary, existing roads, watercourses, existing buildings, and any known land use areas as separate vector layers in your GIS project.
- Generate or import a digital elevation model (DEM) for topographic analysis. SRTM 30-metre resolution data is freely available from the USGS EarthExplorer portal and is sufficient for regional-scale master plans. For layout-scale work, a drone-derived DEM at sub-metre resolution is preferable.
- Produce a slope analysis layer from the DEM. Classify slopes into four categories: 0 to 5 percent (suitable for all development), 5 to 10 percent (suitable with engineering measures), 10 to 15 percent (restricted development), and above 15 percent (unsuitable for intensive development, designated open space or conservation).
- Delineate drainage catchments and watercourse buffers. Apply a minimum 30-metre buffer setback from all watercourse centrelines. Identify and shade all areas within the 1-in-100-year flood extent.
- Produce a composite land suitability map by overlaying your slope, drainage, and existing land use layers. This map becomes your primary site analysis output and the direct basis for your proposed land use plan.
Studio Tip: Many students produce beautiful analysis maps and then completely ignore them when drawing the proposed plan. The purpose of site analysis is to constrain and inform your land use decisions. Your proposed plan should be directly traceable back to your analysis findings. Examiners and planning authorities both look for this traceability.
Step Two: Calculating Your Land Use Programme
Before you draw a single zone on your plan, you need to calculate your land use programme. This is the quantitative exercise that determines how much land is required for each use category based on your population projection and planning standards.
Population Projection
Start with your base population figure from the most recent census data for your plan area. Apply a compound annual growth rate that reflects both natural population increase and anticipated in-migration. In fast-growing Nigerian cities, compound annual growth rates of 3.5 to 5.5 percent are common. In slower-growing secondary towns, 2 to 3 percent may be more appropriate. Project forward to your planning horizon year.
Example Calculation:
- Base population (2025): 45,000 persons
- Compound annual growth rate: 4.2 percent
- Planning horizon: 20 years (to 2045)
- Projected population: 45,000 multiplied by (1.042 to the power of 20) equals approximately 102,000 persons
This projected population is your planning denominator. Every land use calculation flows from this number.
Residential Land Requirement
Determine your target residential density in persons per hectare. For medium-density residential development in a developing-country context, 80 to 120 persons per hectare is a common planning standard. And for low-density residential, 40 to 60 persons per hectare. For high-density residential, 150 to 250 persons per hectare.
Divide your projected population by your target density to determine the net residential land requirement. Add 20 percent for roads, drainage, and service infrastructure within the residential zone to obtain the gross residential land requirement.
Example:
- Projected population: 102,000 persons
- Target density (medium): 100 persons per hectare
- Net residential land: 102,000 divided by 100 equals 1,020 hectares
- Gross residential land (adding 20 percent): approximately 1,224 hectares
Other Land Use Requirements
Apply planning standards to calculate the land required for each other use category. The following table provides indicative standards consistent with physical planning practice across anglophone African jurisdictions.
| Land Use Category | Standard | Basis |
|---|---|---|
| Primary school | 1 school per 5,000 persons | 0.8 to 1.2 ha per school |
| Secondary school | 1 school per 10,000 persons | 1.5 to 2.5 ha per school |
| Primary health clinic | 1 clinic per 7,500 persons | 0.4 to 0.6 ha per clinic |
| General hospital | 1 hospital per 50,000 persons | 3.0 to 5.0 ha per hospital |
| Neighbourhood park | 1 park per 3,000 persons | 0.5 to 2.0 ha per park |
| District park | 1 park per 25,000 persons | 2.0 to 10.0 ha per park |
| Local commercial | Approximately 5 to 8 percent of gross plan area | Distributed along collector roads |
| Industrial / light industrial | Approximately 2 to 5 percent of gross plan area | Segregated from residential |
| Roads and circulation | Approximately 18 to 25 percent of gross plan area | Varies by road hierarchy |
Common Student Mistake: Many students allocate institutional land as a residual, whatever is left over after residential and roads. This produces institutional plots that are either too small to function properly (a primary school on 0.3 ha with no space for a playground) or poorly located (a hospital on the periphery of the plan with no collector road frontage). Calculate institutional land requirements first, allocate them to appropriate locations second, and adjust residential allocations to accommodate them.
Step Three: Drawing the Land Use Plan
With your land use programme calculated and your site analysis complete, you are ready to draw your proposed land use plan. This is the central document of any master plan set. It communicates, at a glance, what goes where and why.
Land Use Colour Coding Standard
Apply the following colour coding standard consistently across all plan drawings. This standard is internationally recognised in physical planning practice and ensures that your plan is immediately legible to any qualified planner, planning authority, or examining board.
- Residential activities: Yellow
- Commercial, shopping, or business activities: Red
- Industrial and manufacturing activities: Purple
- Institutional and public infrastructure uses: Blue
- Transportation and circulation systems: Gray
- Mass assembly and civic gathering spaces: Dark Slate Gray
- Recreational and leisure uses: Light Green
- Natural resource and ecological conservation uses: Forest Green
- Undeveloped or unclassified land: White
In GIS software (QGIS, ArcGIS, or similar), create a separate polygon layer for each land use category and assign these fill colours with a 70 percent opacity. Overlay your road network layer and drainage layer on top. The result should be a clear, professionally coloured land use plan that is ready for further annotation and cartographic refinement.
Spatial Allocation Logic
The sequence in which you allocate land uses to your plan area is not arbitrary. I recommend the following allocation sequence for student and professional planners alike:
- First, designate conservation and flood exclusion zones. These are non-negotiable. No residential or commercial development is permitted within the flood hazard extent or within riparian buffer zones. Map these areas in Forest Green and treat them as fixed constraints.
- Second, establish your primary road network. Your arterial and primary collector roads define the structure of the entire plan. They connect your plan area to the existing road network, divide the plan into manageable development precincts, and establish the framework within which all other land uses are arranged.
- Third, locate your major institutional uses. Hospitals, secondary schools, civic centres, and government facilities require large, well-located plots on collector road frontages. Allocate these before residential zones consume all the best-located land.
- Fourth, designate commercial and mixed-use corridors. Commercial uses are most viable along primary collector roads and at key intersections. Designate commercial zones in Red along these frontages and at the plan’s major nodes.
- Fifth, fill in residential zones. Residential uses occupy the largest proportion of the plan area. Subdivide the residential zone into density sub-zones (R1, R2, R3) based on proximity to services, access to collector roads, and site suitability.
- Sixth, distribute neighbourhood-scale institutional and recreational uses. Primary schools, neighbourhood parks, health clinics, and places of worship are distributed within residential zones at the standards calculated in your land use programme.
- Finally, designate industrial and light industrial zones. These are located downwind of residential areas (based on prevailing wind direction), adjacent to arterial roads for heavy vehicle access, and buffered from residential uses by a minimum 50-metre landscaped setback.
Step Four: Designing the Circulation System
The road network is the skeleton of your master plan. Every other spatial decision is constrained and informed by it. A poorly designed road network is the single most difficult planning error to correct after development begins.
Road Hierarchy for the MegaRegion FlowPlan
Apply the following road classification standards when designing your circulation system.
| Road Classification | Reserve Width | Carriageway Width | Design Speed | Key Design Feature |
|---|---|---|---|---|
| Arterial Road | 60 to 90 metres | 4 to 6 lanes | 80 to 120 km/h | Connects plan area to regional network |
| Primary Collector | 30 to 45 metres | 4 lanes, dual 2 | 60 to 80 km/h | Main internal distributor; commercial frontage |
| Secondary Collector | 18 to 24 metres | 2 lanes | 40 to 60 km/h | Neighbourhood distributor; school and park access |
| Local Access Road | 10 to 15 metres | 2 lanes | 20 to 40 km/h | Direct plot access in residential zones |
| Cul-de-sac Court | 8 to 12 metres | Single lane with passing bays | 15 to 20 km/h | Maximum 20 plots served per court |
| Pedestrian and Cycle Path | 3 to 5 metres | 2 to 3 metre shared path | Walking and cycling | Green network linkages and school routes |
Practical Road Design Guidance for African Contexts
In Nigerian, Ghanaian, East African, and comparable developing-country contexts, road reserve widths serve functions beyond simple vehicle movement. A 15-metre local road reserve in a typical residential layout accommodates a 7-metre carriageway, two 2-metre footpaths, and two 2-metre open drainage channel reserves on each side. This is the minimum functional arrangement. Reducing the road reserve below 12 metres in a residential zone typically results in drainage channel omissions that cause flooding within the first wet season.
Traffic calming measures, speed humps, raised pedestrian crossings, chicanes at school and park entries should be shown on the circulation plan at the master plan stage, not added as an afterthought after occupants begin complaining about speeding.
Connectivity is more important than geometry. A road network with multiple connections and few dead ends is significantly more resilient, safer, and utility-efficient than a network of cul-de-sacs. The temptation to use cul-de-sac heavy layouts to maximise plot yield is a planning mistake that creates traffic concentration problems, emergency vehicle access failures, and drainage management challenges.
Pedestrian and Cycle Networks
Every residential zone in the MegaRegion FlowPlan is served by a dedicated pedestrian and cycle network that operates independently of the vehicle road system. These paths connect residential plots to schools, parks, commercial nodes, and transit stops through the plan’s green corridor system. In practice, this means routing pedestrian paths along drainage reserves, riparian buffers, and park edges — land that is already excluded from development and therefore available for this purpose at no additional land cost.
Step Five: Planning the Drainage System
Drainage is the discipline that separates competent planners from dangerous ones. In sub-Saharan Africa and South Asia, poorly planned drainage is directly responsible for more loss of life, property destruction, and infrastructure failure than any other planning deficiency. Understanding how to plan drainage is not optional for any practising planner.
Catchment Delineation in GIS
In QGIS, the drainage planning workflow using the MegaRegion FlowPlan methodology proceeds as follows:
- Load your DEM layer into QGIS.
- Use the SAGA or GRASS hydrology tools to fill sinks in the DEM. Unfilled sinks produce incorrect flow direction calculations.
- Generate a flow direction raster from the filled DEM.
- Generate a flow accumulation raster from the flow direction raster.
- Use the flow accumulation raster to identify channel initiation points — cells with accumulation values above a threshold that reflects your local topographic context (typically 500 to 2,000 cells for sub-Saharan African terrain at 30-metre resolution).
- Extract stream channels as a vector layer. These are your natural drainage lines. Buffer them by 30 metres on each side to generate your riparian protection zone.
- Delineate sub-catchments for each major drainage outlet in your plan area. These sub-catchments become your drainage management zones.
Two-Tier Drainage System Design
The MegaRegion FlowPlan uses a two-tier drainage system:
Minor drainage system handles regular storm events up to the 10-year return period. It consists of roadside open channels (in developing-country contexts where maintenance of underground pipes is unreliable), culverts at road crossings, and plot-level soakpits or French drains in permeable soil areas.
Major drainage system handles extreme events up to the 100-year return period. It uses the road network, open green corridors, and drainage reserves as overland flow paths that convey floodwater to major watercourses without causing property inundation.
Critical Field Reality: Drainage channels that are correctly dimensioned at the design stage but not maintained after handover to the local authority will fail within five to seven years. Channel silting, vegetation encroachment, and solid waste dumping are universal maintenance failures across West African, East African, and South Asian cities. Design for this reality by specifying generous channel cross-sections with self-cleansing gradients, and include a drainage maintenance schedule as a mandatory component of your planning submission.
Step Six: Zoning, Development Control, and Setback Standards
Zoning is the legal instrument that makes a land use plan enforceable. Without a clear zoning schedule attached to your master plan, the plan has no development control teeth. Understanding how to prepare a zoning schedule is a core professional skill for every practising planner.
What a Zoning Schedule Contains
A complete zoning schedule specifies, for each zone designation:
- The zone name and code (for example R1, R2, C1, I1)
- The primary permitted uses
- The ancillary permitted uses
- The prohibited uses
- The minimum plot size
- The minimum frontage width
- The maximum site coverage
- The floor area ratio or plot ratio where applicable
- The front, rear, and side setback distances
- The maximum building height
- Any special conditions or overlay requirements
Standard Setback Dimensions
| Zone | Front Setback | Rear Setback | Side Setback | Max Coverage |
|---|---|---|---|---|
| R1 Low Density Residential | 6 metres | 6 metres | 2 metres each side | 40 percent |
| R2 Medium Density Residential | 4.5 metres | 3 metres | 1.5 metres (one side nil permitted) | 50 percent |
| R3 High Density Residential | 3 metres | 2 metres | Nil (party wall permitted) | 60 percent, FAR 2.0 |
| C1 Local Commercial | 0 to 3 metres (active frontage) | 3 metres | Nil where fire code permits | 70 percent, FAR 3.0 |
| I1 Light Industrial | 10 metres | 8 metres | 6 metres each side | 50 percent |
| P1 Institutional | 6 metres | 6 metres | 3 metres each side | 40 percent |
Development Control in Practice
In most developing-country planning jurisdictions, development control is the weakest link in the entire planning chain. Plans are approved, zoning schedules are gazetted, and then enforcement capacity collapses under the weight of inadequate staffing, poor remuneration, political interference, and outright corruption. The consequence is setback encroachment, illegal height additions, commercial uses operating in residential zones, and road reserve encroachment that narrows access roads to half their intended width within a decade of occupation.
The MegaRegion FlowPlan addresses this reality by designing development control standards that are physically legible without requiring a permit officer to be present. Wide, clearly demarcated road reserves that cannot be built upon without it being visible from satellite imagery. Drainage channels that function as physical barriers to setback encroachment. Street tree plantings that mark the build-to line visually. These design-embedded controls are not a substitute for proper enforcement but they slow the rate of encroachment significantly in contexts where formal enforcement is unreliable.
Step Seven: Infrastructure Planning and Utility Coordination
Infrastructure planning in the MegaRegion FlowPlan framework is coordinated at the master plan stage, not resolved ad hoc during construction. Utility disconnection, the practice of designing roads, drainage, electricity, water, and telecommunications independently and then trying to fit them together on site, is one of the most expensive and disruptive problems in developing-country urban development.
Utility Corridor Principles
All utility corridors in the MegaRegion FlowPlan are routed within road reserves or formally designated utility easements. No utility line crosses a private plot boundary except where a registered utility easement is recorded on the property title. The minimum dimensions for utility accommodation within a standard 15-metre local road reserve are:
- Water reticulation main: 600 millimetres below natural surface on the left carriageway shoulder
- Low-voltage electricity conduit: 600 millimetres below natural surface on the right carriageway shoulder (opposite side to water to prevent cross-contamination)
- Telecommunications conduit: 450 millimetres below natural surface, bundled with low-voltage conduit where possible
- Sewer reticulation (where provided): 1.0 to 1.5 metres below natural surface at centreline or within a dedicated easement
In areas where waterborne sewerage is not financially feasible, the plan specifies minimum plot dimensions that accommodate ventilated improved pit latrines or septic tank systems without compromising groundwater quality in neighbouring plots.
Power Infrastructure Realities
Grid electricity is genuinely unreliable across most of sub-Saharan Africa and large parts of South Asia. Planning a major residential or commercial development on the assumption of reliable grid power is a planning error with immediate and serious consequences for residents, businesses, and infrastructure operators. The MegaRegion FlowPlan therefore integrates the following provisions:
- Adequate plot area reserved for solar panel mounting on institutional, commercial, and public buildings
- Solar street lighting easements within road reserves, specified at the infrastructure planning stage with conduit and base pad provisions
- Community energy facility plots (minimum 0.2 hectares) designated within each neighbourhood cluster for battery storage or small-scale distributed generation
- Backup generator pads within hospital, school, and government facility plots
Step Eight: Environmental Management and Climate Responsive Planning
The planning horizon of a master plan extends 15 to 20 years into a future that will be measurably warmer, wetter in some regions and drier in others, and more exposed to extreme weather events than the present. Planning as though the climate of 2005 will persist through 2045 is not conservatism, it is negligence.
Heat Island Mitigation in Master Plan Design
Urban heat islands develop in dense urban areas where impervious surfaces, building mass, and the absence of vegetation concentrate and retain solar heat. In tropical and subtropical developing-country cities, where temperatures are already high and air conditioning penetration is low, the health consequences of the urban heat island effect fall hardest on the poorest residents.
The MegaRegion FlowPlan incorporates the following heat mitigation measures directly into the spatial plan:
- Street tree planting at a maximum 10-metre spacing along all collector and arterial roads, shown as a notation on the landscaping plan
- Minimum 30 percent soft landscaping within all non-residential plots, specified in the zoning schedule
- Green roof requirements for flat-roofed commercial and institutional buildings above 500 square metres of footprint
- Cool roof specifications (minimum solar reflectance of 0.65) for industrial and warehouse buildings
- Linear green corridors running perpendicular to prevailing wind directions to promote urban ventilation
Informal Settlement Integration
One of the most consistent failures of formal master planning in African cities is the complete exclusion of existing informal settlements from the plan framework. Informal settlers are treated as a nuisance to be relocated or ignored, rather than as an existing urban community with valid claims to space, services, and tenure security. The consequence is that informal settlements continue to grow at the periphery of formally planned areas, creating the exact conditions, inadequate drainage, no road access, no institutional facilities, no utility infrastructure that the formal plan was designed to prevent.
The MegaRegion FlowPlan requires a systematic informal settlement survey as part of the site analysis phase. Existing informal settlements within the plan area are categorised as: suitable for in-situ upgrading and formalisation, suitable for phased voluntary relocation with compensation and replacement housing, or unsuitable for retention (located in flood hazard zones, on steep slopes, or within critical infrastructure corridors) and requiring managed relocation.
In-situ upgrading is the preferred approach wherever physically feasible. It retains established social networks, reduces relocation trauma and resistance, and is substantially cheaper than building equivalent replacement housing elsewhere. Planners who recommend wholesale clearance of informal settlements without exhausting upgrading options are, in my assessment, not serving the people their plans are supposed to benefit.
Step Nine: Master Plan Presentation and Report Preparation
A technically excellent plan presented poorly will fail in the approval process and fail to persuade the communities and decision-makers who need to act on it. Presentation is a professional discipline, not a cosmetic exercise.
The Standard Master Plan Drawing Set
A complete master plan submission typically includes the following drawings:
- Location and Context Plan: Shows the plan area in its regional context, including surrounding settlements, major roads, and natural features. Scale typically 1:50,000 to 1:100,000.
- Existing Land Use Plan: Documents the current land use pattern within and immediately around the plan area. Scale typically 1:10,000 to 1:25,000.
- Site Analysis Plan: Shows topographic analysis, drainage catchments, flood zones, slope categories, existing vegetation, existing infrastructure, and any identified planning constraints. Scale typically 1:10,000 to 1:25,000.
- Proposed Land Use Plan: The primary planning output showing all proposed land use zones in the standard colour coding system, with a full land use schedule table. Scale typically 1:5,000 to 1:10,000.
- Zoning Plan: Shows the detailed zoning designations (R1, R2, C1, I1, etc.) with zone boundaries precisely delineated. Typically the same scale as the proposed land use plan.
- Circulation and Transportation Plan: Shows the complete road hierarchy, pedestrian and cycle networks, transit stops, and parking areas. Scale typically 1:5,000 to 1:10,000.
- Infrastructure and Utilities Plan: Shows water, sewer, electricity, and telecommunications alignments, pump stations, substations, and waste collection points. Scale typically 1:5,000 to 1:10,000.
- Drainage and Environmental Management Plan: Shows the drainage catchment boundaries, primary and secondary drainage channels, retention basins, flood exclusion zones, and green corridor alignments. Scale typically 1:5,000 to 1:10,000.
- Phasing Plan: Shows the planned sequence of development phases, with phase boundaries and approximate timeline. Scale typically 1:10,000 to 1:25,000.
- Urban Design Concepts: Key node designs, streetscape cross-sections, and character area illustrations that communicate the intended physical quality of the development.
The Planning Report
Every master plan drawing set is accompanied by a planning report that explains, justifies, and elaborates on the spatial decisions shown in the drawings. A well-written planning report is your strongest tool in the approval process. It pre-empts agency objections, documents your analysis methodology, and demonstrates that your plan is evidence-based rather than arbitrary.
The planning report should include:
- Executive summary (maximum two pages, written for a non-technical audience)
- Introduction and planning context
- Legislative and policy framework
- Site analysis findings
- Population projection and land use calculations
- Proposed land use framework and justification
- Circulation and transportation strategy
- Infrastructure strategy
- Environmental management strategy
- Development control provisions and zoning schedule
- Implementation strategy and phasing programme
- Appendices: data tables, GIS methodology notes, public participation records, agency consultation records
Professional Recommendation: Write the executive summary last. After completing the full report, you will have a much clearer understanding of the three or four most important messages your plan needs to communicate to decision-makers. A good executive summary is not a table of contents. It is a persuasive argument that answers the question every decision-maker asks before reading further: why should I approve this plan?
Planning Software and Tools for the MegaRegion FlowPlan Workflow
Students and early-career planners frequently ask which software they should learn for master planning work. Here is my honest assessment of the tools that matter most in developing-country planning practice.
QGIS is the essential foundation. It is free, open source, powerful, and increasingly well-documented. Every planner working in a resource-constrained environment should be proficient in QGIS for base map preparation, site analysis, land use mapping, and plan monitoring. The QGIS documentation and the QGIS Training Manual (available at qgis.org) provide a comprehensive self-study pathway.
AutoCAD remains the industry standard for layout plan drafting in most anglophone African jurisdictions. Local government authorities and survey departments typically require submission of plans in DWG format. CAD proficiency is a near-universal requirement for practising planners.
ArcGIS is used by many larger planning consultancies, government agencies, and international organisations. Its spatial analysis capabilities are superior to QGIS in some respects, but its licensing cost makes it inaccessible in most resource-constrained contexts. If your employer or institution provides ArcGIS access, use it. Otherwise, QGIS delivers equivalent functionality for the vast majority of planning workflows.
Adobe Illustrator or Inkscape for final plan cartographic presentation and report layout. Your GIS-produced maps exported as SVG or PDF can be refined in Illustrator or the free equivalent Inkscape to produce the professional presentation quality that approval authorities and clients expect.
Microsoft Word and Excel remain the practical tools for report writing and land use calculation spreadsheets in most developing-country planning contexts. Resist the temptation to produce reports in exotic formats what matters is clarity, accuracy, and accessibility.
You can find structured software tutorials, GIS workflows, and planning studio guidance in the MassodihPlans Plan School section, which is specifically designed for planning students, interns, and self-teaching professionals.
Common Mistakes in Master Plan Preparation and How to Avoid Them
Years of reviewing student plans, supervising interns, and auditing submitted planning documents have produced a reliable list of the mistakes that appear most consistently. I share them here because awareness is the first step to avoidance.
Mistake One: Starting with the Road Network
Many students draw roads first and then try to fit land uses around them. The correct sequence is analysis first, then constraints, then institutional uses, then roads, then residential. Starting with roads produces a plan where drainage is an afterthought, institutional uses are squeezed into residual plots, and flood plains are crossed with local access roads because nobody mapped them first.
Mistake Two: Ignoring Scale
A plan drawn at 1:10,000 but presented at 1:25,000 on A3 paper is illegible. A plan that shows individual plot boundaries at 1:50,000 scale is misleading. Use appropriate scales for each drawing. Annotate every drawing with a scale bar, a north point, a title block, a revision history, and a legend. These are not optional decorations — they are the basic cartographic requirements that make a plan a legal and professional document.
Mistake Three: Copying Other Plans Without Understanding Them
I see this constantly. A student finds a master plan from a Lagos or Nairobi project, copies the road network pattern, relabels the zones, and submits it as an original response to a completely different site brief. Examiners recognise this immediately. More importantly, a copied plan that ignores the specific topographic, demographic, cultural, and infrastructure context of the actual site will fail in implementation even if it passes examination.
Mistake Four: No Land Use Calculations
A plan without a land use calculation schedule is an opinion, not a plan. Every zone on your land use plan must be supported by a calculation that shows how the area allocated was determined. If your plan allocates 25 hectares to secondary education, your report must show the calculation that derived that figure from your population projection and your school-size planning standard.
Mistake Five: Beautiful Maps, Illegible Plans
GIS software produces stunning visual output. Students sometimes spend 80 percent of their studio time on cartographic refinement and 20 percent on the substantive planning content. Examiners value substance over aesthetics. A clearly reasoned, accurately calculated plan presented in clean but simple cartography will consistently outperform a visually spectacular plan with weak analytical content.
The Investment and Development Dimension
The MegaRegion FlowPlan is not only a studio exercise. It is a framework that directly influences the investment value of land and the financial viability of development projects. Understanding this connection is increasingly important for planning students who will work not only in government but in private consultancies, development companies, and real estate firms.
How Good Planning Creates Land Value
Serviced, zoned, and planned land commands a substantial premium over unserviced, unzoned land in the same location. In most developing-country real estate markets, the price differential between a titled, serviced residential plot in a planned layout and a comparable unserviced plot in an informal settlement in the same general area ranges from 200 to 500 percent. This premium is entirely a product of planning of the certainty, infrastructure, and tenure security that good planning provides.
Developers who understand this use planning as a direct value creation tool. They purchase unserviced land, commission a master plan and layout plan, obtain planning approval, install trunk infrastructure, and sell titled serviced plots at the planning premium. The planning process itself not construction generates the majority of the value uplift.
For students and early-career planners moving into the private sector, this means that your planning skills have a direct commercial value. A planner who can prepare, submit, and manage the approval of a 100-hectare layout plan is a commercially valuable asset to any development firm. Explore how MassodihPlans supports both planning education and professional development through the MassodihPlans Services section.
Mixed-Use Integration and Development Viability
Mixed-use development, the deliberate co-location of residential, commercial, and light institutional uses within the same precinct or even the same building is not just an urbanistic preference. It is a financial strategy. Ground-floor commercial income from a mixed-use residential building reduces the effective cost of housing for upper-floor residents. Commercial activity on collector road frontages generates rental income that cross-subsidises the delivery of community facilities within the same development.
The MegaRegion FlowPlan designates mixed-use corridors along all primary collector roads, permitting ground-floor commercial uses and upper-floor residential uses by right within the C1 commercial zone. This provision is not merely a planning standard, it is an instruction to developers about how to maximise the financial return from their investment in collector road frontage land.
Real Urban Challenges the MegaRegion FlowPlan Addresses Directly
Planning tutorials that ignore the real challenges of implementing plans in developing-country contexts are doing their readers a disservice. Here are the challenges that every master planner working in Africa, South Asia, or comparable environments must be prepared to navigate.
Flooding and inadequate drainage remain the most visible infrastructure failure in developing-country cities. The MegaRegion FlowPlan addresses this through GIS-based catchment delineation, two-tier drainage system design, flood exclusion zones, and drainage maintenance planning, all covered in Step Five above.
Informal settlement encroachment on planned reserves is universal. Road reserves, drainage channels, institutional plots, and open spaces are all at risk of encroachment as soon as the formal planning presence withdraws. Physical marking of reserves, community engagement, and design-embedded controls (described in Step Six) slow but do not eliminate this risk.
Approval bottlenecks are a chronic feature of planning administration across most developing-country jurisdictions. Pre-application engagement, technically complete submissions, and proactive agency consultation management are the most effective mitigation strategies available to the submitting planner.
Power infrastructure failure requires planners to design for energy resilience from the outset, as described in Step Seven. A development that relies entirely on grid power in Lagos, Nairobi, or Accra is a development that will disappoint its residents from the day of occupation.
Land speculation following master plan announcement inflates land acquisition costs for subsequent phases and distorts the planned land use pattern as speculators lobby for upzoning. Phased plan disclosure and land value capture mechanisms can partially address this, but it remains a persistent governance challenge.
Conclusion: Your Path from Student to Practising Planner
The gap between planning education and planning practice is real, but it is not unbridgeable. The MegaRegion FlowPlan gives you a structured, step-by-step pathway through the actual process of preparing a master plan — from site analysis and land use calculation, through zoning design and circulation planning, to drainage strategy, infrastructure coordination, environmental management, and professional plan presentation.
What I want you to take away from this guide is not a set of rules to memorise. It is a way of thinking about planning problems, starting with analysis, moving through calculation, grounding every spatial decision in evidence, and designing for the real conditions of developing-country urban environments rather than the idealised conditions of planning textbooks.
Start with your GIS base map. Calculate your land use programme. Apply your analysis findings to your spatial decisions. Design your road network after your constraints, not before. Plan your drainage system before you finalise your road alignments. Write a planning report that justifies every decision you have made.
Do these things consistently and you will produce plans that work on the ground, survive the approval process, attract investment, and serve the communities they are designed for.
Continue building your planning knowledge through the MassodihPlans Plan School, where you will find structured tutorials on GIS for planners, layout plan preparation, zoning schedule writing, planning report structures, and professional presentation techniques. Browse real master plan examples, layout plans, and planning documentation in the Plans Library. And when your project requires professional consultancy support whether for a student dissertation, a development company commission, or a government planning assignment the MassodihPlans team is available through the Services section.
Better planning practice begins with better planning education. This is yours.
Frequently Asked Questions
What is the MegaRegion FlowPlan?
The MegaRegion FlowPlan is a structured master planning and physical development framework designed for students, planners, consultants, and developers working in rapidly growing cities. It functions as both a planning methodology and a studio tutorial guide, covering the complete process of master plan preparation from site analysis through to professional plan submission.
How do I start drawing a master plan as a student?
Begin with your site analysis in GIS topography, drainage, existing land use, and constraints. Then calculate your land use programme from your population projection and planning standards. Allocate conservation zones and flood exclusion areas first, establish your road hierarchy second, locate major institutional uses third, then fill in residential and commercial zones. Never start with the road network before mapping your constraints.
What GIS software should a planning student learn first?
Start with QGIS. It is free, open source, and capable of handling every GIS task required in master plan preparation, from base mapping and site analysis to land use mapping and drainage catchment delineation. AutoCAD proficiency is also important for layout plan drafting in most African planning jurisdictions.
What colour is used for residential zones in a master plan?
Residential activities are shown in Yellow on standard land use plans. Commercial uses are Red, industrial uses are Purple, institutional uses are Blue, transportation and circulation are Gray, mass assembly spaces are Dark Slate Gray, recreational uses are Light Green, and conservation areas are Forest Green.
How do you calculate residential land requirements in a master plan?
Divide your projected planning horizon population by your target residential density in persons per hectare to get your net residential land area. Add 20 percent for roads, drainage, and services within the residential zone to obtain the gross residential land requirement. Always base your density target on local planning standards and comparable development contexts, not generic national averages.
What is the standard road reserve width for a local access road?
A local access road in a residential layout typically has a reserve width of 10 to 15 metres. Within that reserve, a standard arrangement accommodates a 7-metre carriageway, two 2-metre footpaths, and two 2-metre open drainage channel reserves. Reducing the reserve below 12 metres usually means omitting the drainage channels, which causes flooding in the first wet season.
What should a planning report include?
A complete planning report includes an executive summary, introduction and planning context, legislative framework, site analysis findings, population projections and land use calculations, proposed land use justification, circulation and infrastructure strategies, environmental management strategy, development control provisions, implementation phasing, and appendices for data, GIS methodology, and consultation records.
How do planners deal with informal settlements in a master plan?
The first step is a systematic survey to categorise existing informal settlements as suitable for in-situ upgrading, suitable for phased voluntary relocation, or unsuitable for retention due to physical hazards. In-situ upgrading is the preferred approach wherever physically feasible, as it retains social networks, reduces relocation costs and resistance, and is typically more cost-effective than constructing replacement housing elsewhere.
Take the Next Step in Your Planning Career
Whether you are a student preparing your first studio project, an intern working on your first professional commission, or a consultant preparing a master plan for government approval the MassodihPlans platform provides the education, worked examples, and professional support you need.
Start Learning in Plan School Structured tutorials on GIS, layout planning, zoning, and master plan preparation.
Browse the Plans Library Real master plans, layout plans, and planning documentation for reference and study.
Request Professional Consultancy Expert planning support for your development project, dissertation, or government assignment.
Related post
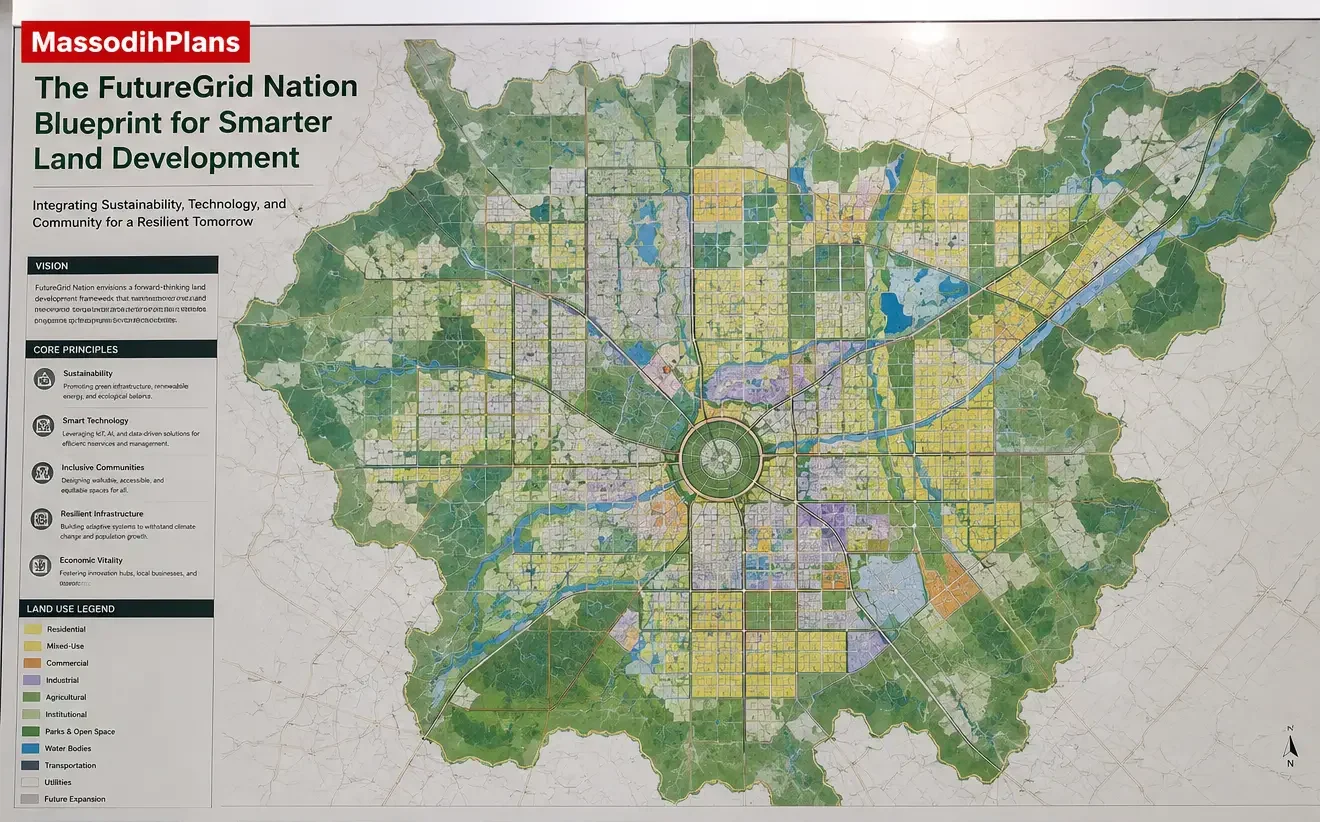
- The Proposed FutureGrid Nation Blueprint for Smarter Land Development
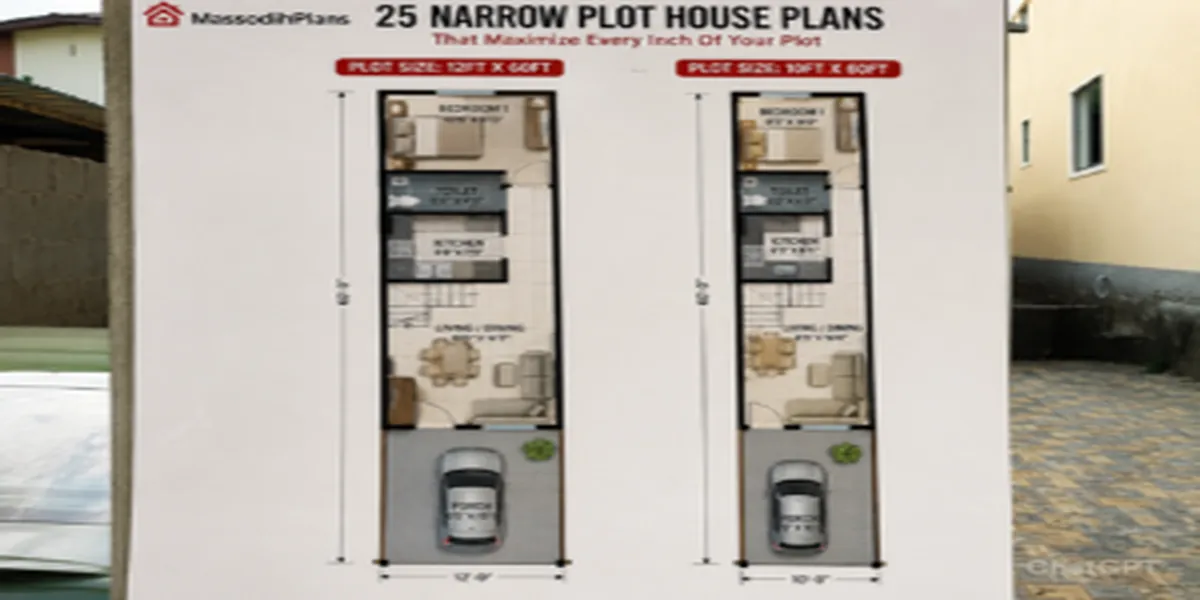
- Industrial Estate Layout Design in Nigeria: Smart Master Plan for Small Industrial Plots
- Small Residential Estate Layout Design in Nigeria: Smart Master Plan Ideas for Limited Land
About Author
Massodih Okon is a built environment professional with a background in architecture and urban planning. He specializes in practical Nigerian house design guidance through MassodihPlans.com.. He has a Master’s degree in Urban and Regional Planning, a first degree in Geography and Environmental Management, and professional certificates in Architectural Design, Landscape Design, and GIS. With over 15 years of hands‑on experience in architecture, town planning, GIS, and building economics across Nigerian residential and institutional projects, he understands the real challenges Nigerians face when planning and building homes.
At MassodihPlans, Massodih shares practical Nigerian building guides, modern bungalow and duplex house plans, and built environment resources created specifically for Nigerian homeowners, developers, and property investors. His work is based on real‑life conditions in Nigeria, climate‑responsive design, and cost‑effective planning, aimed at helping everyday Nigerians make smarter, more confident building decisions.